https://mallize.com/blogs/news.atomMallize - News2023-06-30T21:13:51-04:00Mallizehttps://mallize.com/blogs/news/4-bomb-grill-recipes-from-bay-area-chefs2023-06-30T21:13:51-04:002023-06-30T21:13:51-04:004 Bomb Grill Recipes from Bay Area Chefsadmin
Fourth of July tradition calls for lighting up the grill. But there's no rule that says you have to stick to hot dogs and hamburgers.
In a bid to up our game before hosting the annual backyard barbecue, we asked some of the Bay Area's best open flame experts to share their favorite recipes for grilling.
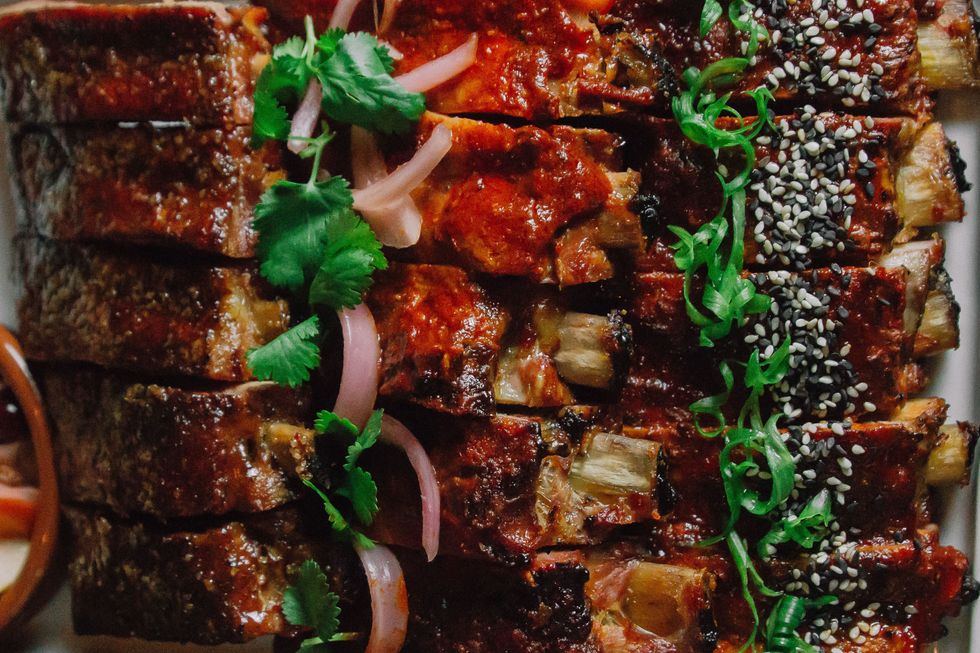
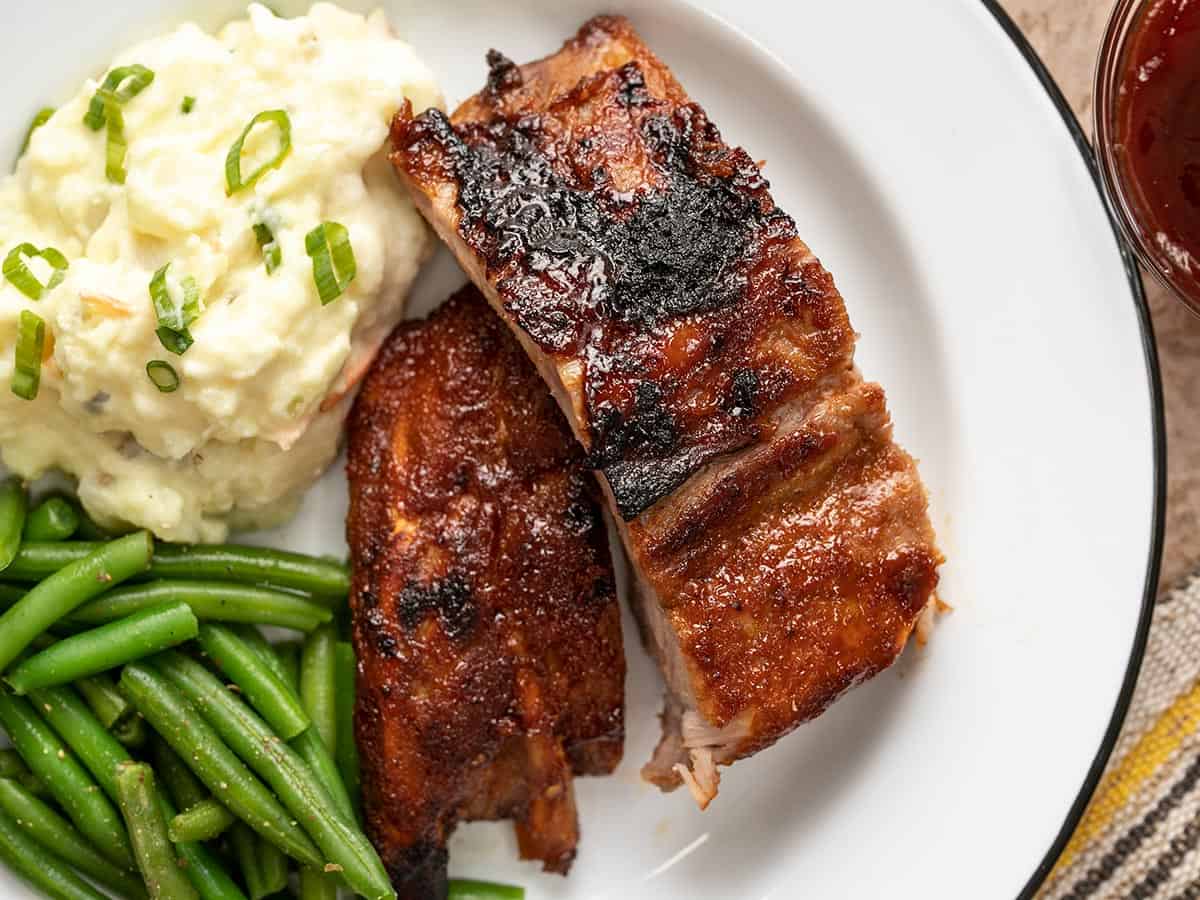
International Smoke's Korean-Style Barbecue Ribs
Love Korean-style barbecue and Ayesha Curry? These ribs are gonna be your jam.
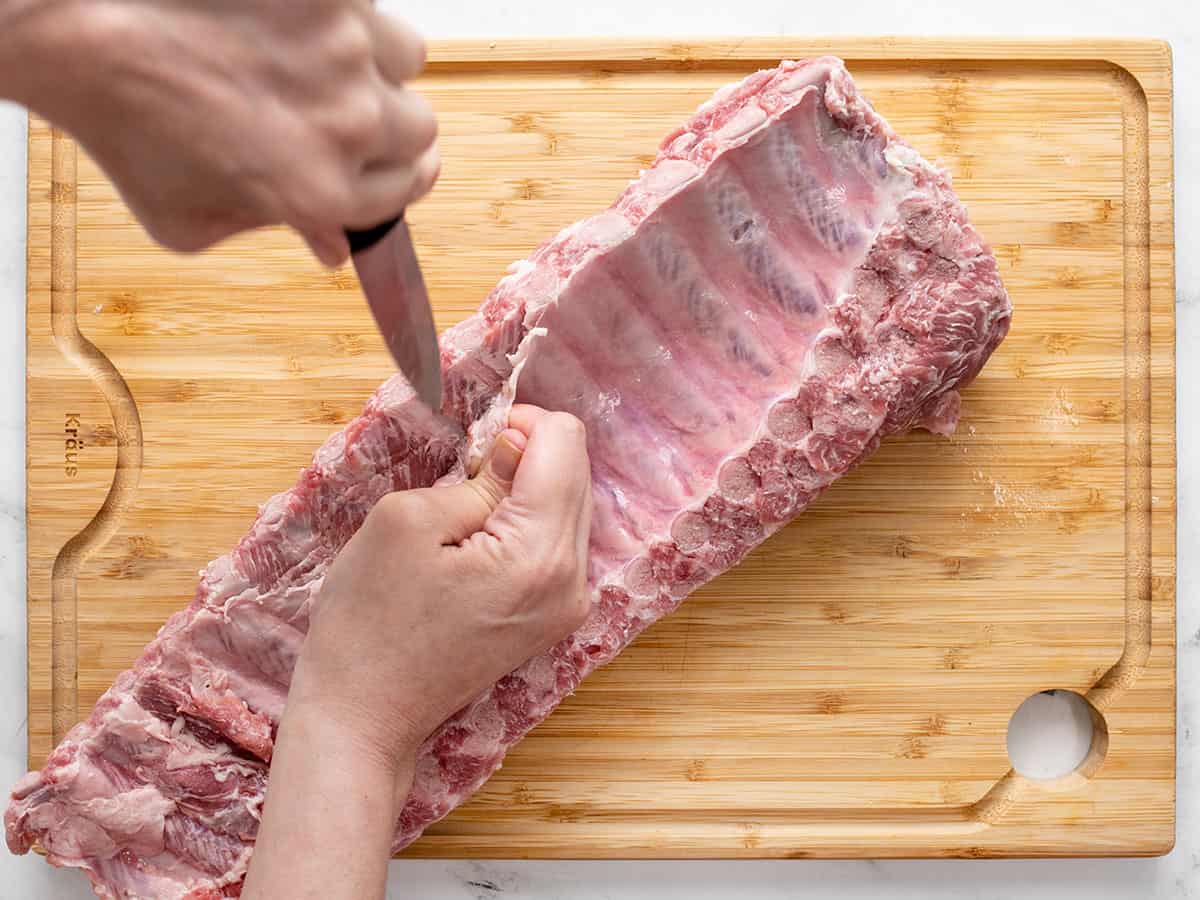
"We dry-marinate the ribs for 12 hours, and this marinade produces a great sticky bark when the ribs are cooked," Curry says. To prepare this recipe successfully, she reminds readers to "...budget time to cook on two separate days in order to maximize flavor with the overnight marinating process."
½ tbsp toasted sesame seed, white, ground in blender
½ cup dark brown sugar
4 tbsp kosher salt
1 ½ tbsp garlic powder
1 ½ tbsp onion powder
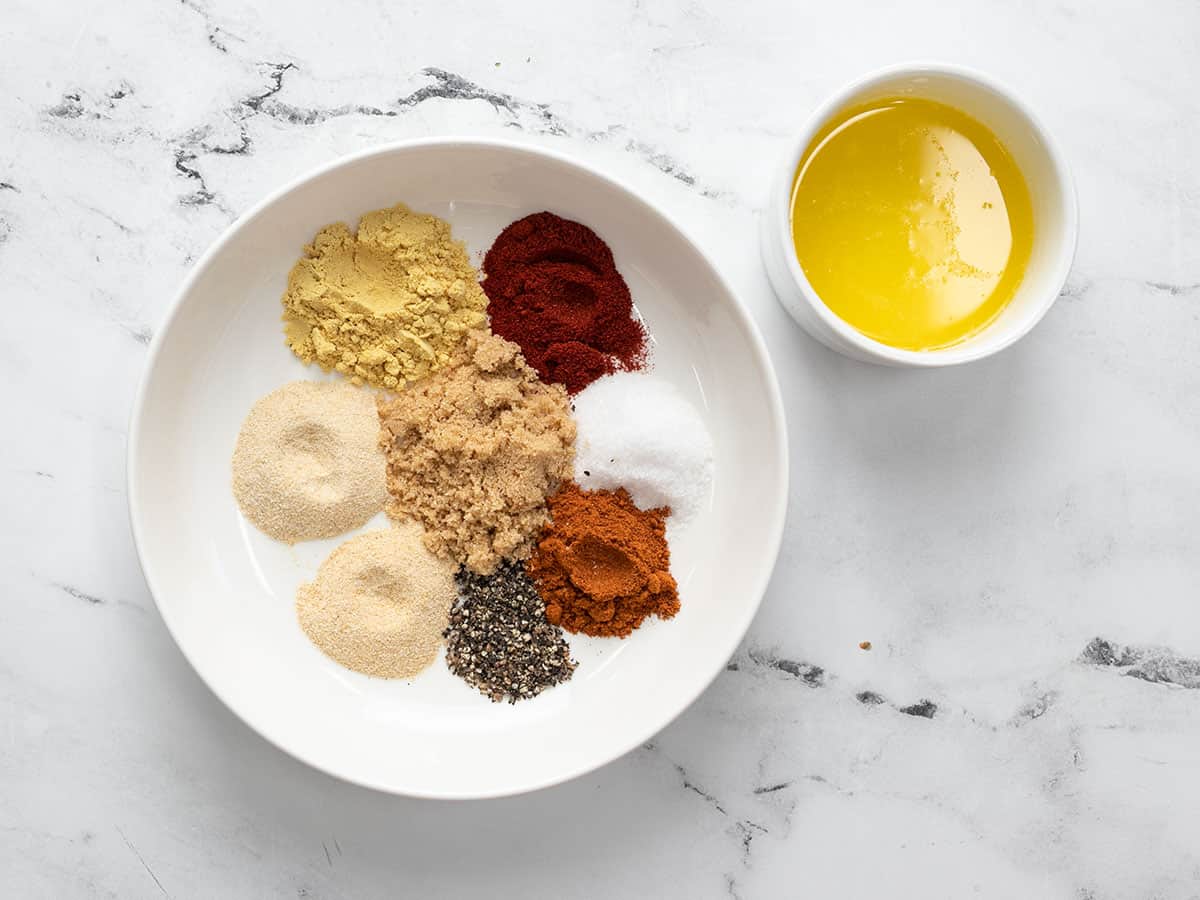
Combine all ingredients in a mixing bowl and whisk to completely combine. Set aside.
Korean-style wet rib glaze:
3 tbsp garlic cloves, peeled and coarsely chopped
1 cup fresh scallions, peeled, coarsely chopped
1 1/16 cups ginger, peeled, coarsely chopped
½ cup gochujang chili paste
2 tbsp soy sauce
2 tbsp (packed) brown sugar
2 tbsp sugar, granulated white
3 tbsp apple cider vinegar
¼ cup toasted sesame seeds
2 tbsp peanut or grapeseed oil
Pulse scallions, garlic, and ginger in a food processor until finely chopped. Heat 2 tbsp oil in a medium saucepan over medium heat. Add scallions, garlic, and ginger and cook, stirring often, until softened, and starting to stick to bottom of pan, about 4 minutes. Add gochujang, white sugar, brown sugar, soy sauce, and sesame seeds and stir until smooth. Bring to a simmer and cook, stirring often to prevent scorching, until thick, 5 - 10 minutes. Remove sauce from heat; season with salt. Transfer mixture to a food processor (preferably a Vitamix blender) and blend until fully incorporated and smooth. Transfer to heat-safe storage container. Set aside.
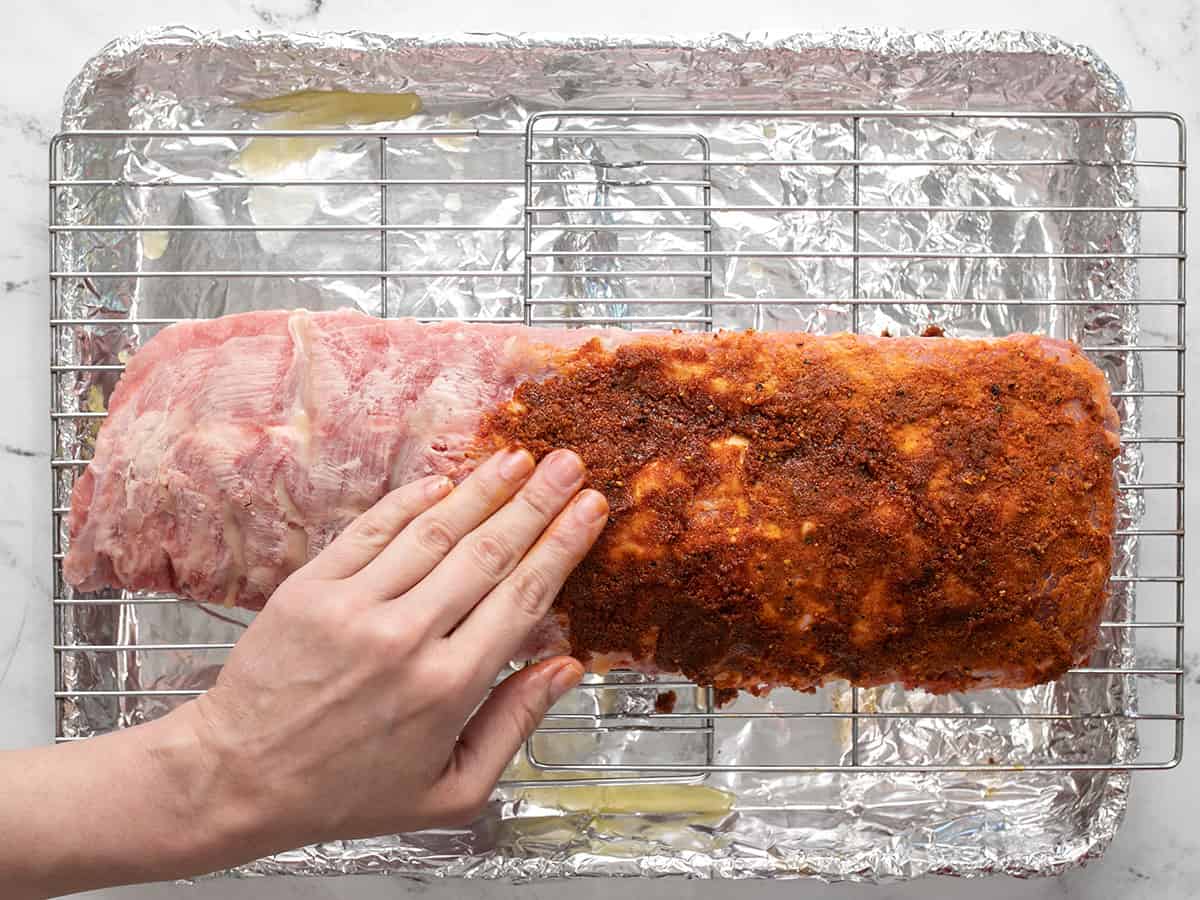
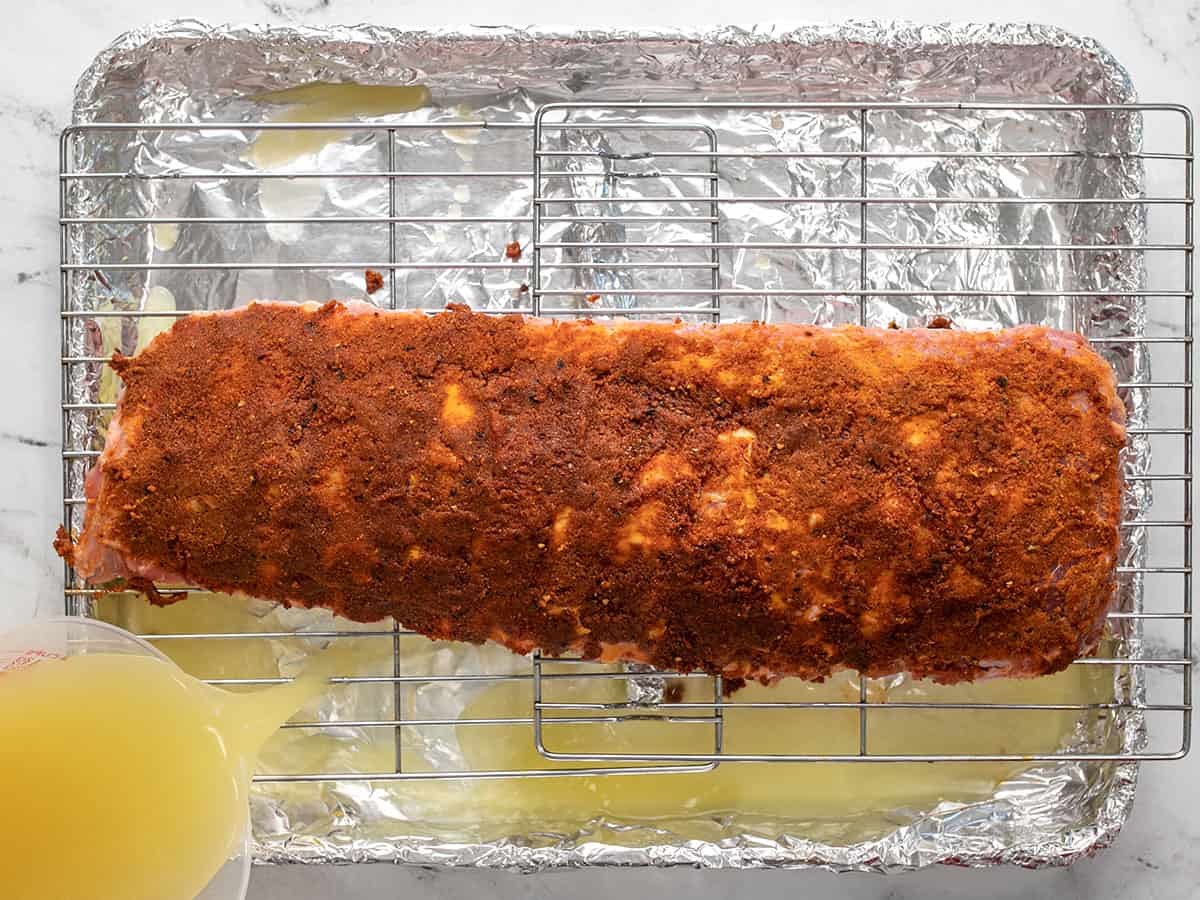
Rub ribs with the wet glaze and dust with Korean dry rib rub spice mix.
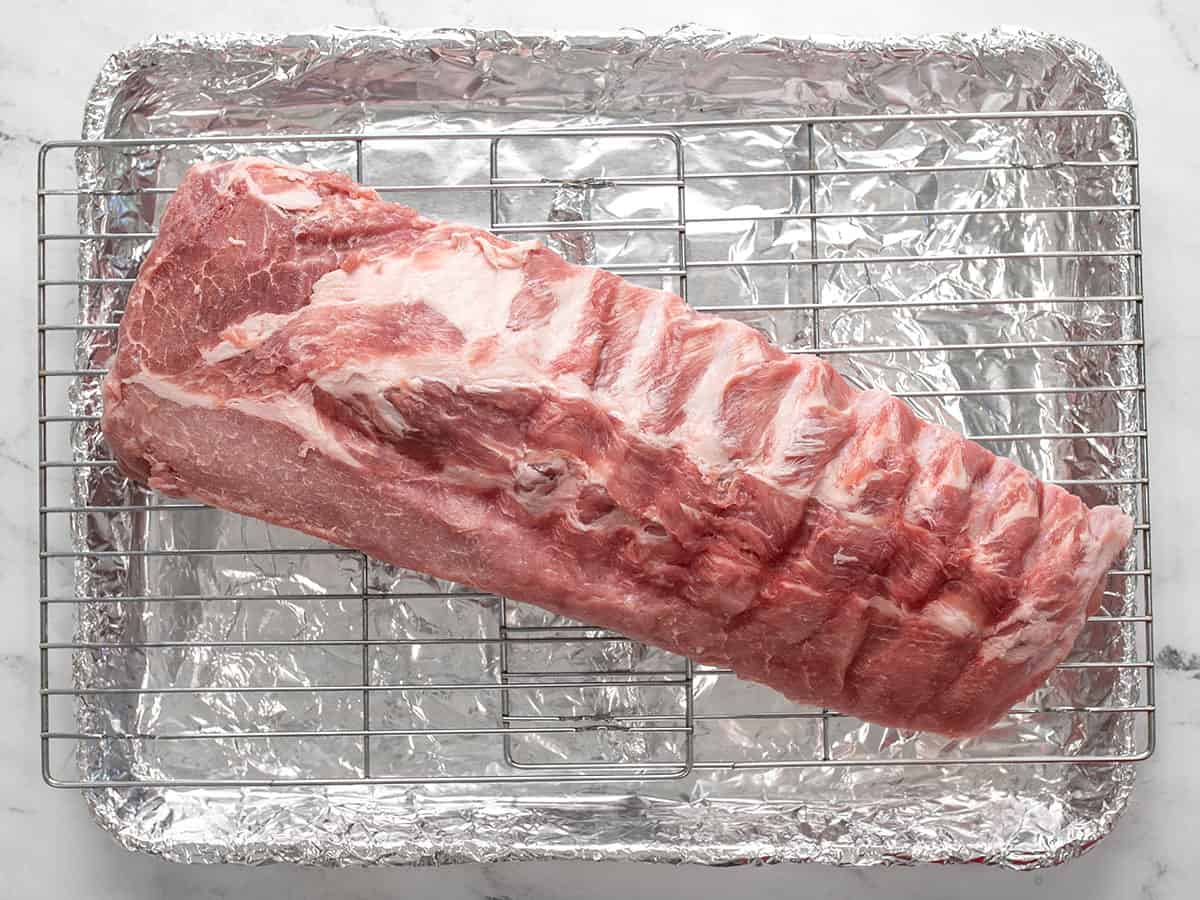
Let stand on a cooling rack on sheet pans, uncovered, on the top shelf of the refrigerator until the next day.
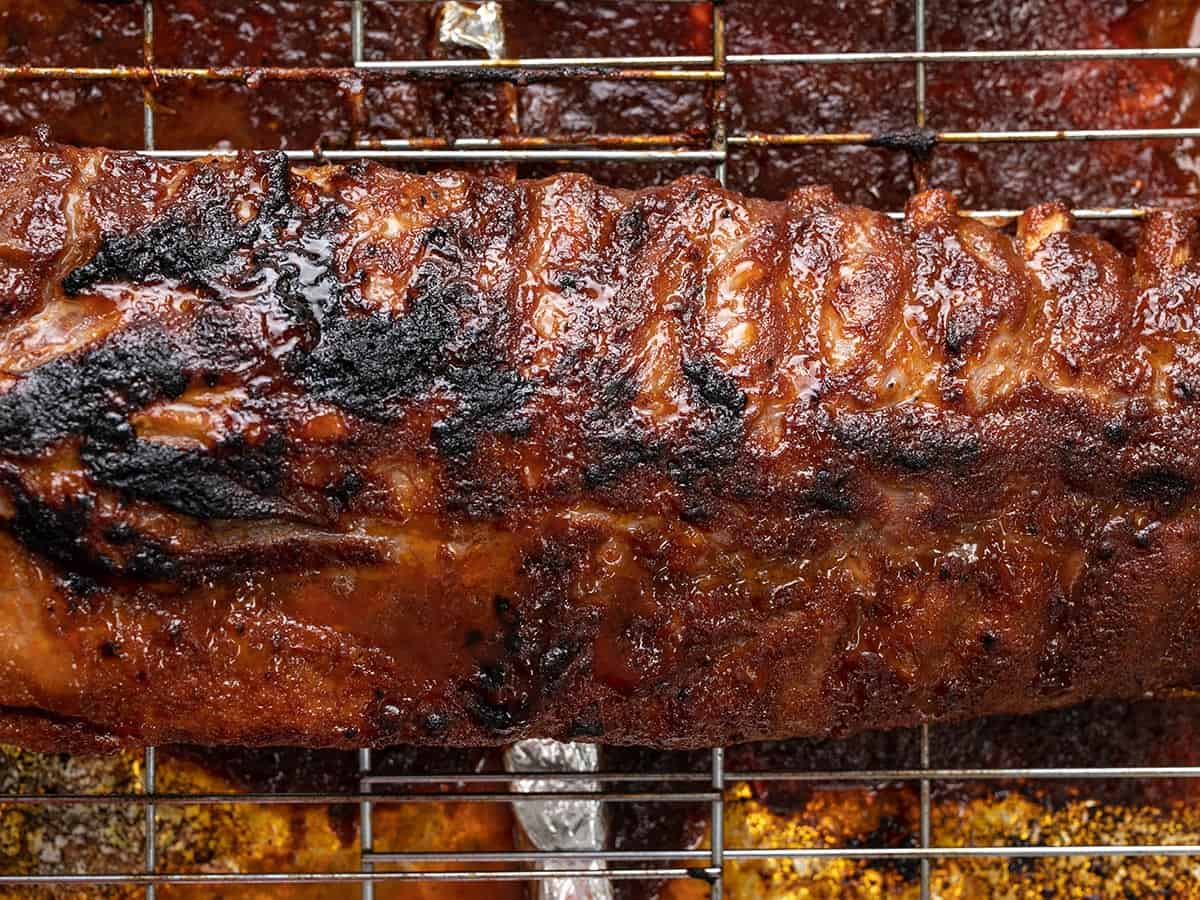
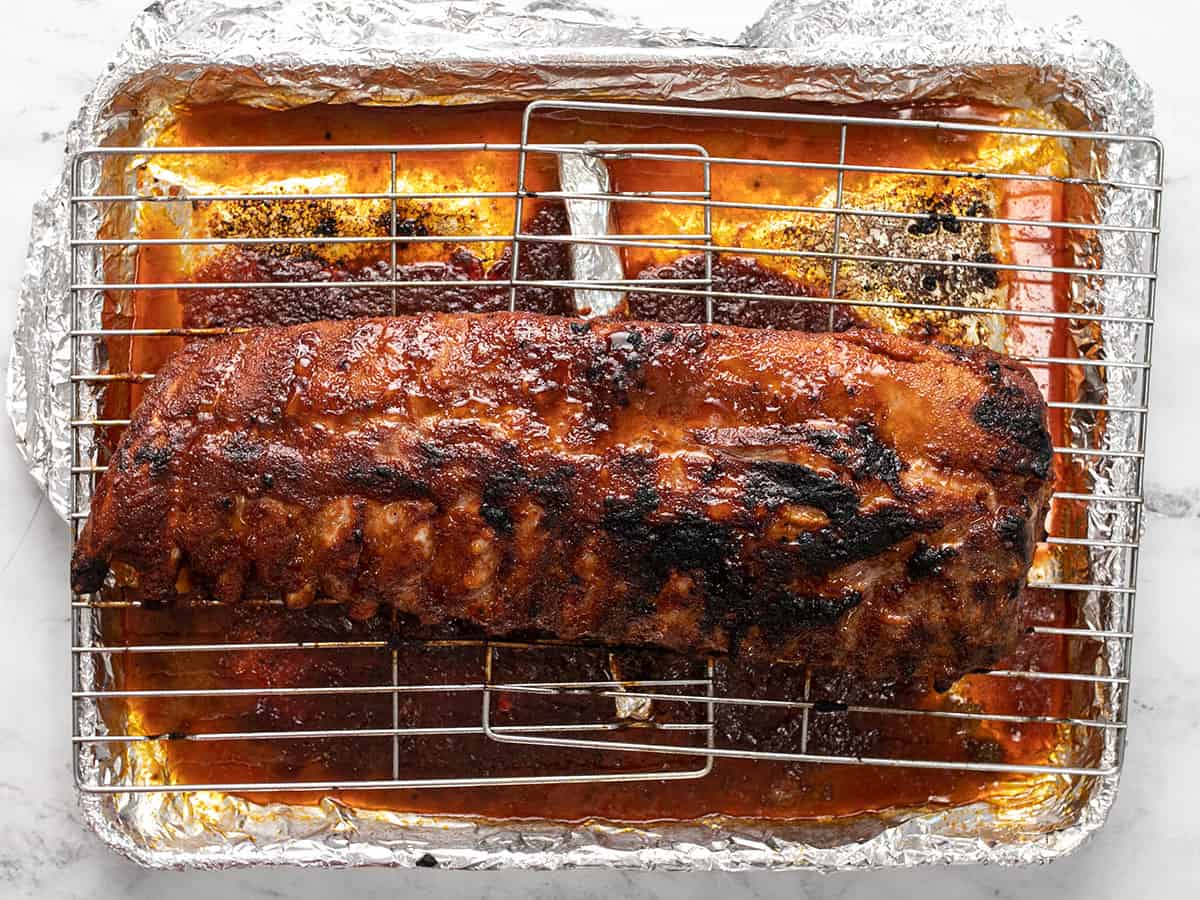
The following day, to cook your ribs to tenderness, you'll need to use indirect heat on your grill. If you're using a charcoal grill, heat your chimney of coals and then empty them all onto one side; if you're using a gas grill, turn up the burner on only one side. Place the ribs on the opposite side, over indirect heat, so they can cook low and slow. The goal is for the closed grill to maintain a temperature of 250 degrees. Forget about them for 3 to 4 hours.
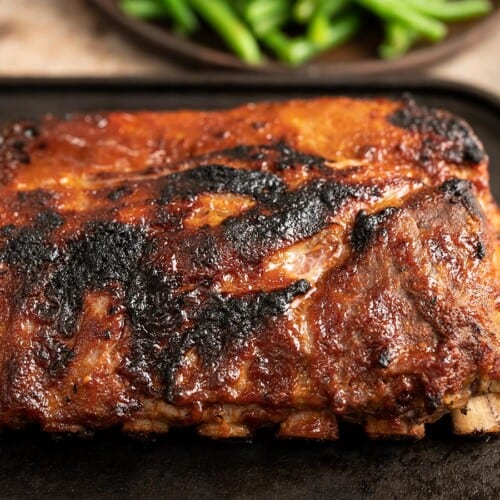
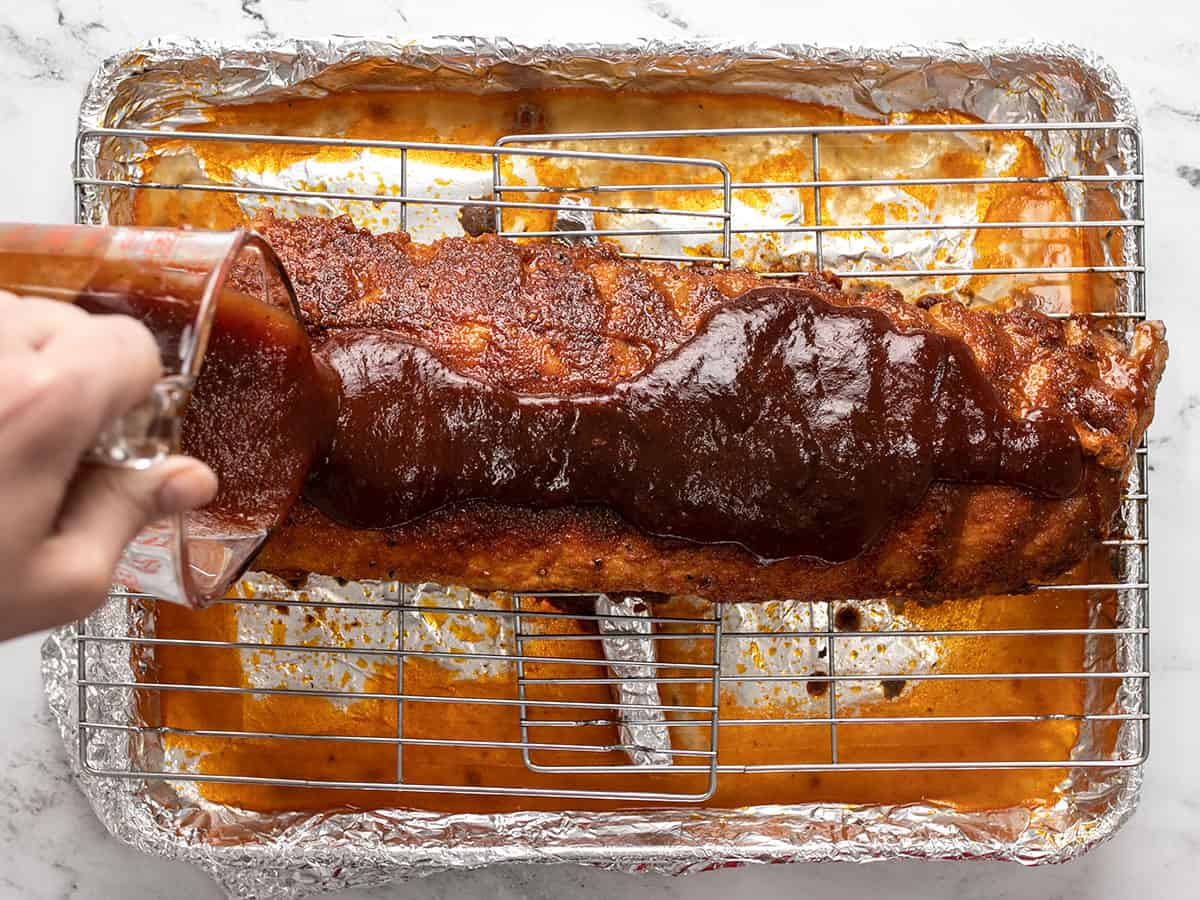
Remove from the smoker and baste with part of the Korean-style wet rib glaze. Rest for 10 to 12 minutes.
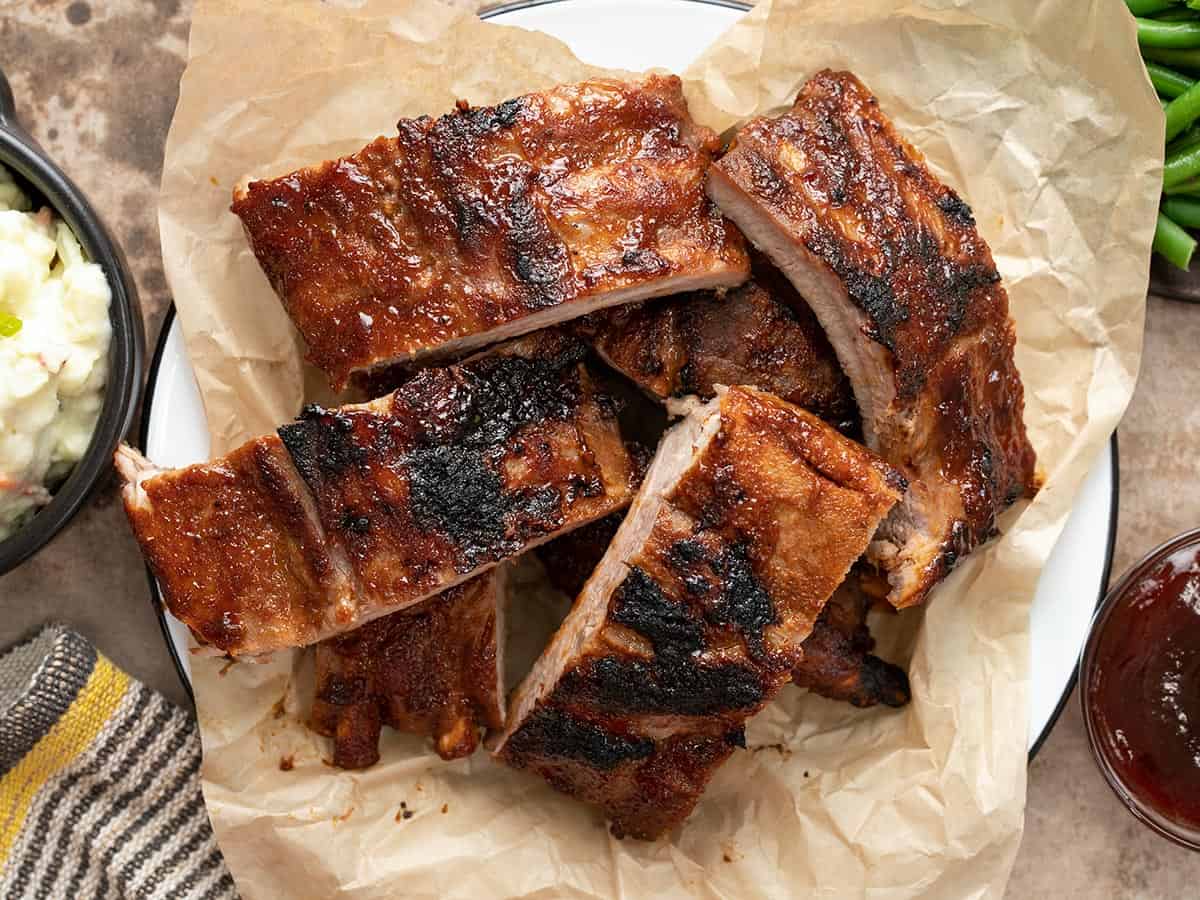
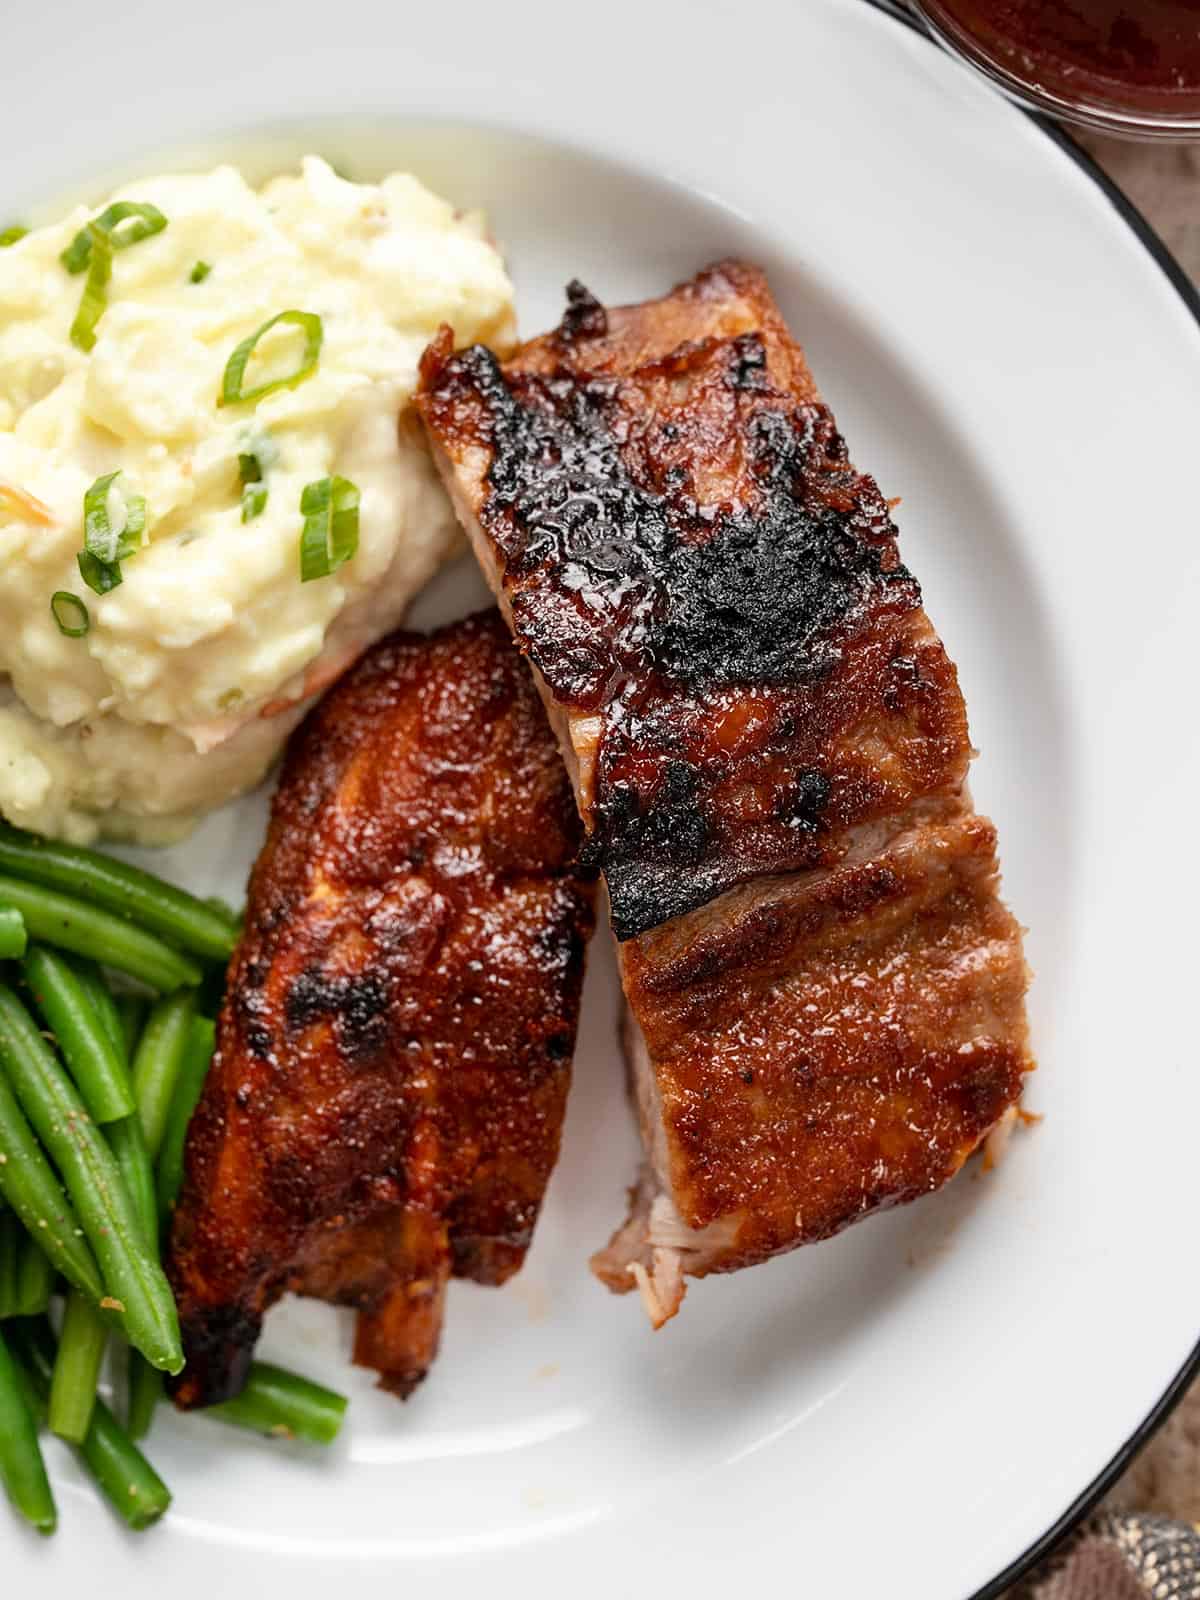
To serve, cut into portions and re-brush with more wet glaze.
To garnish, sprinkle red salt, sesame seeds, and scallions on the ribs prior to plating.
4505 Burgers and BBQ's Harissa Chicken Wings
You may have tasted these already—the harissa chicken wings make occasional appearances on the menu at 4505 Burgers and BBQ. And according to chef Ryan Farr, "These wings are perfect for a backyard barbecue!"
"The harissa dry rub adds a new dimension to the typical chicken wing," adds Farr, who serves them with a mayonnaise-based white barbecue sauce, also known as Alabama white sauce, which is popular throughout the Southeast. "While it's great on all kinds of BBQ, it especially shines with smoked chicken, and it's stellar on chicken wings," Farr says.
chicken wings, flats and drums divided, tips reserved for stock
lemons cut into wedges
½ bunch picked cilantro
2 cups house white BBQ (recipe below)
*Harissa is a North African spice that people often associate with a paste, but this recipe will let you make a dry seasoning powder to toss on your wings before popping them on the grill.
Harissa dry rub:
½ cup sea salt
½ cup ancho powder
⅓ cup granulated garlic
⅓ cup paprika
⅓ cup cayenne
1 tbsp sugar
1 tbsp coriander
1 tbsp cumin
1 tbsp pepper
1 tbsp chipotle
1 tbsp caraway
1 tbsp red pepper
1.5 tsp fennel
1.5 tsp dry spearmint
Mix together all ingredients and set aside.
House white BBQ sauce:
2 cups mayonnaise, preferably Helman's or Best Foods
2 tbsp pickled jalapeno liquid (from a jar or can)
½ tsp salt
½ tsp pepper
½ tsp ground coriander
Mix together all ingredients and set aside.
Method:
Preheat grill to medium heat.
Toss wings with extra virgin olive oil and Harissa spice in a large bowl, and place wings on the grill in a single layer.
Turn wings occasionally, and cook through until skin is crispy, 20 to 35 minutes.
Platter wings and top with cilantro.
Serve with lemon wedges and house white BBQ sauce on the side.
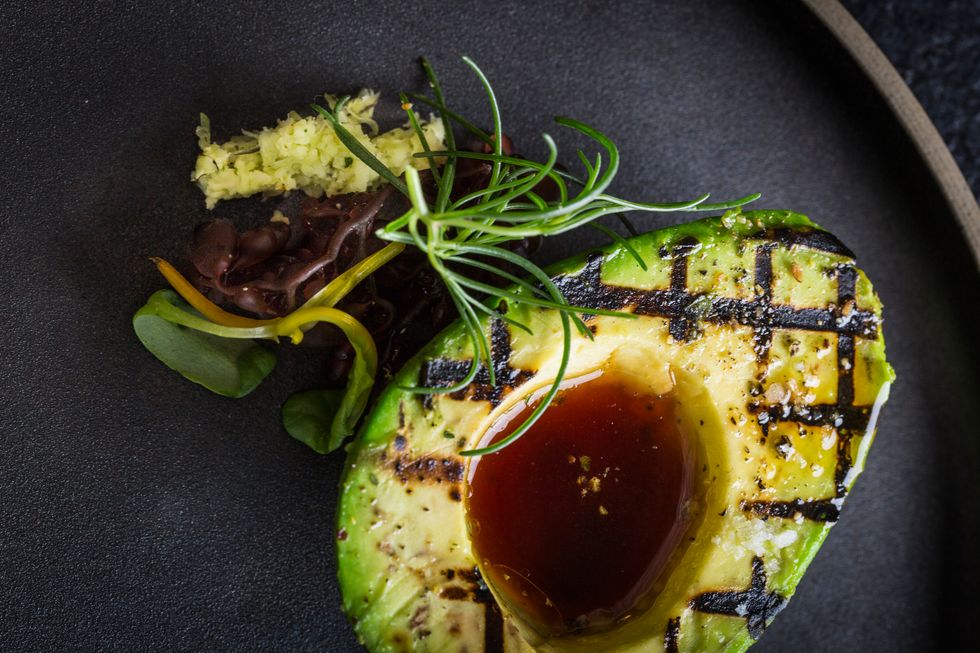
Bird Dog's Grilled Avocado with Ponzu
"This is the most California dish I've ever made in my life," admits chef Robbie Wilson of Bird Dog in Palo Alto. "We are so blessed with avocados in California, and we like to use them in unique ways while they are in season."
Putting them on the grill was only natural. "We light a fire every day at the restaurant because, let's face it, everything tastes better over wood. Why not avocados?"
When you cook an avocado, it becomes buttery—"like the most tender piece of meat you've ever had." Then, a half-salty, half-acidic Ponzu sauce provides the perfect balance.
A note about ripeness: When selecting avocados for the grill, Wilson suggests channeling Goldilocks. "Choose ones that are not too soft, and not too firm. The fruit should just give a little to the touch. If it feels soft like guacamole, run away. You are better off erring on the side of too firm than too soft."
// Bird Dog, 420 Ramona St. (Palo Alto), birddogpa.com
You will need:
4 Haas avocados
4 tbsp extra virgin olive oil
1 tbsp freshly grated wasabi or horseradish
1 batch ponzu sauce (recipe below) or good-quality store bought
salt and pepper to taste
Ponzu sauce:
1 piece kombu seaweed (3 x 2 inches)
1 to 1.5 cups bonito flakes (katsuobushi)
¾ cup plus 2 tbsp soy sauce
¾ cup lemon juice
⅓ cup plus 1 tbsp mirin
2 tsp sugar
2 tsp rice vinegar
Combine all ingredients in a bowl and refrigerate for one to two days to develop taste; strain well after one day. If you like more dashi flavor, keep it in refrigerator for two to three days and then strain. The ponzu sauce keeps in the refrigerator for six months. Mirin is often available in small bottles at Whole Foods and Safeway.
Method:
Preheat the grill as if you were cooking a steak.
Cut each avocado lengthwise in half and separate.
Carefully remove the pit.
With a large spoon, scoop the fruit out of its skin and brush each side with the olive oil.
Season with salt and pepper.
Place the avocado flat side down and grill to mark. (the idea is to mark each avocado, not actually cook)
Gently turn over and grill until barely warmed through.
Fill each cavity with the Ponzu sauce and serve with freshly grated wasabi.
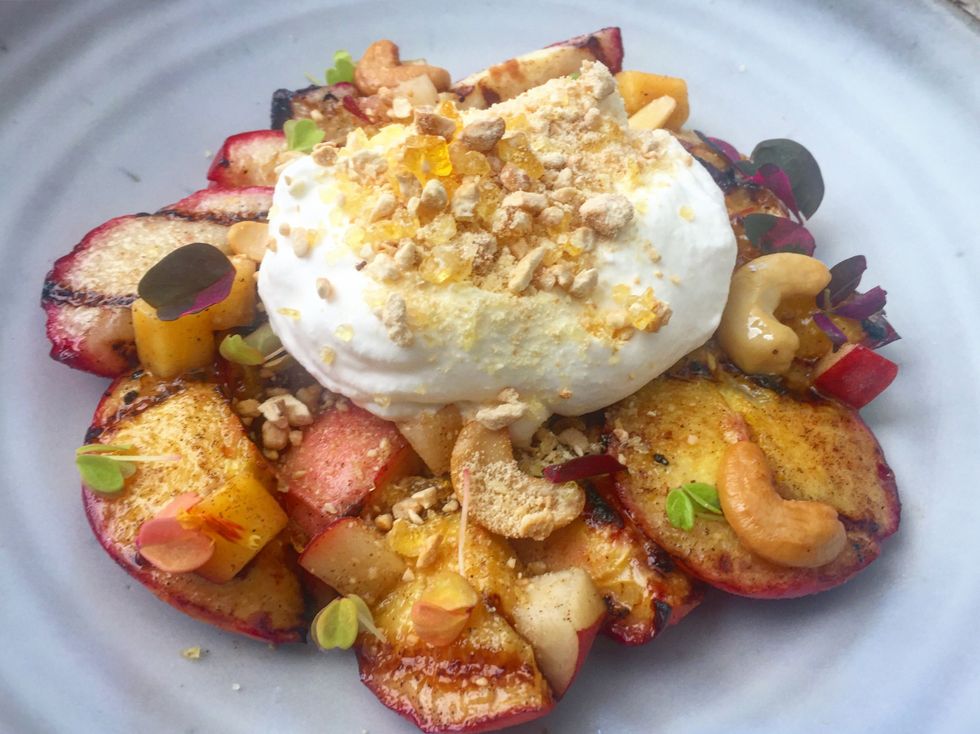
DOSA's Grilled Peaches and Cream
Grilling peaches intensifies the flavor of the fruit, which makes chef Arun Gupta's sweet-and-smoky dessert more than the sum of its parts.
"The heat from the fire concentrates the sugar, and the bitterness of the slightly burnt edges accentuates the natural sugars of the peach," he says.
The fresh peaches in this dessert add acid as well as texture, while the cardamom, yogurt cream, and cashew chikki impart nutty flavors, creaminess, and complexity. If you have never tried a grilled peach, you are in for a special treat.
Note: While you could use substitutions for jaggery (light brown sugar) and ghee (clarified butter), Gupta recommends paying a visit to your local Indian grocery store for the real thing. Rose water is typically available in Safeway and Whole Foods.
// Sadly, Dosa has closed it restaurant locations, but you can still make this tasty dessert at home.
You will need:
1.5 pounds fresh peaches
yogurt cream (recipe below)
cashew chikki (recipe below)
Yogurt cream:
2 cups cream
⅓ cup sugar
1½ cups yogurt
½ tsp rose water (half cap full)
1 tsp ground black cardamom
Beat cream, sugar, rosewater, and cardamom in mixer until very soft peaks form - just enough to barely hold shape. Fold in yogurt. Makes about 1.5 quarts.
Cashew chikki:
1 cup cashews
¾ cups jaggery
1 tbsp ghee
Preheat oven to 325 degrees. Spread cashews onto a baking tray and toast in an oven until golden brown (8 to 10 minutes) at 325F. Once cool, lightly pulse cashews in a food processor until crushed. (Make sure to not pulse them fully into a powder.) Next, heat ghee in a sauté pan and add jaggery, cooking 3 to 4 minutes on medium high heat until jaggery is fully dissolved and starts to thicken slightly. Add crushed cashews and continue to cook until jaggery mix evenly coats all the nuts. Pour out onto a greased baking surface and let cool. Pulse in food processor and use to garnish as desired. Keep sealed in an airtight container in the freezer for up to a month.
Grilled peaches:
1 pound peaches cut into quarters
½ pound peaches diced
1 tsp sugar
1 tsp olive oil
½ tsp cinnamon powder
¼ tsp powdered cloves
1 tsp cardamom powder
Method:
Preheat grill to medium high.
Toss peaches with sugar, olive oil, cinnamon and cardamom and place cut sides on grill over medium high flame.
Once cut side is sufficiently charred (it can be a little black) flip peach onto other cut side and repeat the process.
Carefully remove grilled peaches and toss with fresh diced peaches.
Divide into serving bowls and garnish with a tablespoon of yogurt and and a teaspoon of cashew chikki.
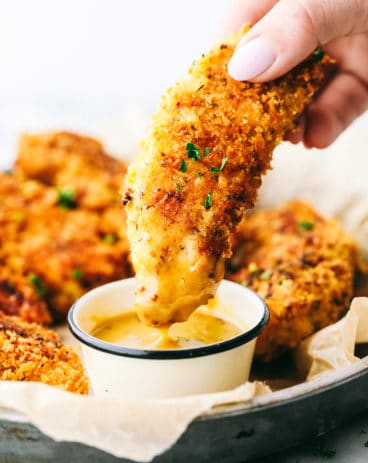
Tender and juicy, sweet and smoky, this Baked BBQ Chicken will shake up your weeknight dinner routine with big, bold flavor. You won’t believe it came from your oven!
Why You’ll Love This Baked BBQ Chicken Breast Recipe
Double the BBQ Flavor. This isn’t your ordinary barbecue chicken! By marinating the chicken in my BBQ Chicken Marinade and then slathering it in Homemade Barbecue Sauce you get maximum BBQ flavor. The sweet and tangy marinade infuses every bite, while barbecue sauce locks in the moisture and adds an extra layer of lick-your-fingers deliciousness.
Tastes Like Grilling. The smoky flavors in the marinade and sauce are the next best thing to Grilled Chicken!
Ideal for Busy Evenings. When it comes to weeknight dinners, this baked BBQ chicken breast recipe is a dream meal. You can prep it the night before and then have it cooked and ready to eat in under 30 minutes.
Healthier Than Your Favorite BBQ Restaurant. Like my BBQ Chicken Salad and Crockpot BBQ Chicken, this baked BBQ chicken is much lighter than the barbecue chicken you find on restaurant menus. Using homemade BBQ marinade and sauce means there’s no high-fructose corn syrup and you can control the amount of sodium in the recipe, but still get that classic BBQ flavor.
Everyone Will Love It. Kid-friendly! Adult-approved! No one can resist juicy oven baked BBQ chicken breasts. The technique in this BBQ chicken recipe is based on my wildly popular Baked Chicken Breasts, so it’s guaranteed to be a winner winner chicken dinner.
How to Make Oven-Baked BBQ Chicken
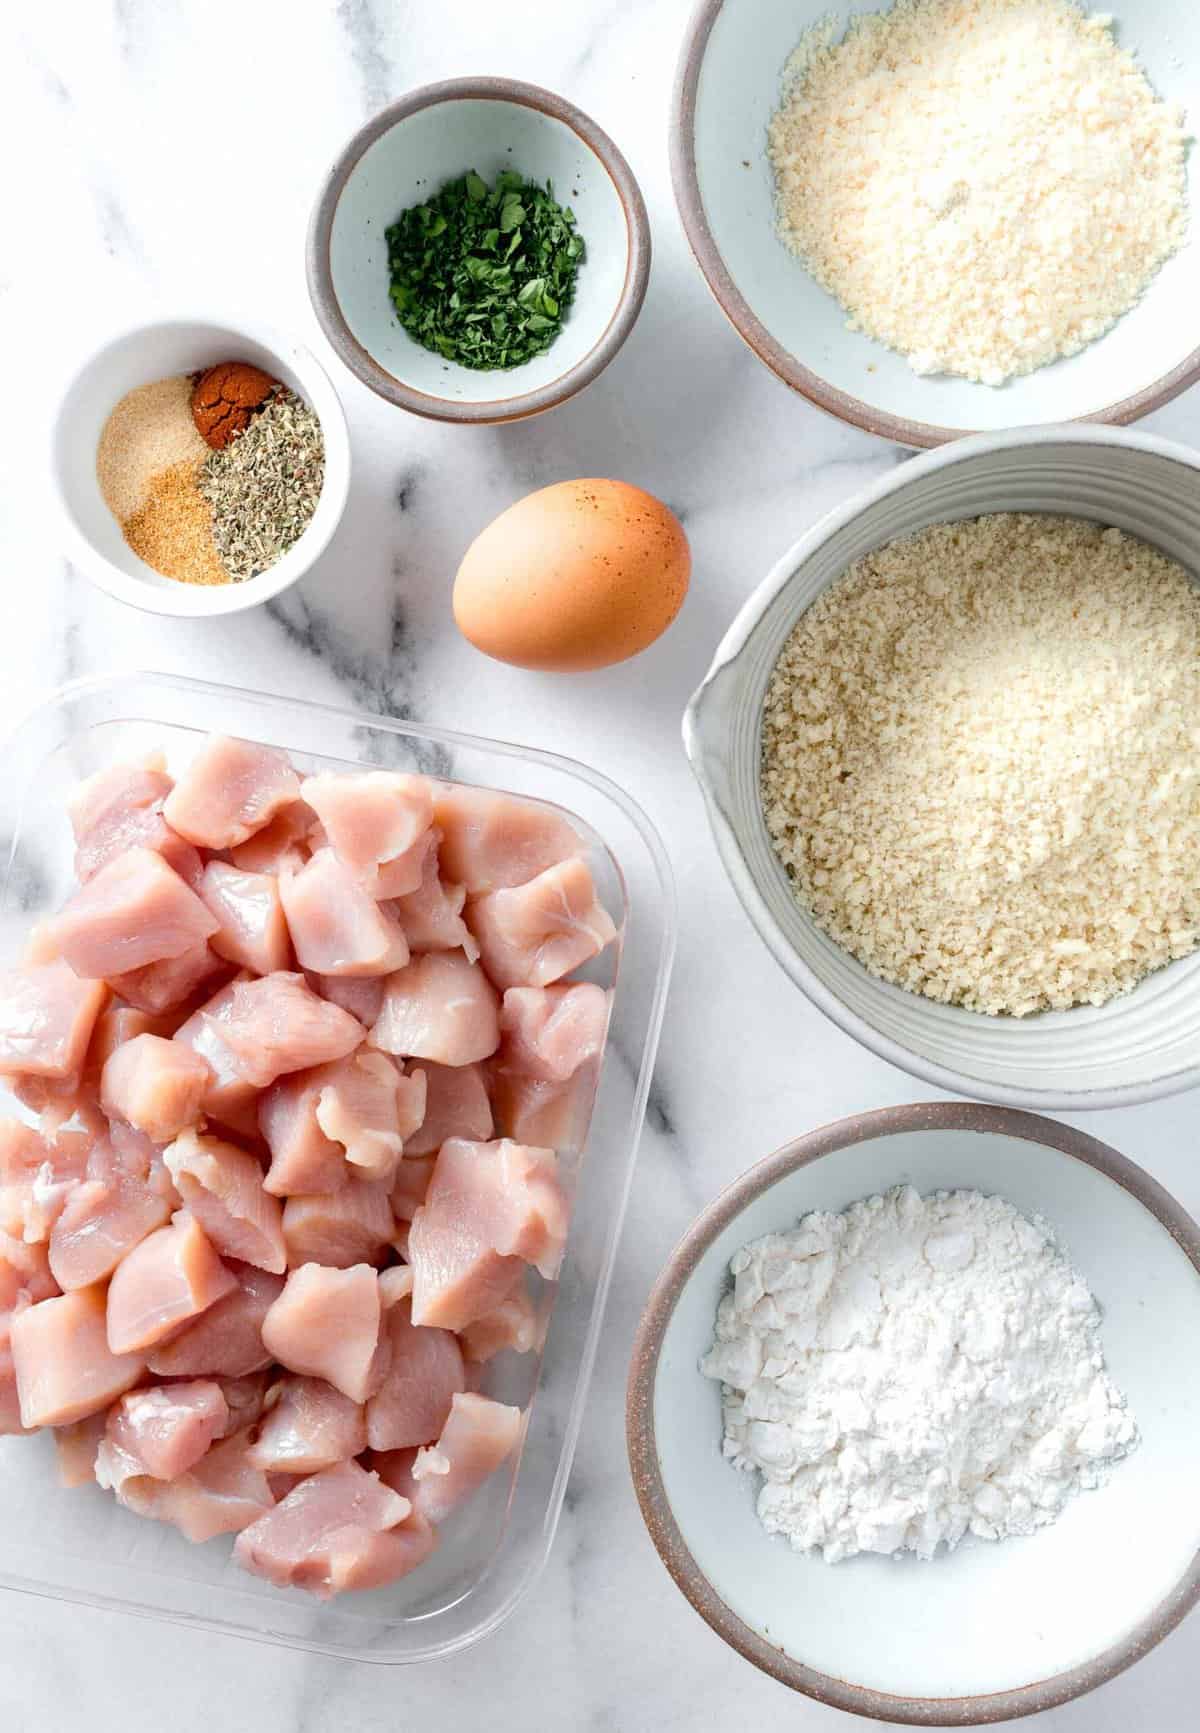
The Ingredients
Boneless Skinless Chicken Breasts. You can use boneless or bone-in.
BBQ Chicken Marinade. My recipe has all the flavors of a good barbecue sauce, but in marinade form!
Barbecue Sauce. Or use your favorite store-bought or homemade BBQ sauce.
Substitution Tip
This recipe works for a variety of cuts of chicken, both bone-in and boneless. You can make barbecue chicken wings, chicken drumsticks, skin-on chicken thighs, dark meat—whatever! Just note that the cooking times will vary.
The Directions
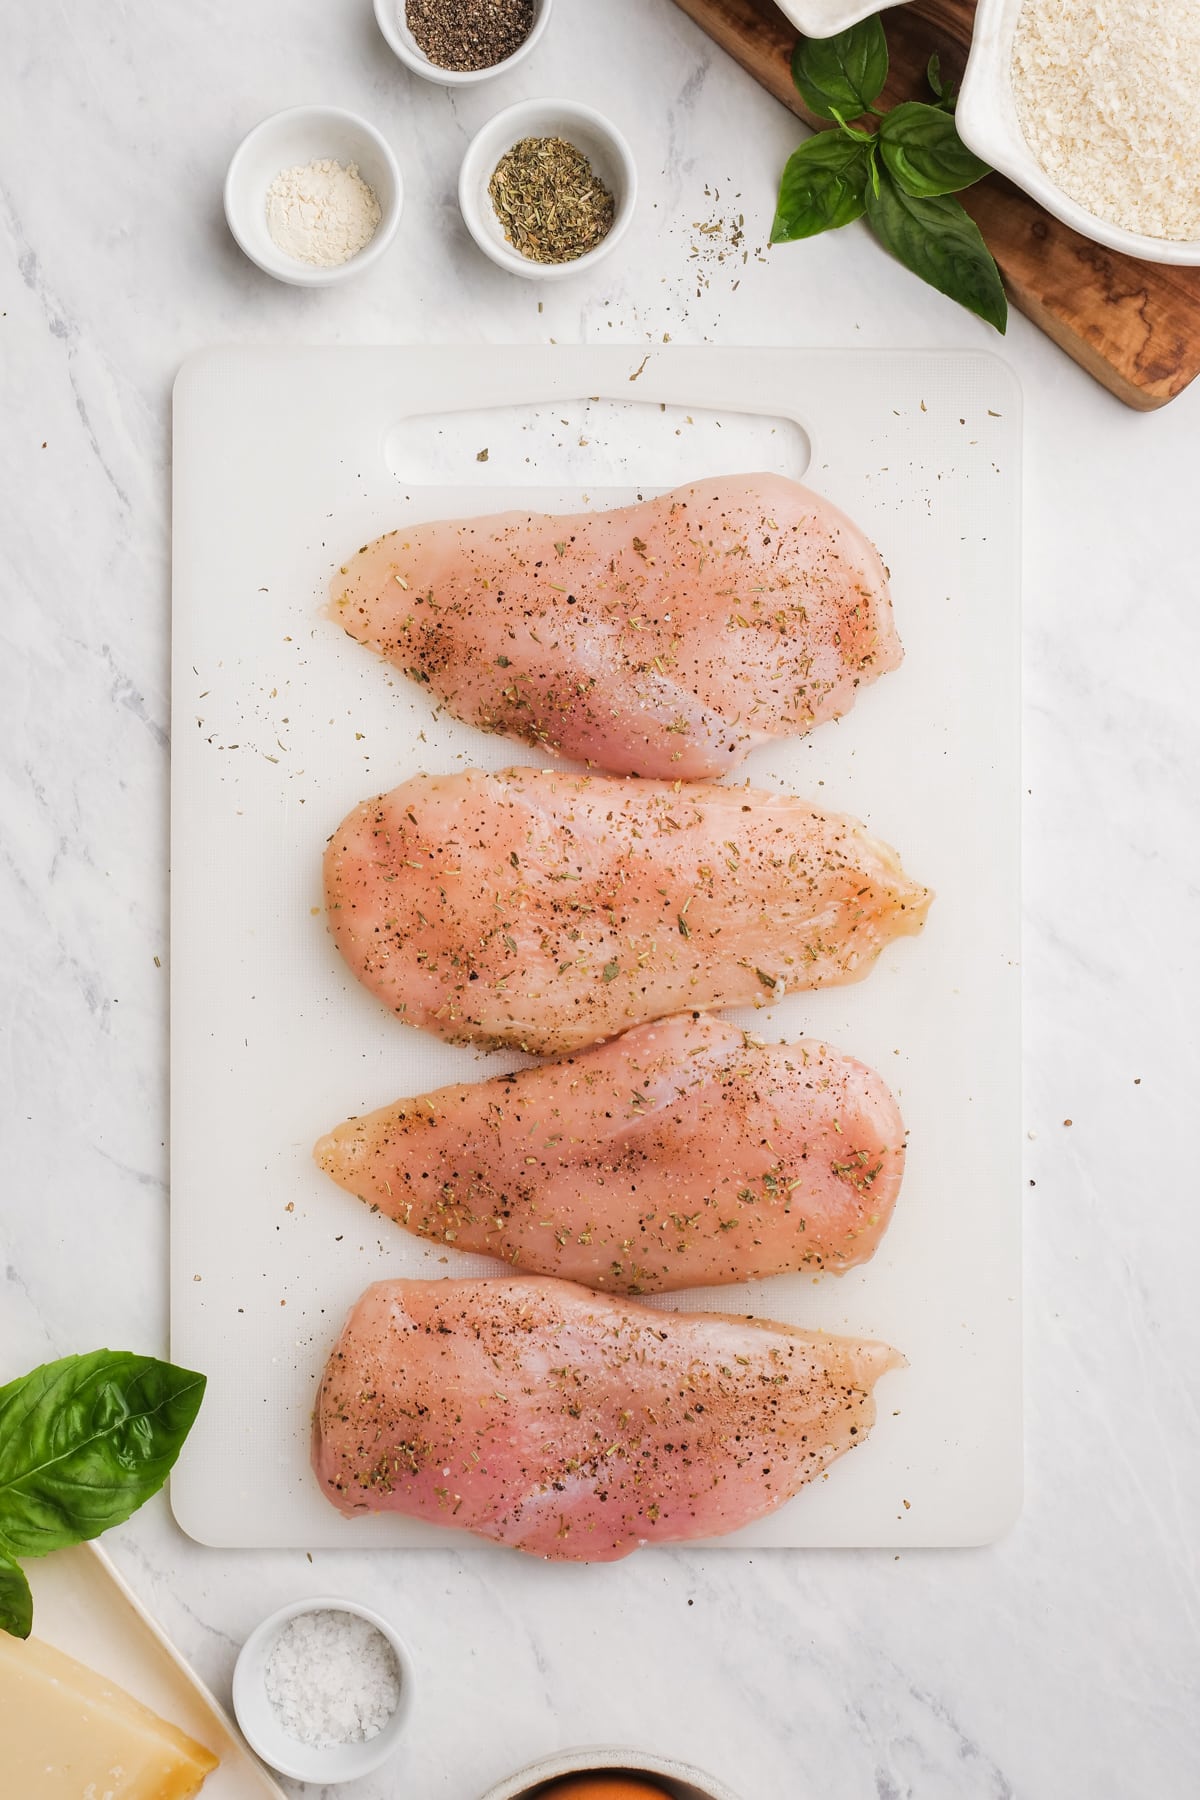
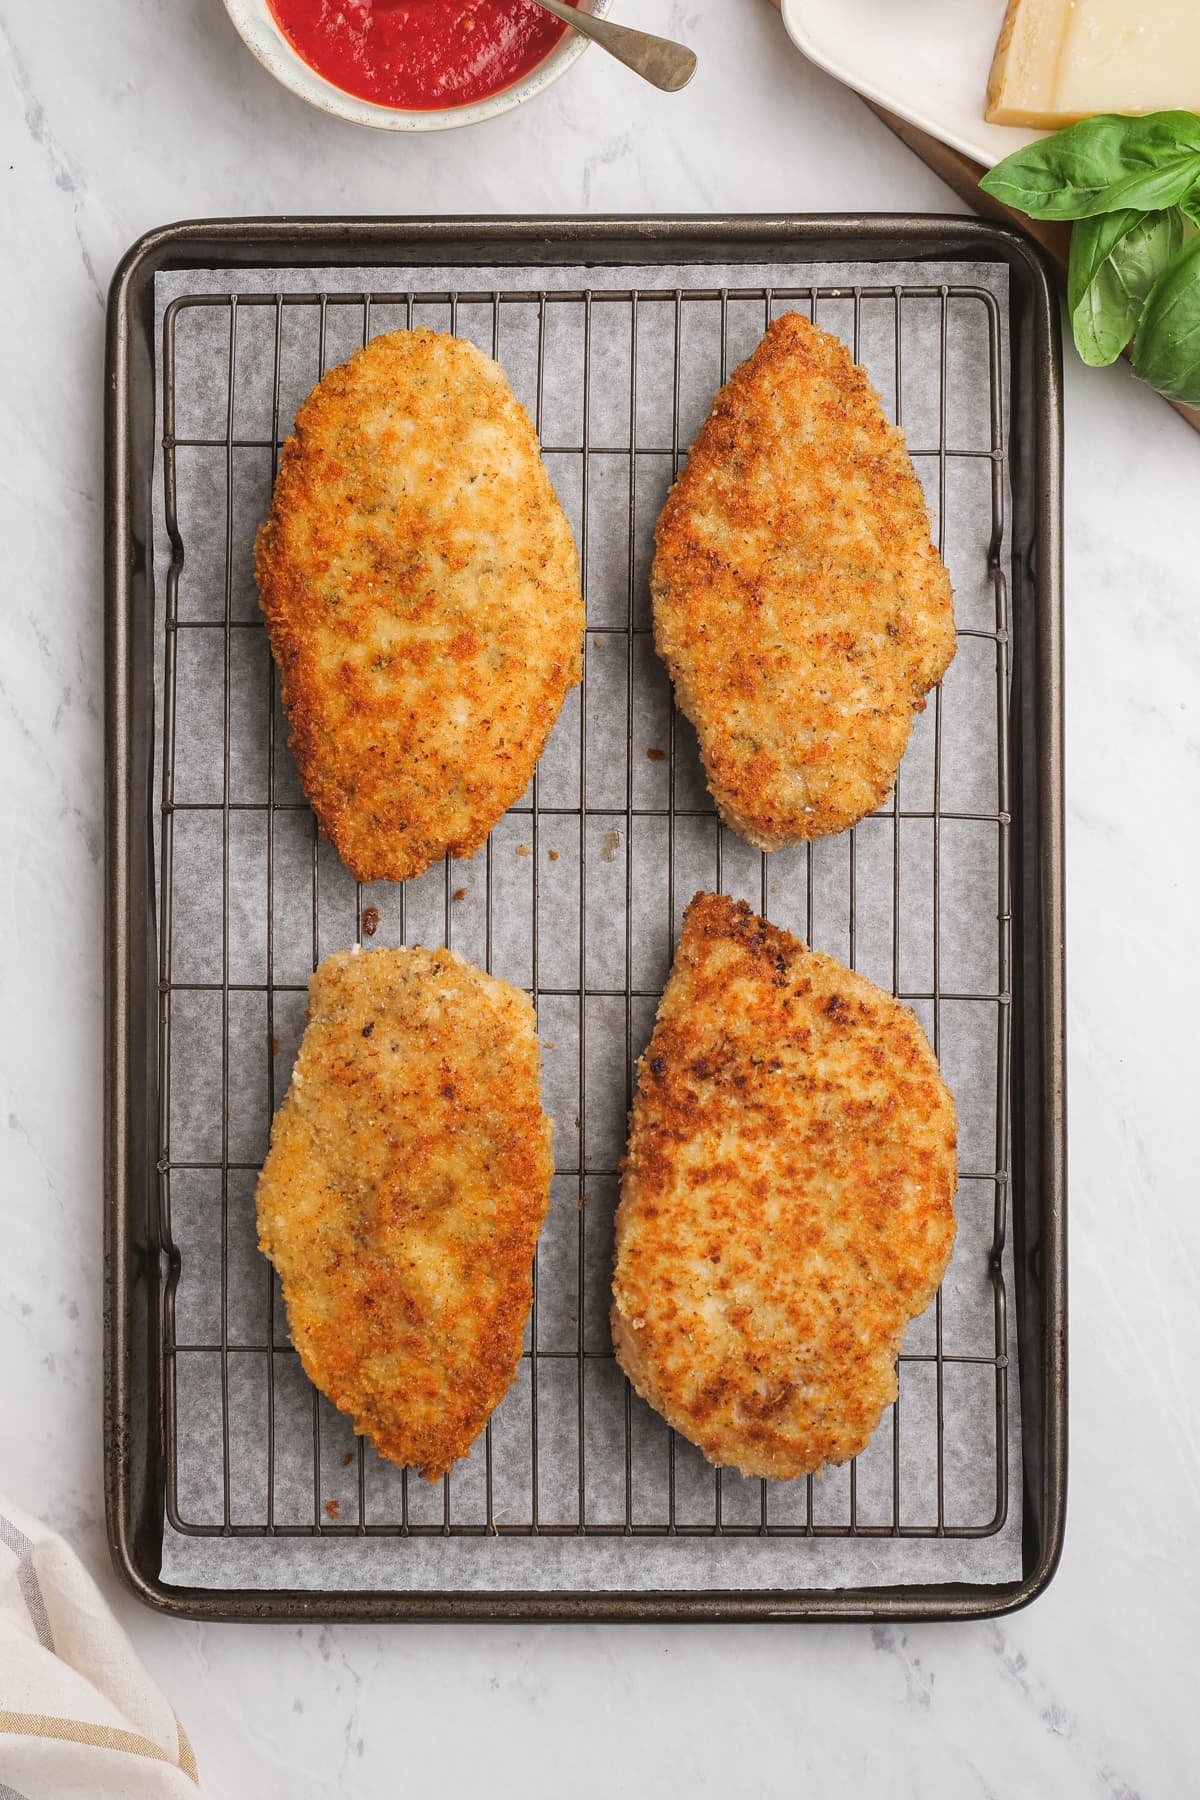
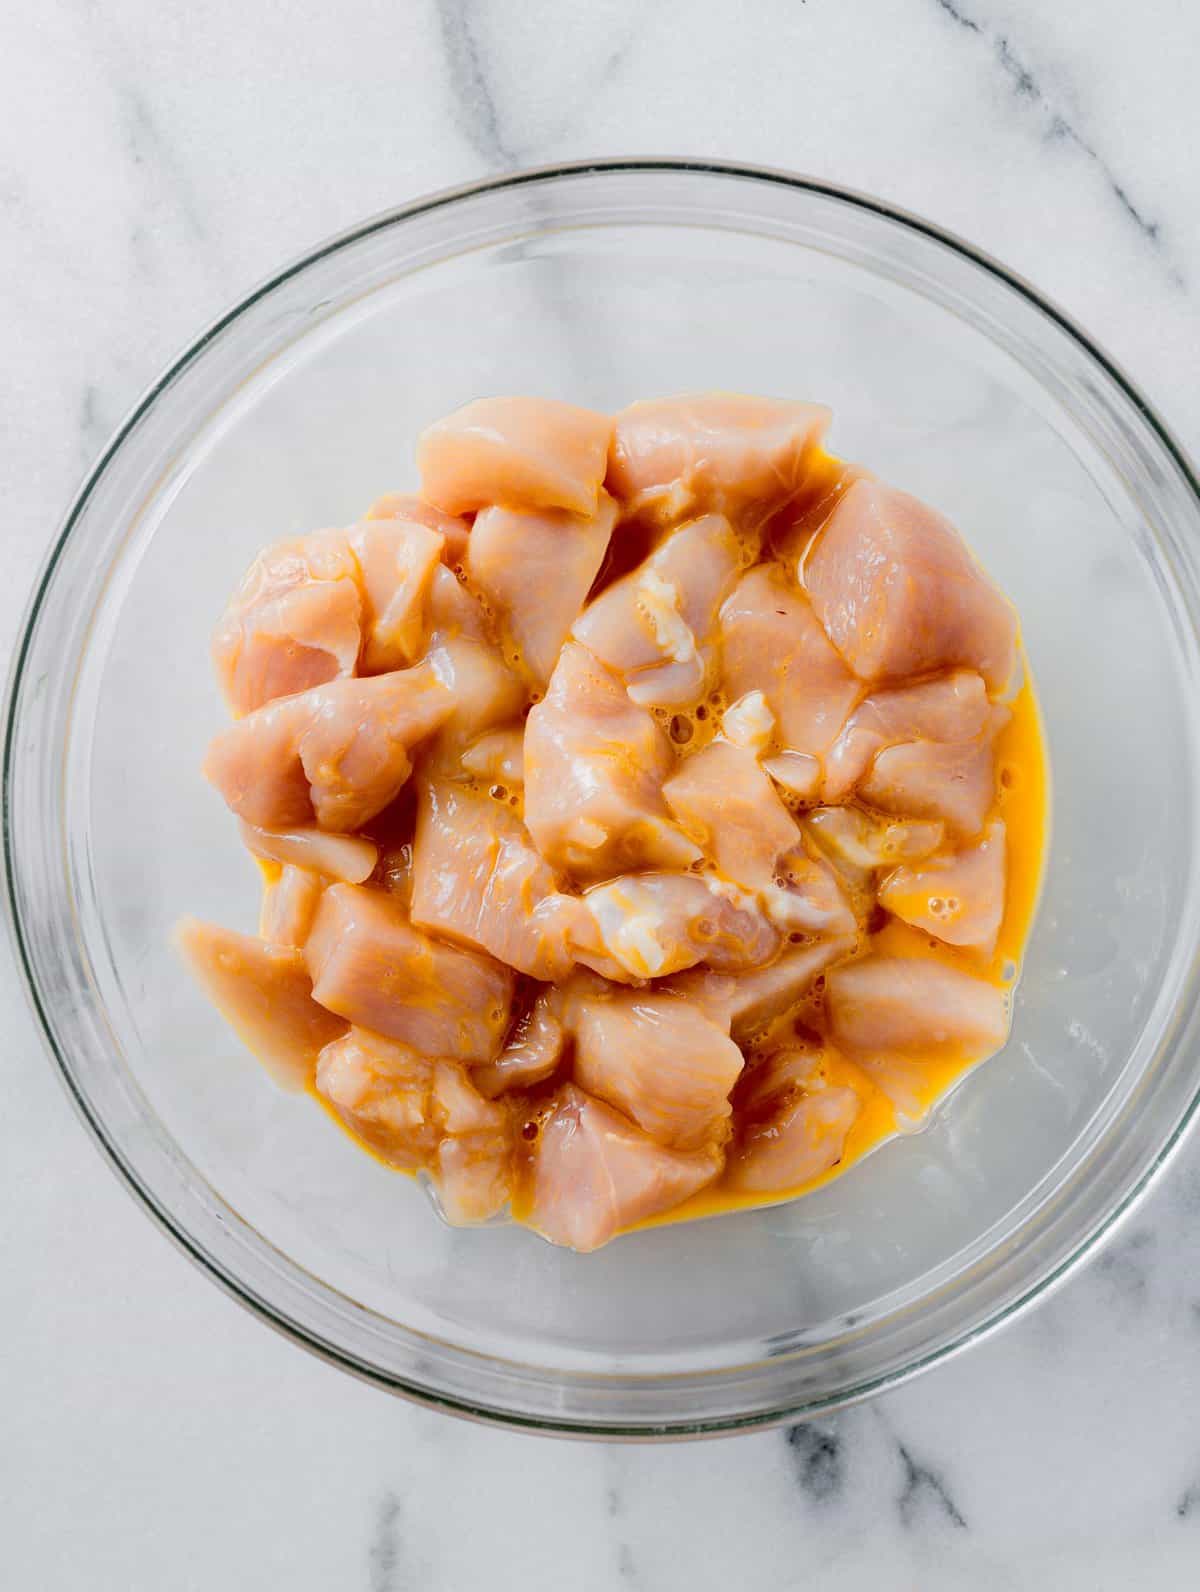
Prepare the Chicken. Pat the chicken dry, then pound it and place it in a zip-top bag or dish.
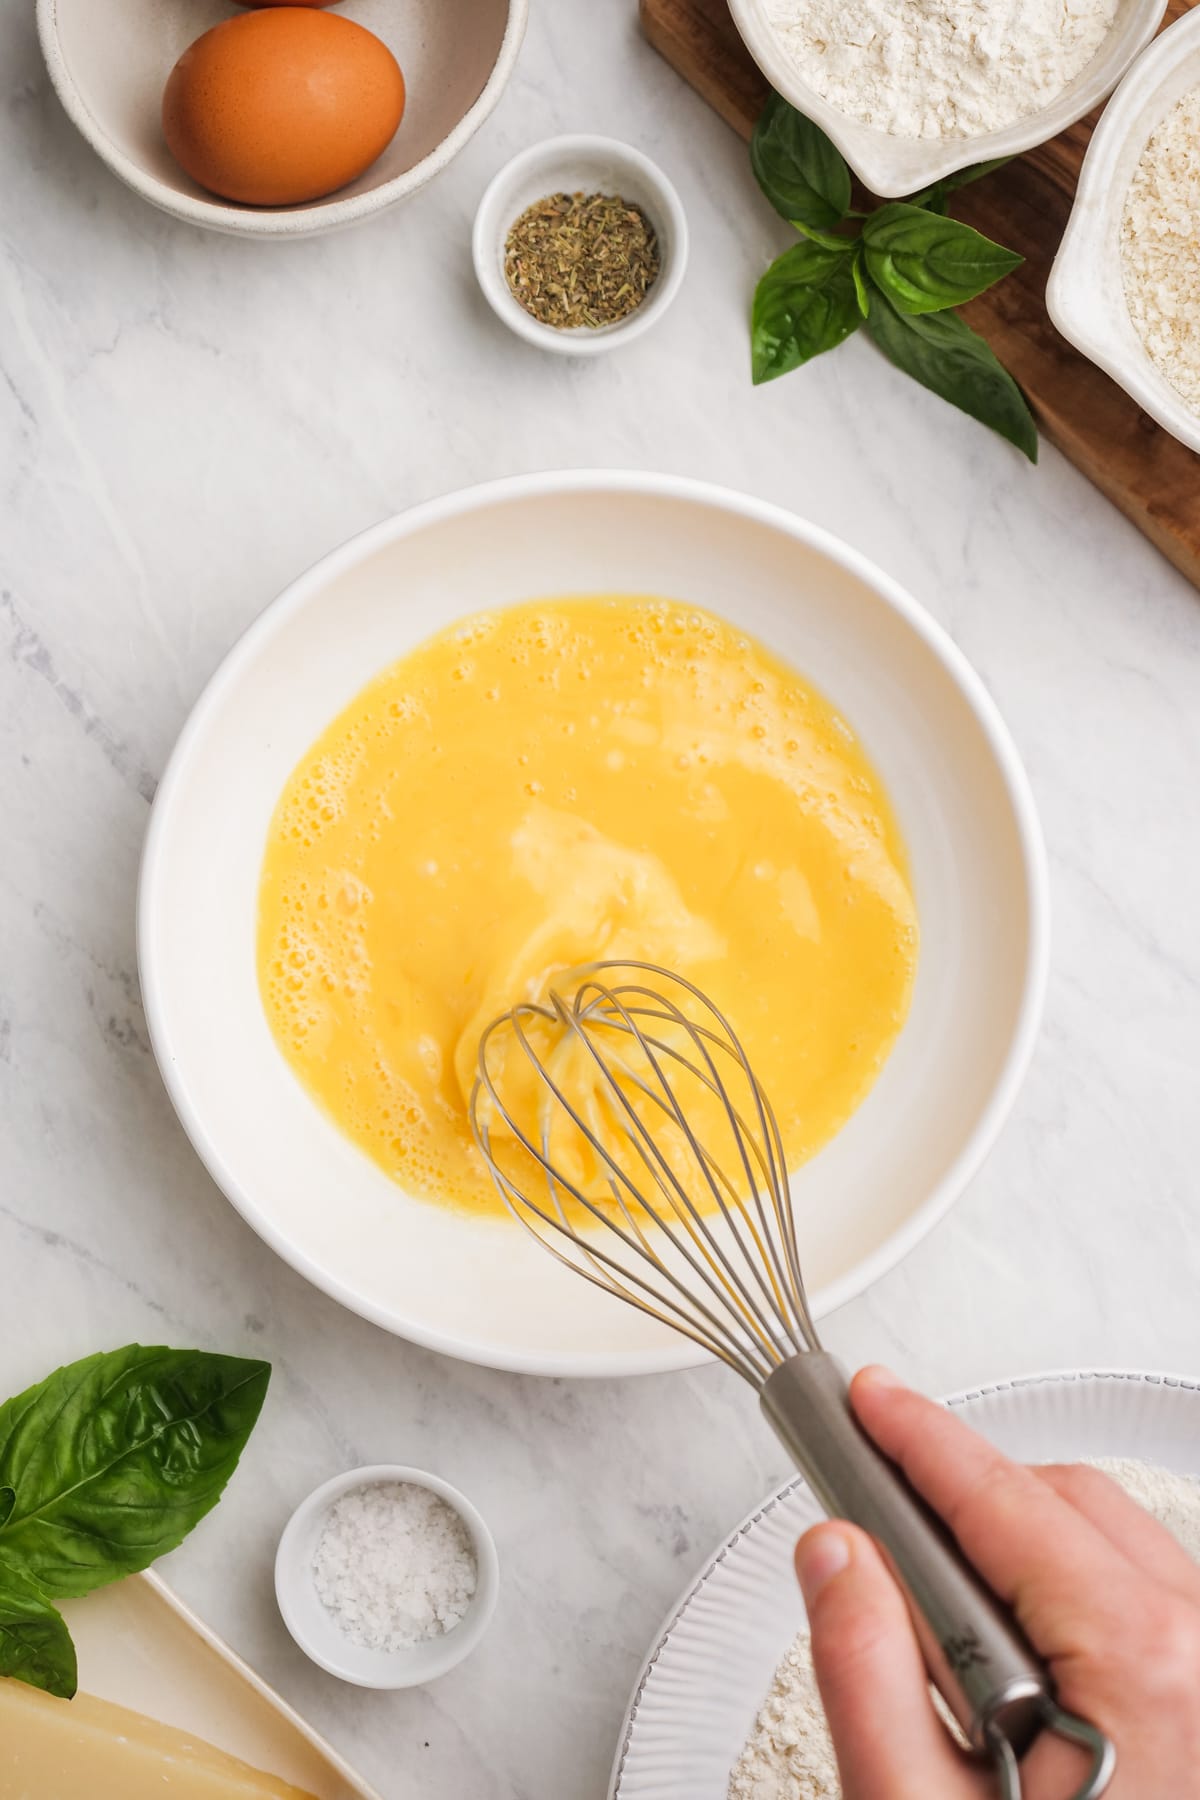
Make the Marinade. Whisk all of the ingredients in a small bowl.
Marinate. Pour the marinade over the chicken, turn to coat, and refrigerate. Marinade BBQ chicken for 2 hours or up to 1 day.
Bake. Place the BBQ chicken breasts on a parchment-lined baking sheet and bake in the preheated oven until they reach 155 degrees F.
Rest and Serve. Transfer the chicken to a plate or cutting board. Let it rest, covered, for at least 5 minutes, then serve and ENJOY!
Storage Tips
To Store. Refrigerate baked BBQ chicken breasts in an airtight container for up to 3 days.
To Reheat. Leftover chicken can be reheated in a baking dish in the oven at 350 degrees F. Brush with fresh BBQ sauce before reheating and to serve.
To Freeze. Freeze leftovers in an airtight freezer-safe storage container for up to 3 months. Thaw overnight in the refrigerator, then reheat according to the directions above.
Meal Prep Tip
The chicken marinade and barbecue sauce can be made in advance and stored in the refrigerator for up to a week.
Pound the Chicken. This allows you to make sure your chicken is the same thickness throughout, which means that all of your chicken breasts will finish cooking at the same time and each breast will be juicy and tender throughout, instead of rubbery on the ends. (The meat will be more tender too!)
Marinate Overnight. If you have time, marinating the chicken overnight will help make it extra flavorful. That said, you don’t want to marinate it much longer than this—after 24 hours, the marinade will begin to break down the fibers in the chicken, making it mushy and unappetizing.
Use a Meat Thermometer. Don’t watch the clock! The best way to know when your chicken is done cooking is to use an instant-read thermometer. I remove the chicken from the oven when it reaches 155 degrees F, as the internal temperature will continue to rise during the resting time, eventually reaching the perfect (and safe!) 165 degrees F.
Let It Rest. If you cut into the chicken too soon, all the juices will run out, leaving your chicken dry. Loosely cover the BBQ chicken breast with foil and let it rest for 5 to 10 minutes, then serve and cut.
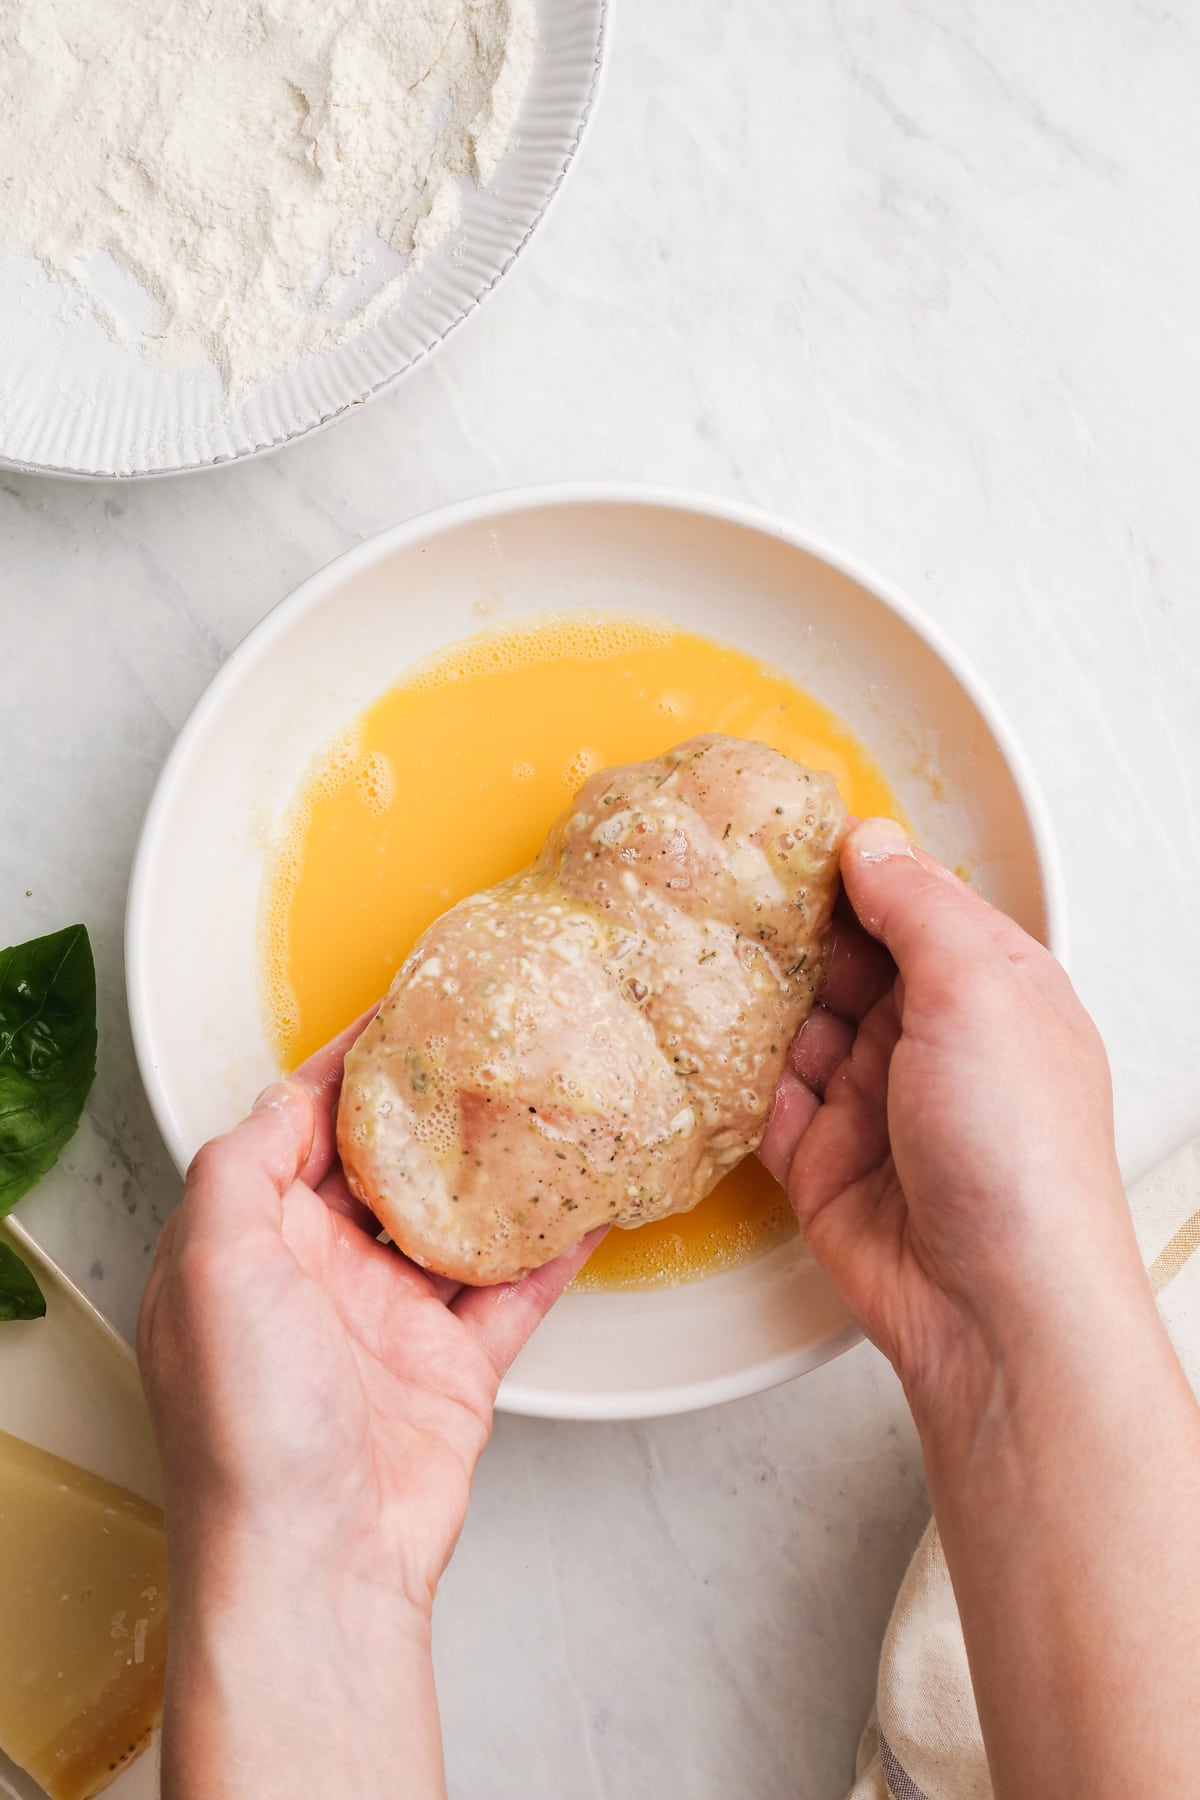
Pat the chicken dry, then place chicken breasts on a cutting board; if desired lay a sheet of plastic wrap over the top to keep things tidy. With a meat mallet or rolling pin, gently pound the breasts into an even thickness. Place in a sturdy ziptop bag or a small dish that will hold it snugly.
In a small bowl, stir together the marinade ingredients: ketchup, maple syrup, vinegar, Worcestershire, smoked paprika, cumin, salt, garlic powder, and black pepper.
Add the marinade to the chicken (either the bag or the dish). Seal the bag (if using), squeezing out as much air as possible. Turn to coat the chicken in the marinade. Marinade the chicken in the refrigerator for at least 2 hours or up to 1 day.
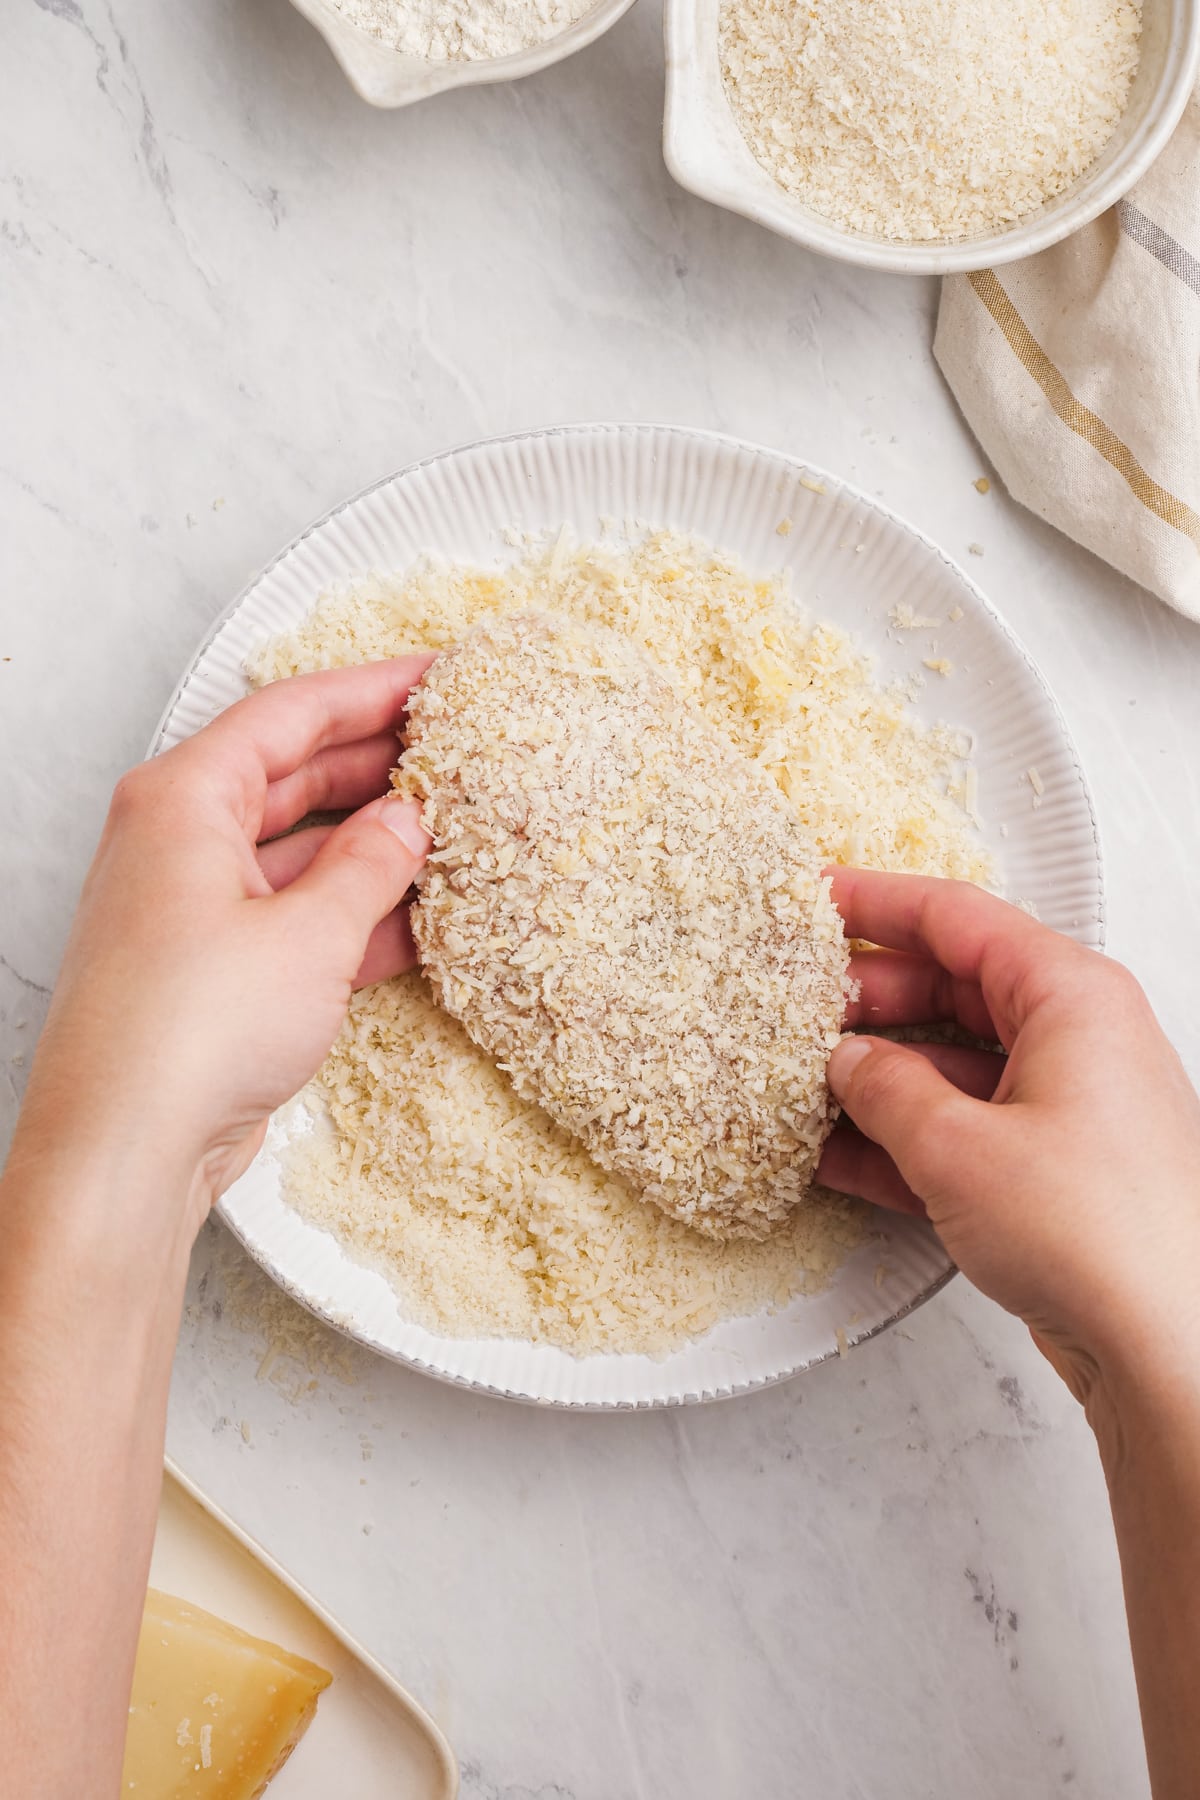
When ready to cook, remove the chicken from the refrigerator and let stand at room temperature while you preheat the oven. Place a rack in the center of the oven and preheat to 425°F. Line a rimmed baking sheet or baking dish large enough to hold the chicken without it touching with parchment paper.
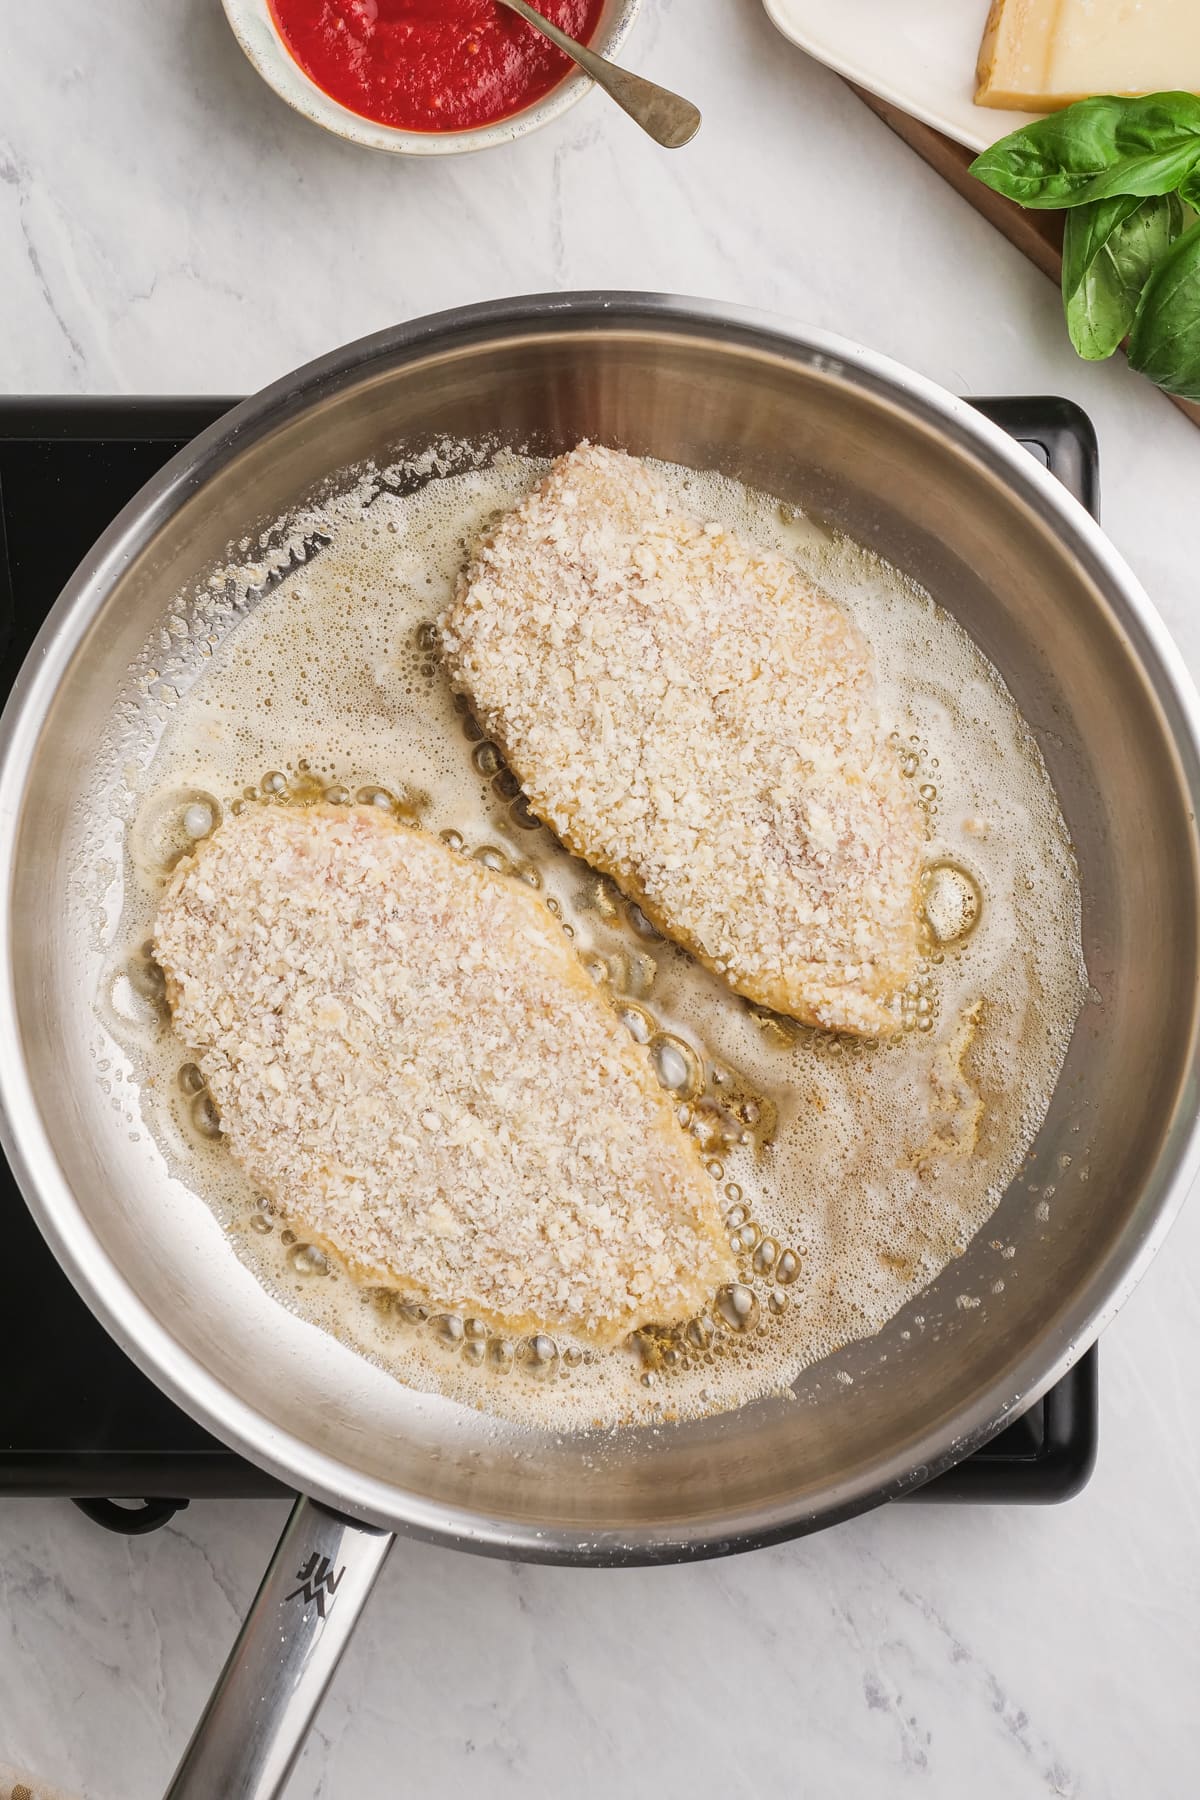
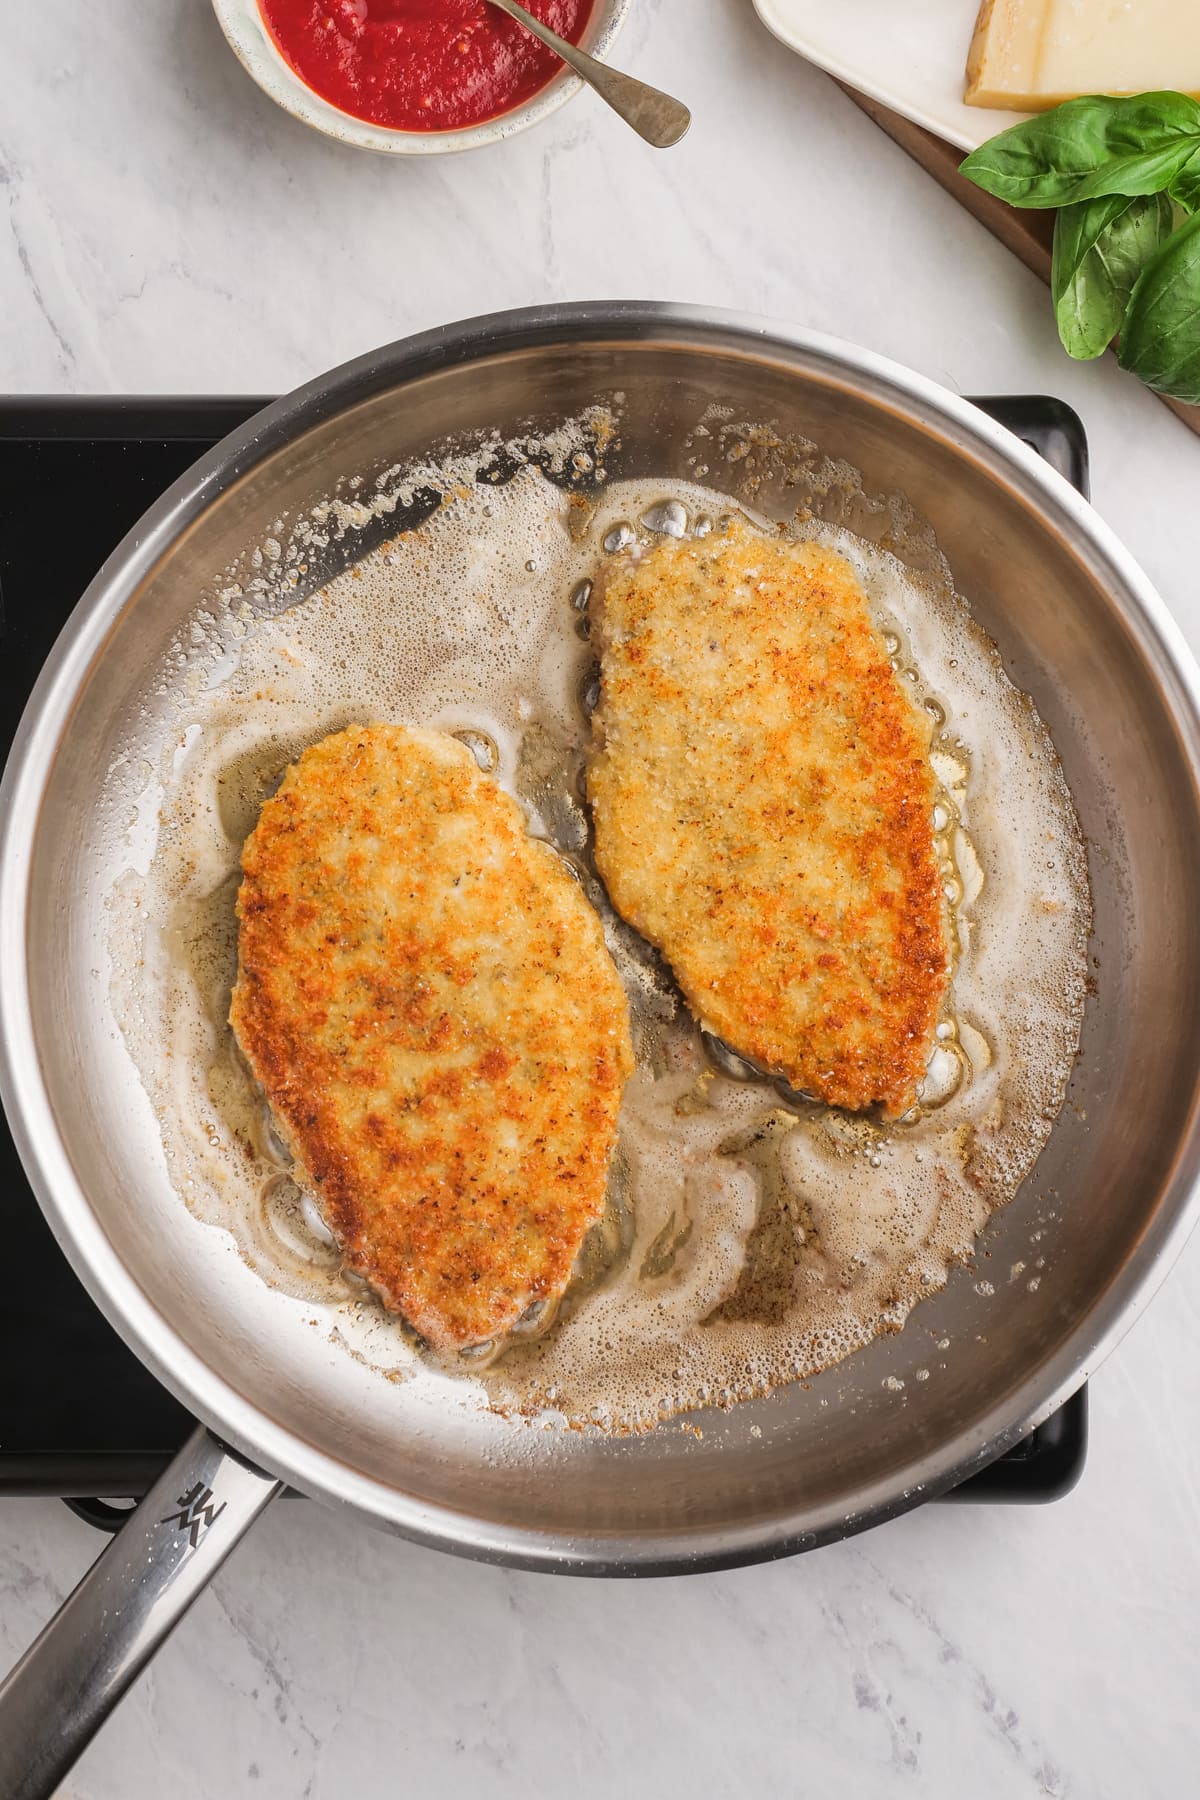
Remove the chicken from the marinade and place on the parchment paper. Bake BBQ chicken for 14 to 16 minutes (for small/medium breasts that are about 6 to 7 ounces), 16 to 20 minutes (for medium/large breasts that are 8 to 10 ounces), or 20 to 25 minutes (for larger breasts). For best results, use an instant-read thermometer. When the breasts reach 165°F, they are done. Note that the chicken’s temperature will rise as it rests; I prefer to remove mine at 155°F. If desired, when the chicken has about 5 minutes left, brush it liberally with BBQ sauce.
Transfer the chicken to a plate or cutting board. Cover and let rest for a minimum of 5 minutes. Enjoy hot with a side of barbecue sauce as desired.
TO STORE: Refrigerate baked BBQ chicken breast in an airtight container for up to 3 days.
TO REHEAT: Leftover chicken can be reheated in a baking dish in the oven at 350°F.
TO FREEZE: Freeze leftovers in an airtight freezer-safe storage container for up to 3 months. Thaw overnight in the refrigerator, then reheat according to the directions above.
I’ve tested a whole range of temperatures for baking chicken and 425 degrees F consistently produces the best results, with tender, juicy chicken and a nicely browned exterior.
How Long Should Chicken Be in the Oven at 425 degrees F?
Small to medium chicken breasts take 14 to 16 minutes, medium to large take about 20 minutes, and extra large chicken breasts can take as much as 25 minutes. I recommend using an instant-read thermometer rather than setting a timer, which is much more accurate.
Do You Put Barbecue Sauce on Before or After Baking?
When I’m making BBQ chicken breasts in the oven, I apply the first coating of sauce when the chicken reaches 150 degrees F, then I slather more BBQ sauce on after serving. The marinade already infuses the chicken with BBQ flavor, so the sauce is just a bonus!
How Do You Make BBQ Sauce Stick to Chicken?
Applying the sauce after the chicken has been in the oven for a while is key to getting the sauce to stick. I apply it when the chicken reaches 150 degrees F, but if you don’t have a thermometer, brush it on about 10 minutes before the chicken is done baking.
Can I Shred BBQ Chicken?
The texture of baked chicken lends itself better to dicing than shredding. For a shredded version, check out my Crockpot BBQ Chicken.
Related Recipes
Everyone needs some back pocket chicken recipes! These are some of my favorites:
]]>
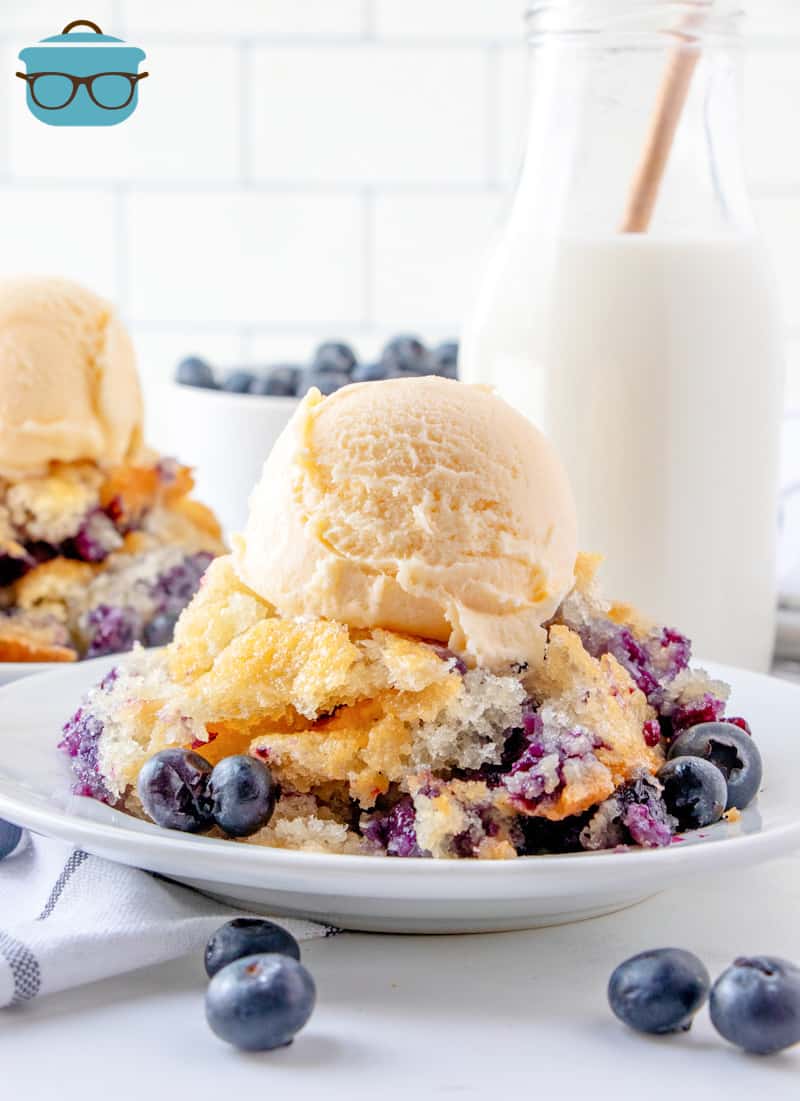
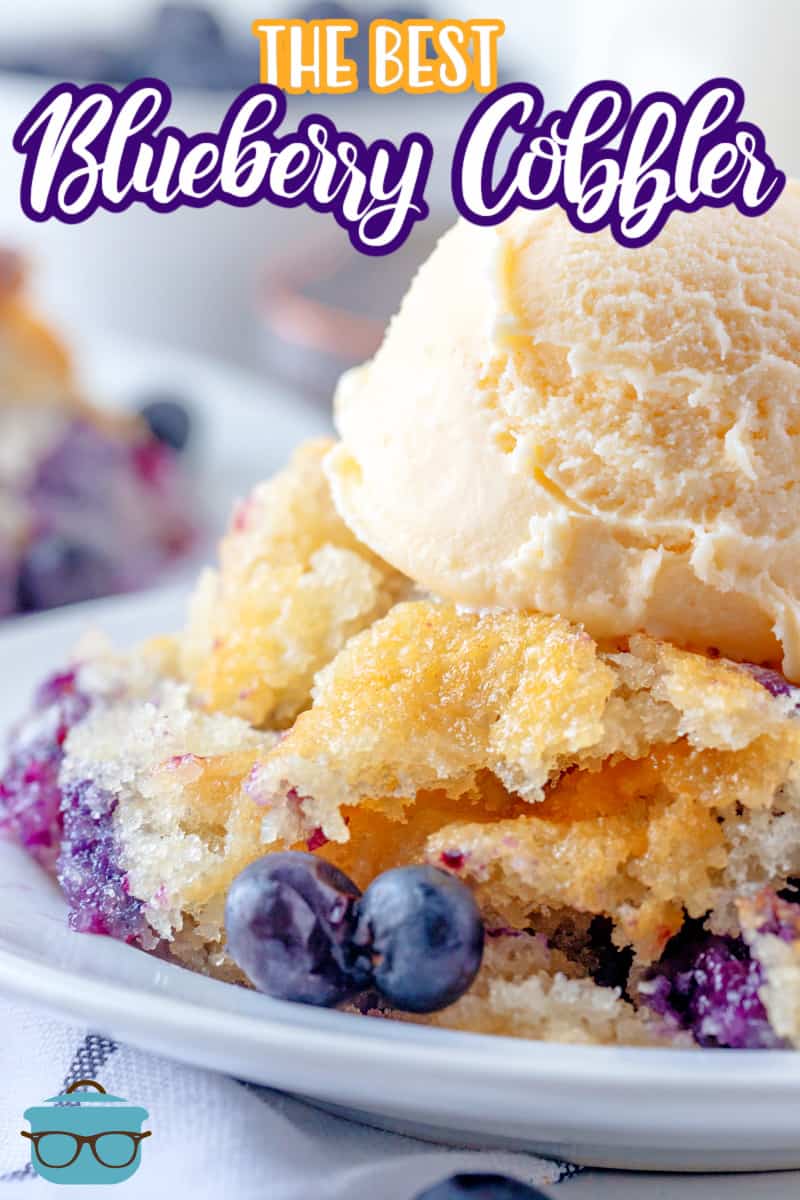
https://mallize.com/blogs/news/the-best-blueberry-cobbler2023-06-29T21:13:51-04:002023-06-29T21:13:51-04:00The Best Blueberry Cobbleradmin
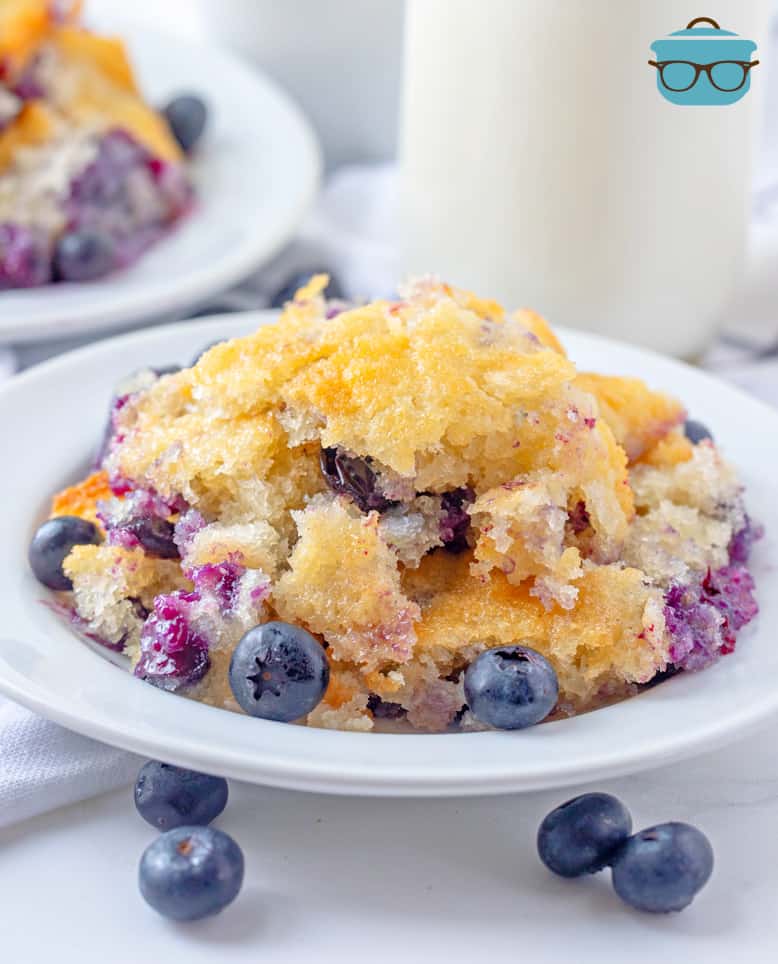
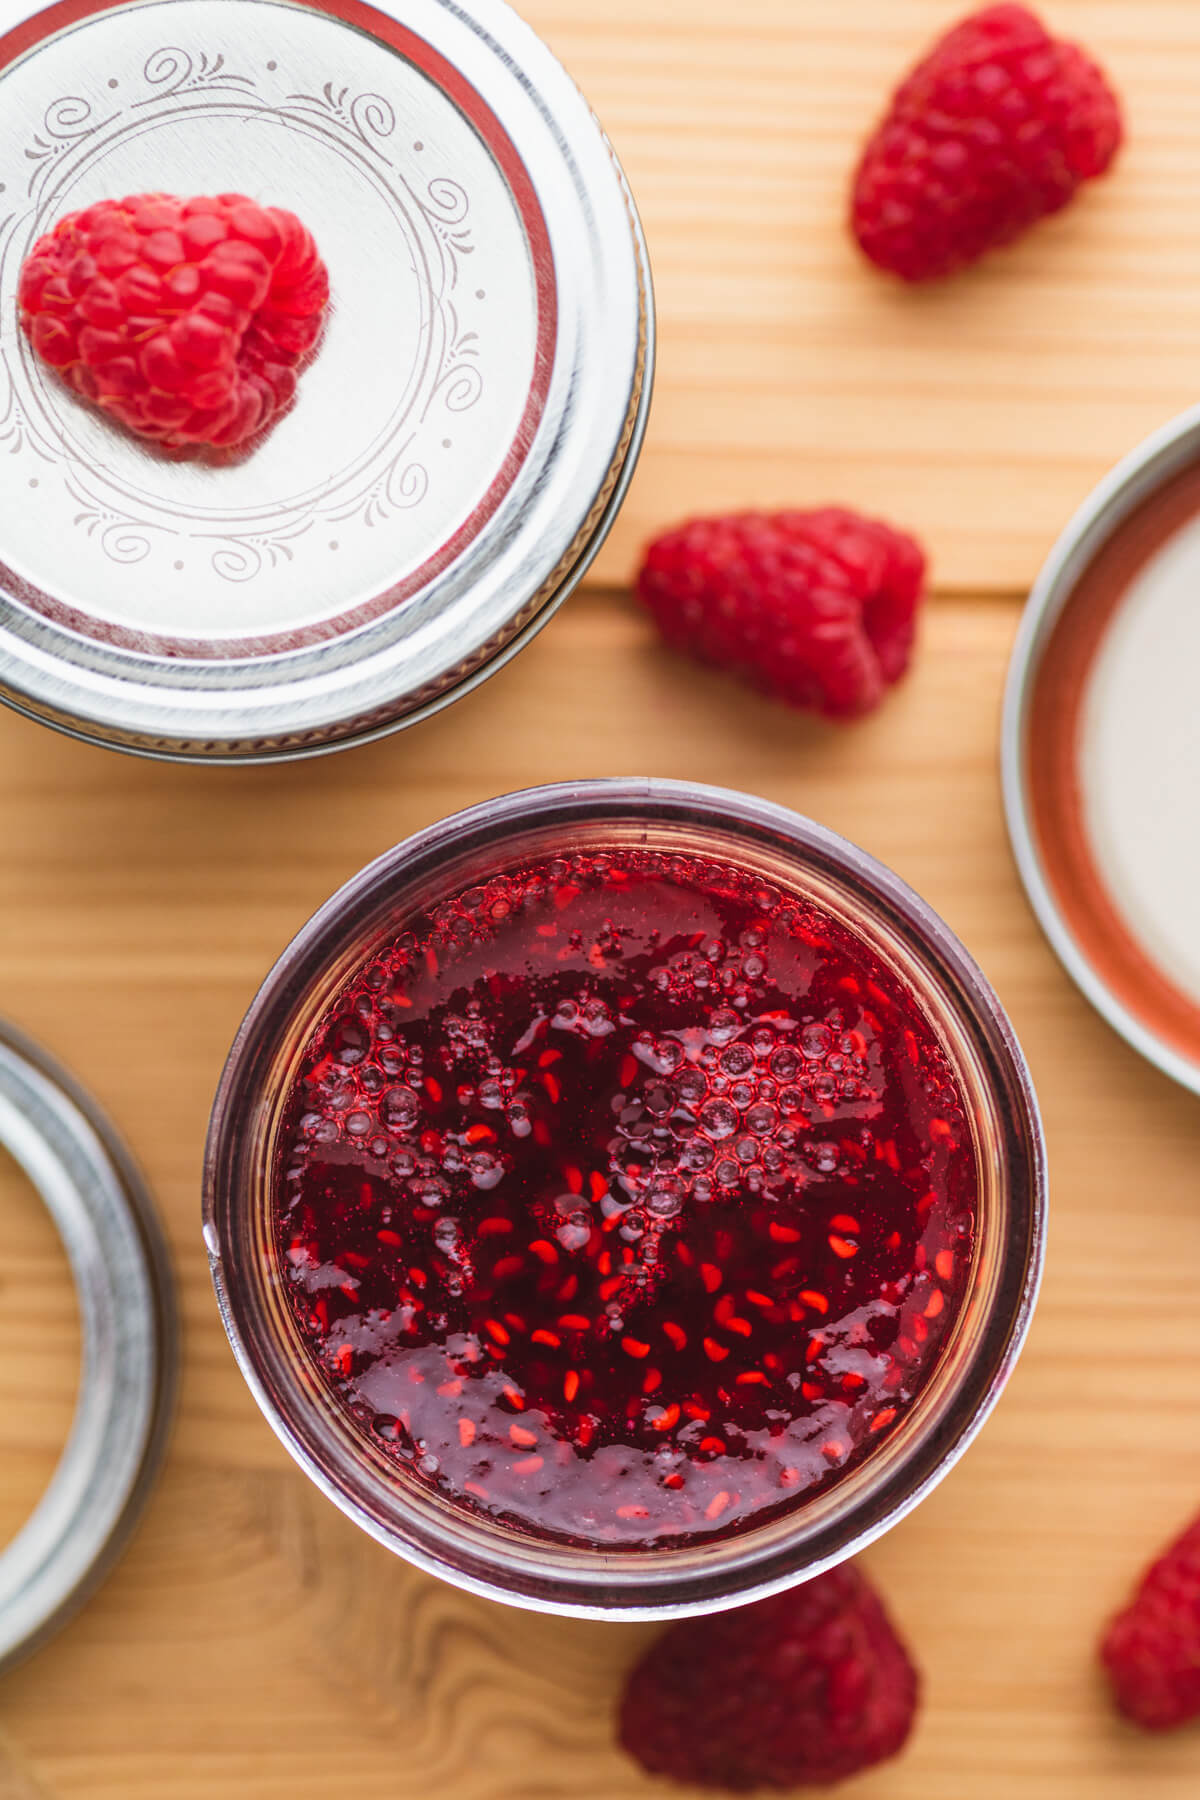
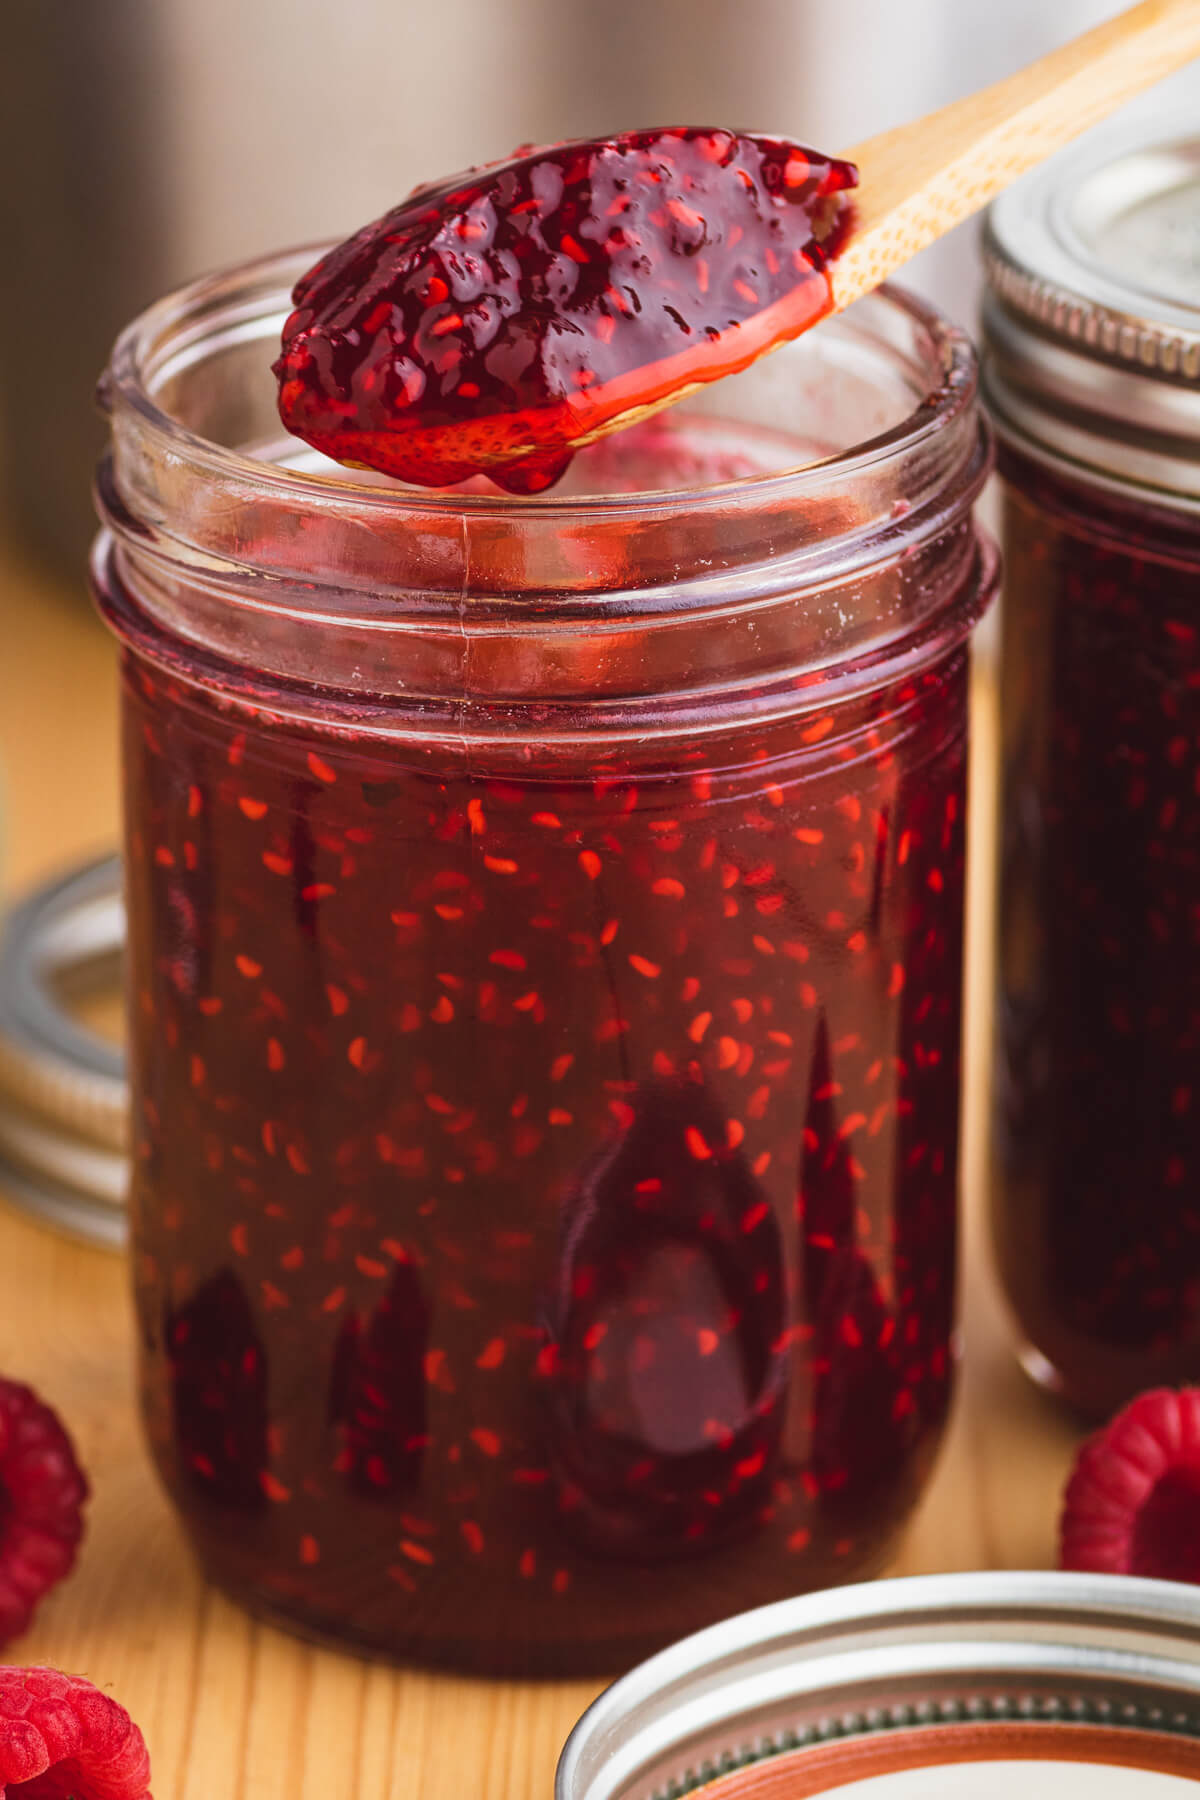
This Easy Blueberry Cobbler recipe only has 6 ingredients! Fresh blueberries and an easy, sweet homemade batter make this simply perfect!
A SIMPLE BLUEBERRY COBBLER RECIPE
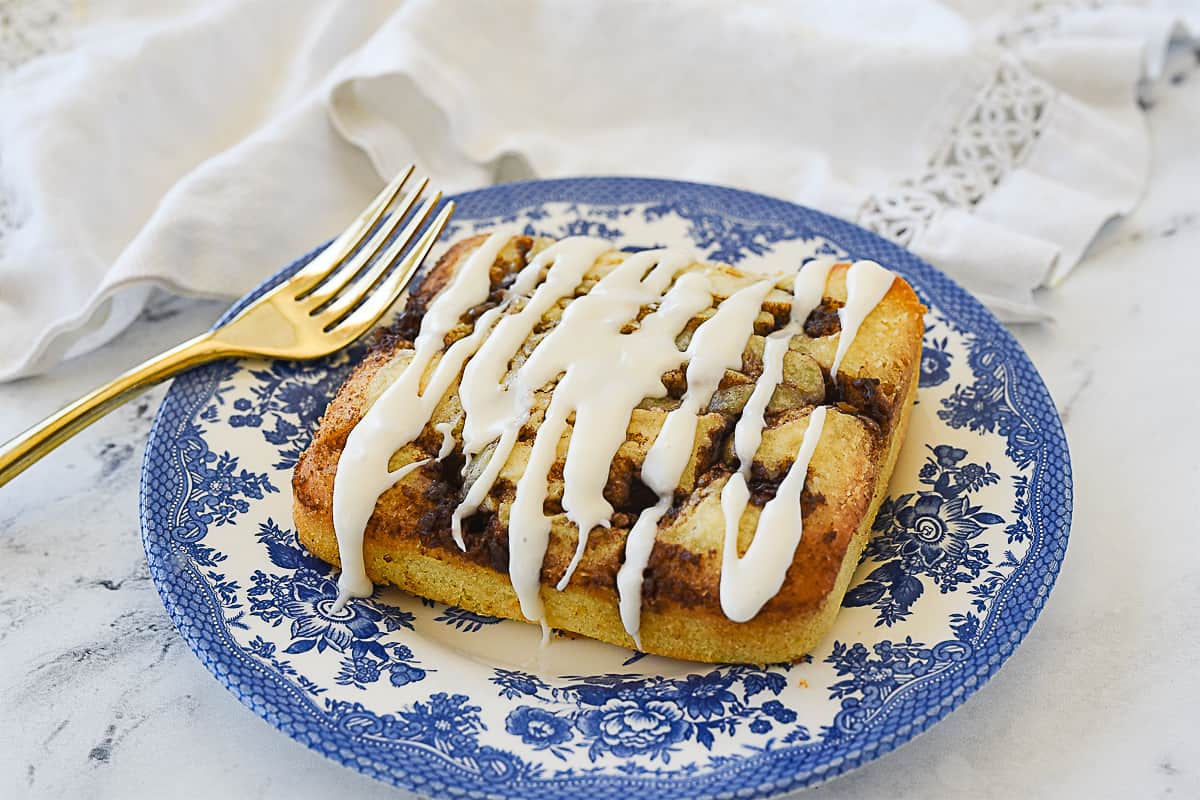
This easy blueberry cobbler is about to become one of your absolute favorite easy dessert recipes! I’m a huge blueberry fan and this blueberry dessert does not disappoint! It’s so ooey gooey, moist, sweet, and oh so delicious! After it bakes, you get a slightly crispy edge (which is my favorite part!)
FREQUENTLY ASKED QUESTIONS:
What other fruits can be used besides blueberries?
For this recipe just whisk together one cup of all-purpose flour with 1 1/2 teaspoons of baking powder and 1/4 teaspoon of salt. Proceed with recipe as written.
Can I use frozen blueberries?
You can but keep in mind that frozen blueberries will require more work to use. You will need to fully defrost the blueberries then dry them as best as possible. If you don’t, they will add too much water to the cobbler and it won’t turn out properly. Cobbler is best made with fresh fruits which is why you often see them served in the summer.
Can I use almond, soy or oat milk?
I get this question a lot these days, and I will be honest, I don’t use anything other than cow’s milk. I would think that you could but its one of those things that you will just have to try and test out yourself.
Can I use a sugar substitute?
I will answer the same as above. I only bake with real sugar. If you are familiar with baking with sugar substitutes then I would hope that you would already know how to properly substitute sugar in recipes. I will be no help there.
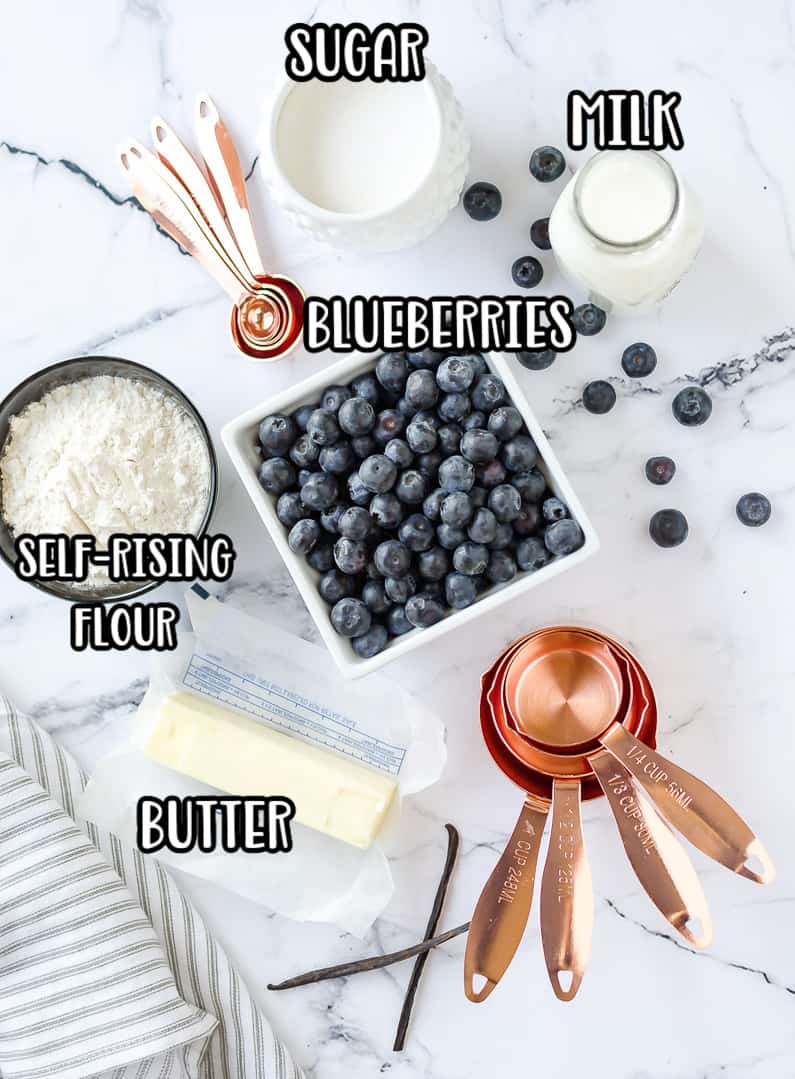
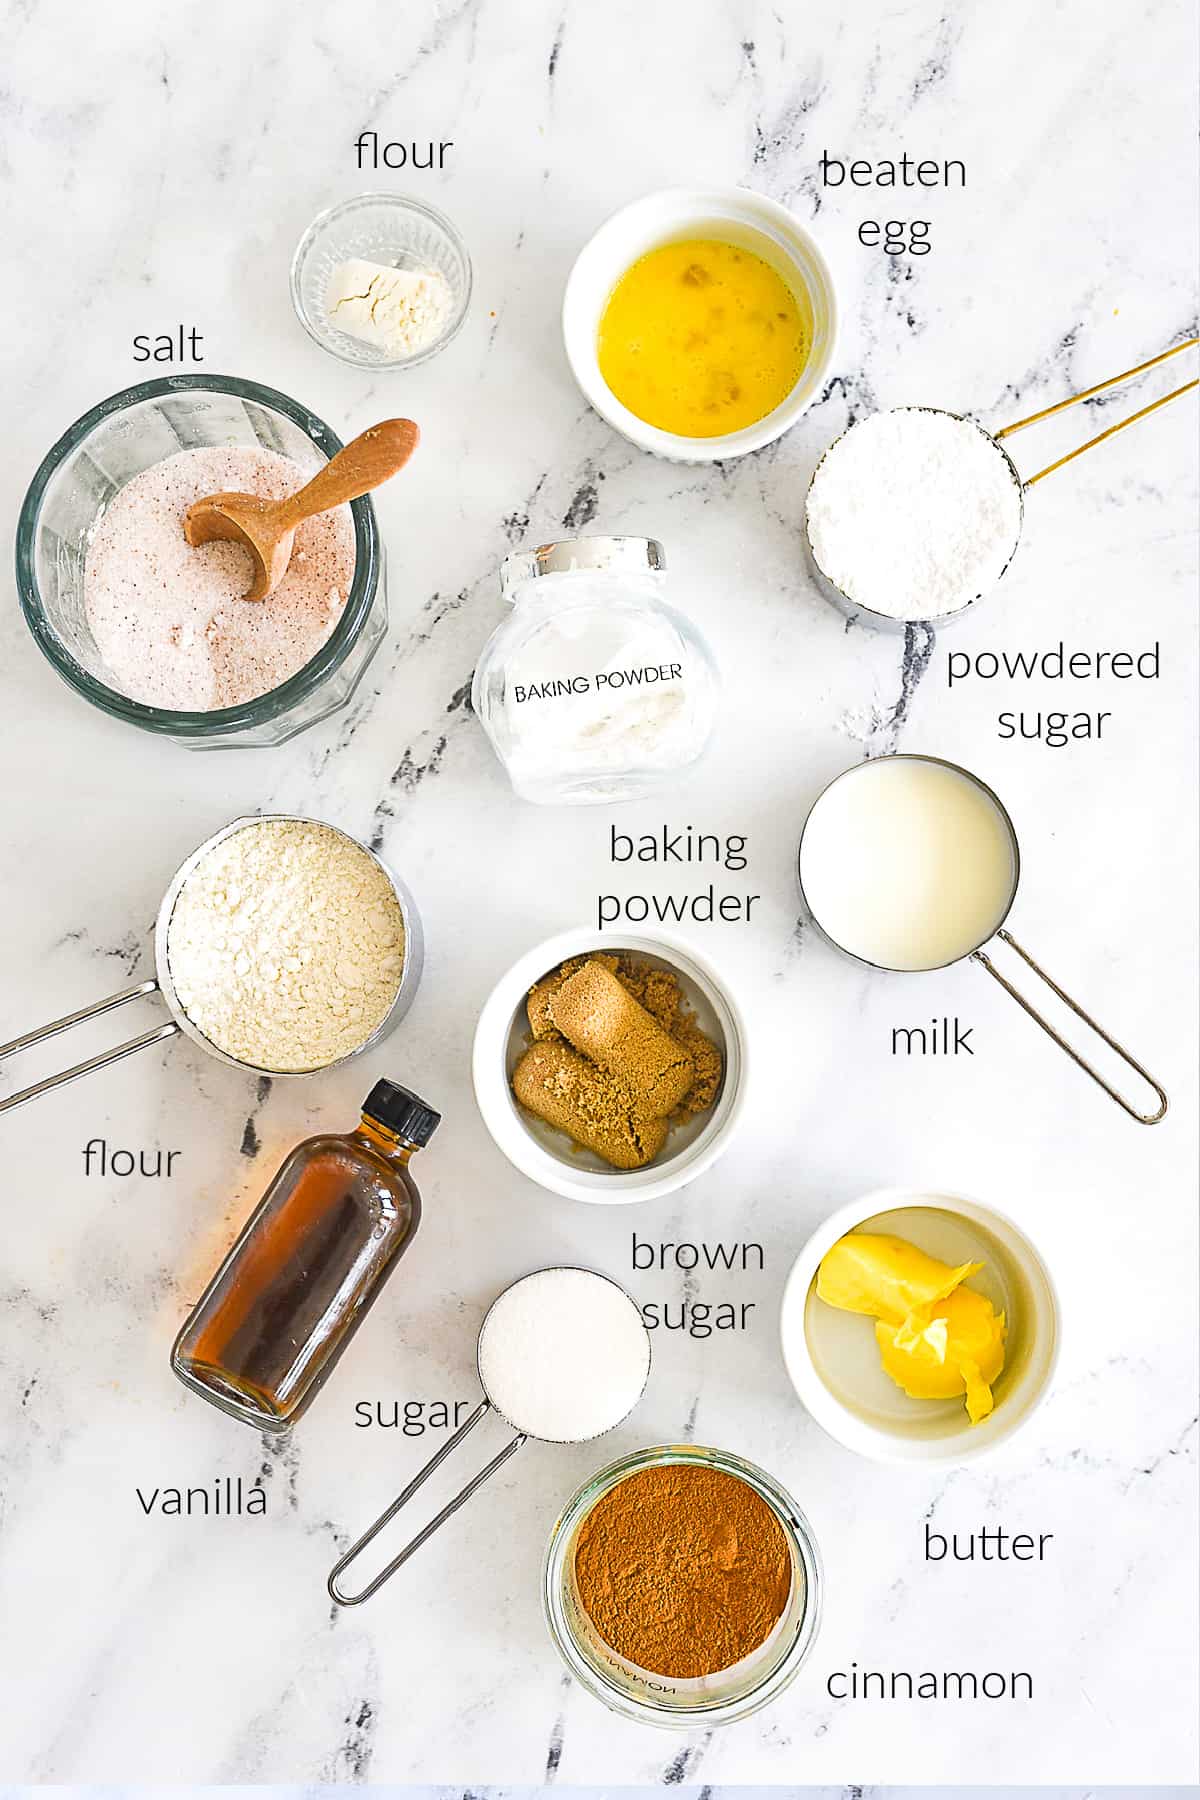
INGREDIENTS NEEDED: (SEE RECIPE CARD BELOW FOR THE FULL RECIPE)
self-rising flour – y’all already know I swear by White Lily flour. It is my absolute favorite for baking. See my FAQ above about using all purpose flour.
sugar – just regular ole white sugar. I have not tried this with brown sugar.
milk – I always prefer 2% or higher milk. The fat in milk really gives flavor.
salted butter – it needs to be real butter, not margarine. Margarine is basically just oil. I like salted butter. It does not make this taste salty. It gives it a nice balance of flavor with the overall sweetness.
vanilla extract -I actually like the vanilla extract that says “baking vanilla extract.” But if you have a bougie vanilla extract you love, then go for it!
fresh blueberries – see my notes above about using frozen blueberries. Also, this same recipe can be made with fresh raspberries and blackberries.
HOW TO MAKE THE BEST BLUEBERRY COBBLER:
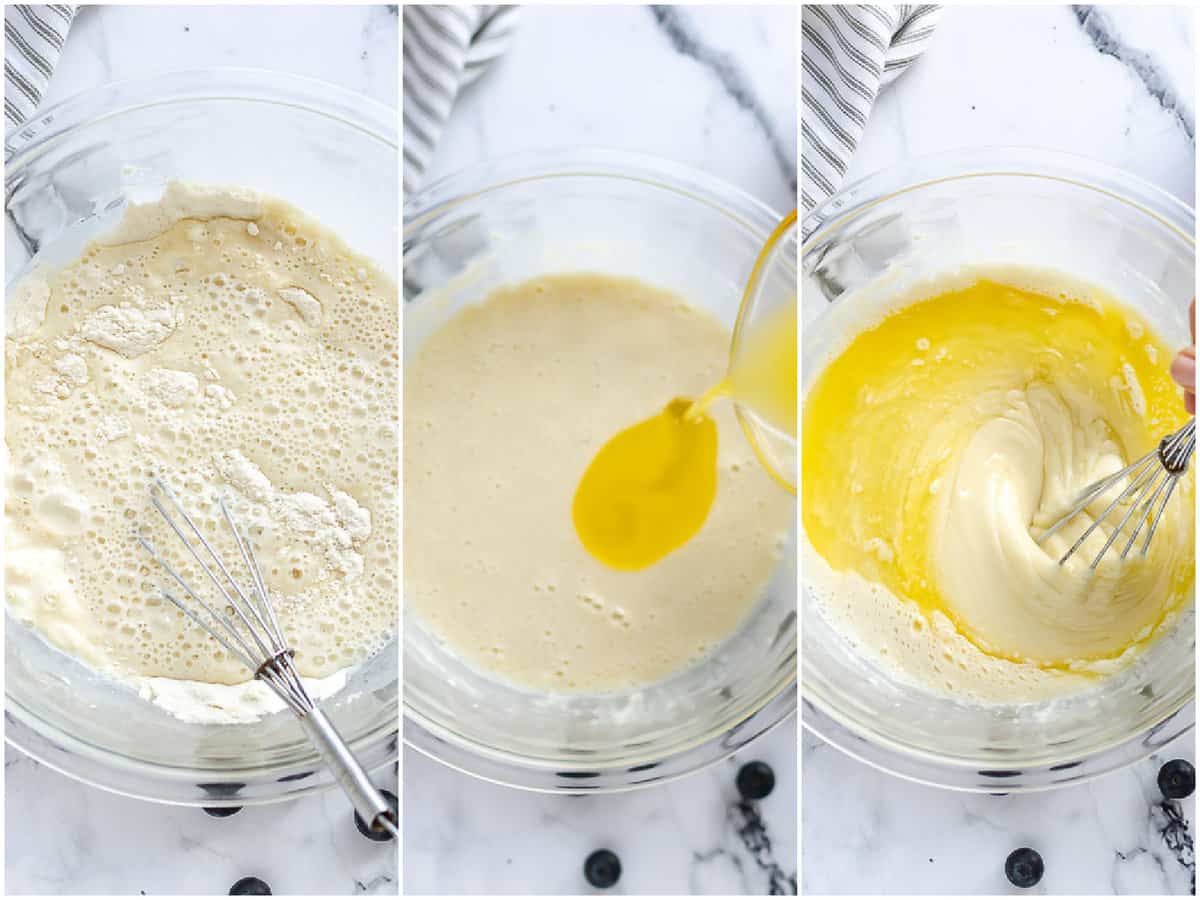
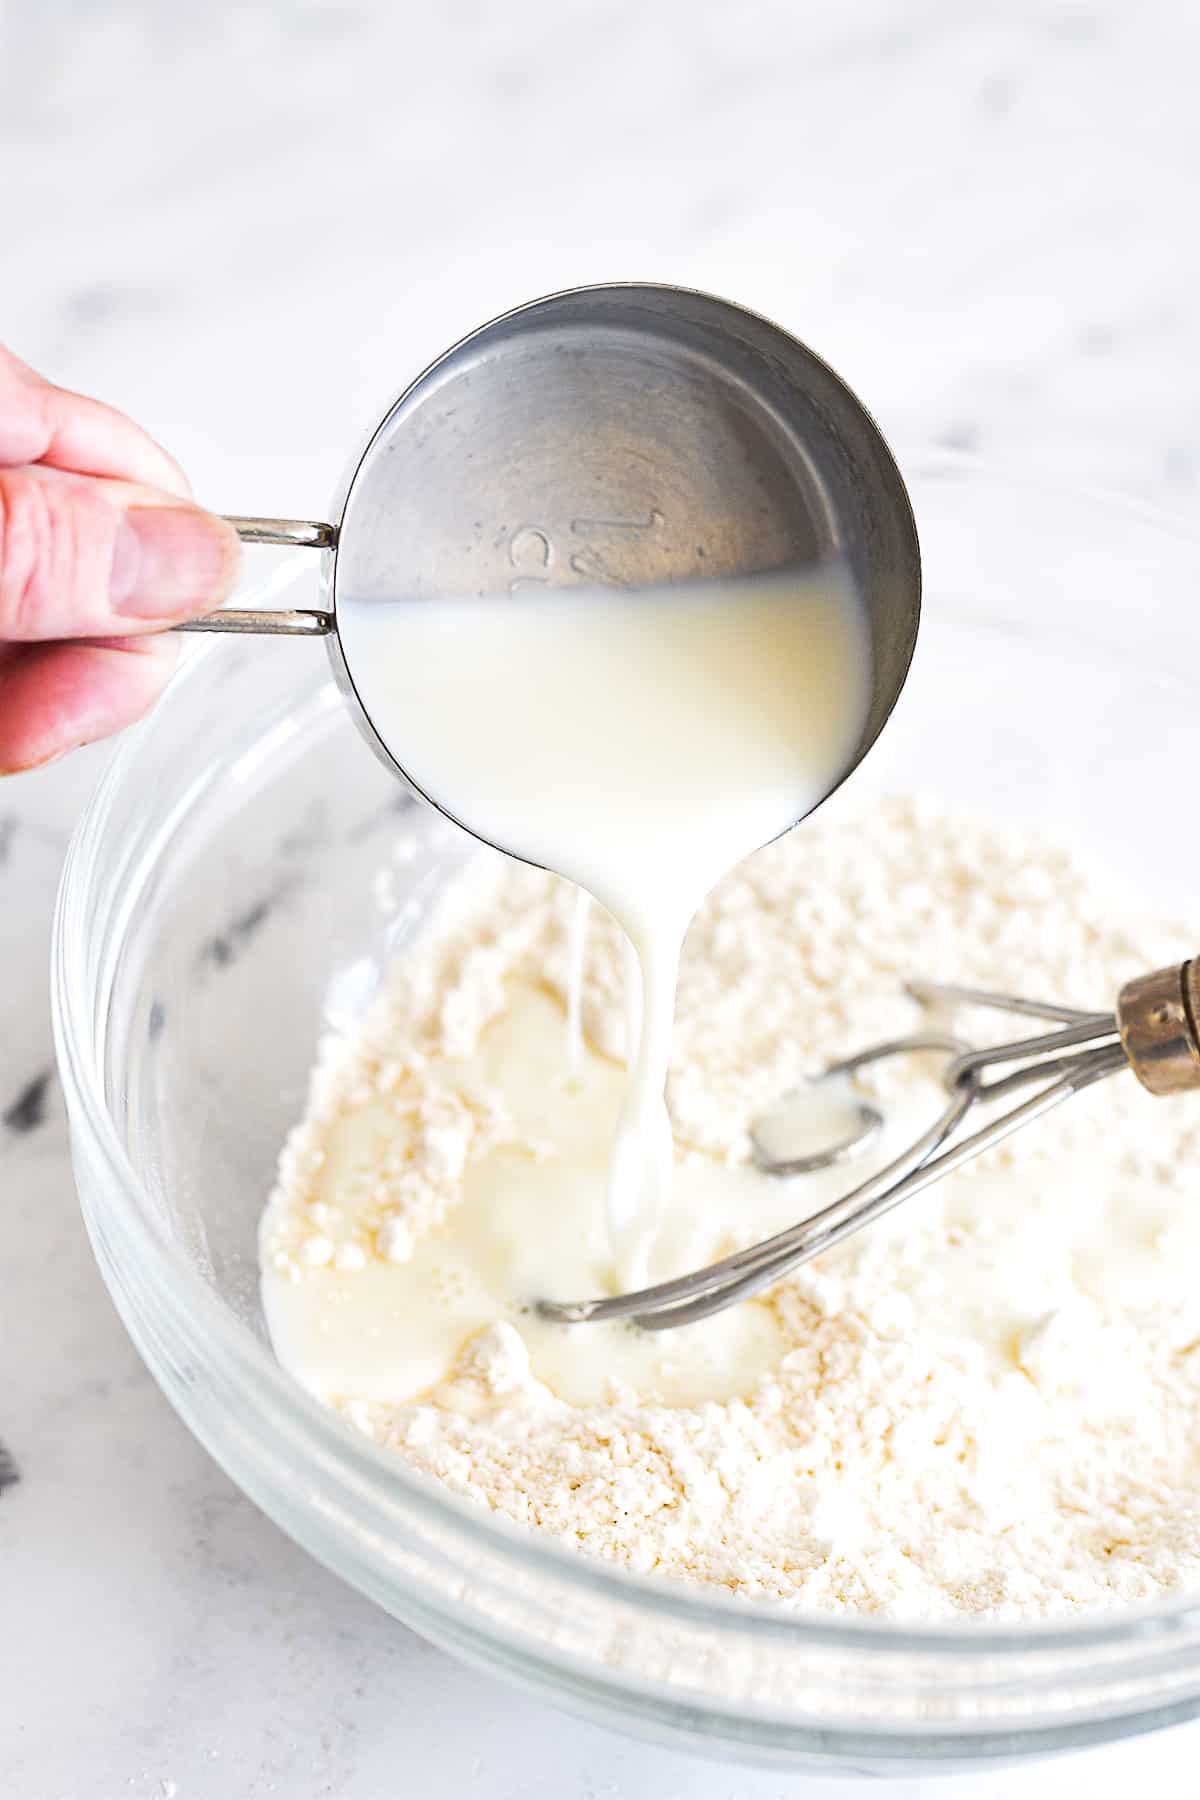
Preheat the oven to 350F degrees. Spray a 9″ x 9″ square baking dish with nonstick cooking spray and set aside. In a medium sized bowl, stir together the flour with 1 cup of sugar and then add in the milk. Then, pour the melted butter and vanilla extract. Stir until combined.
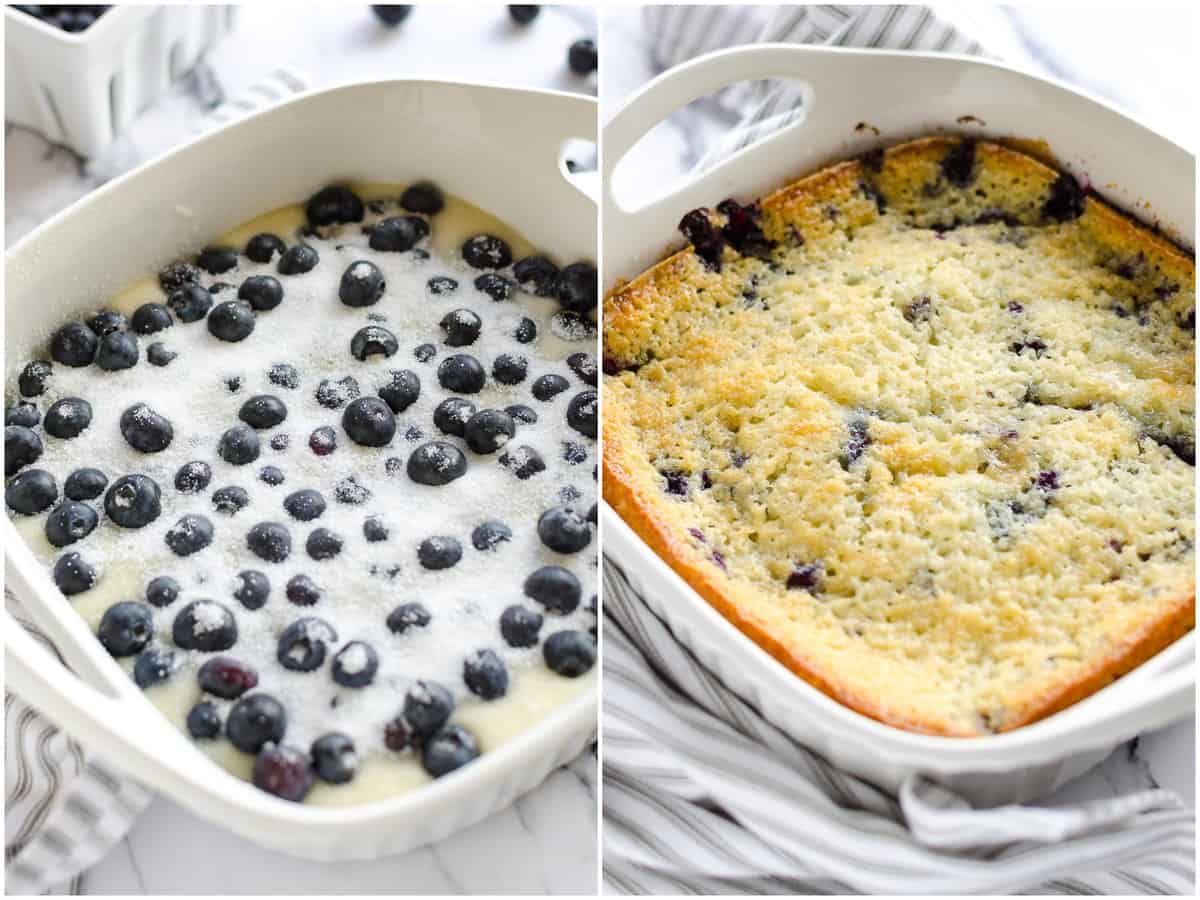
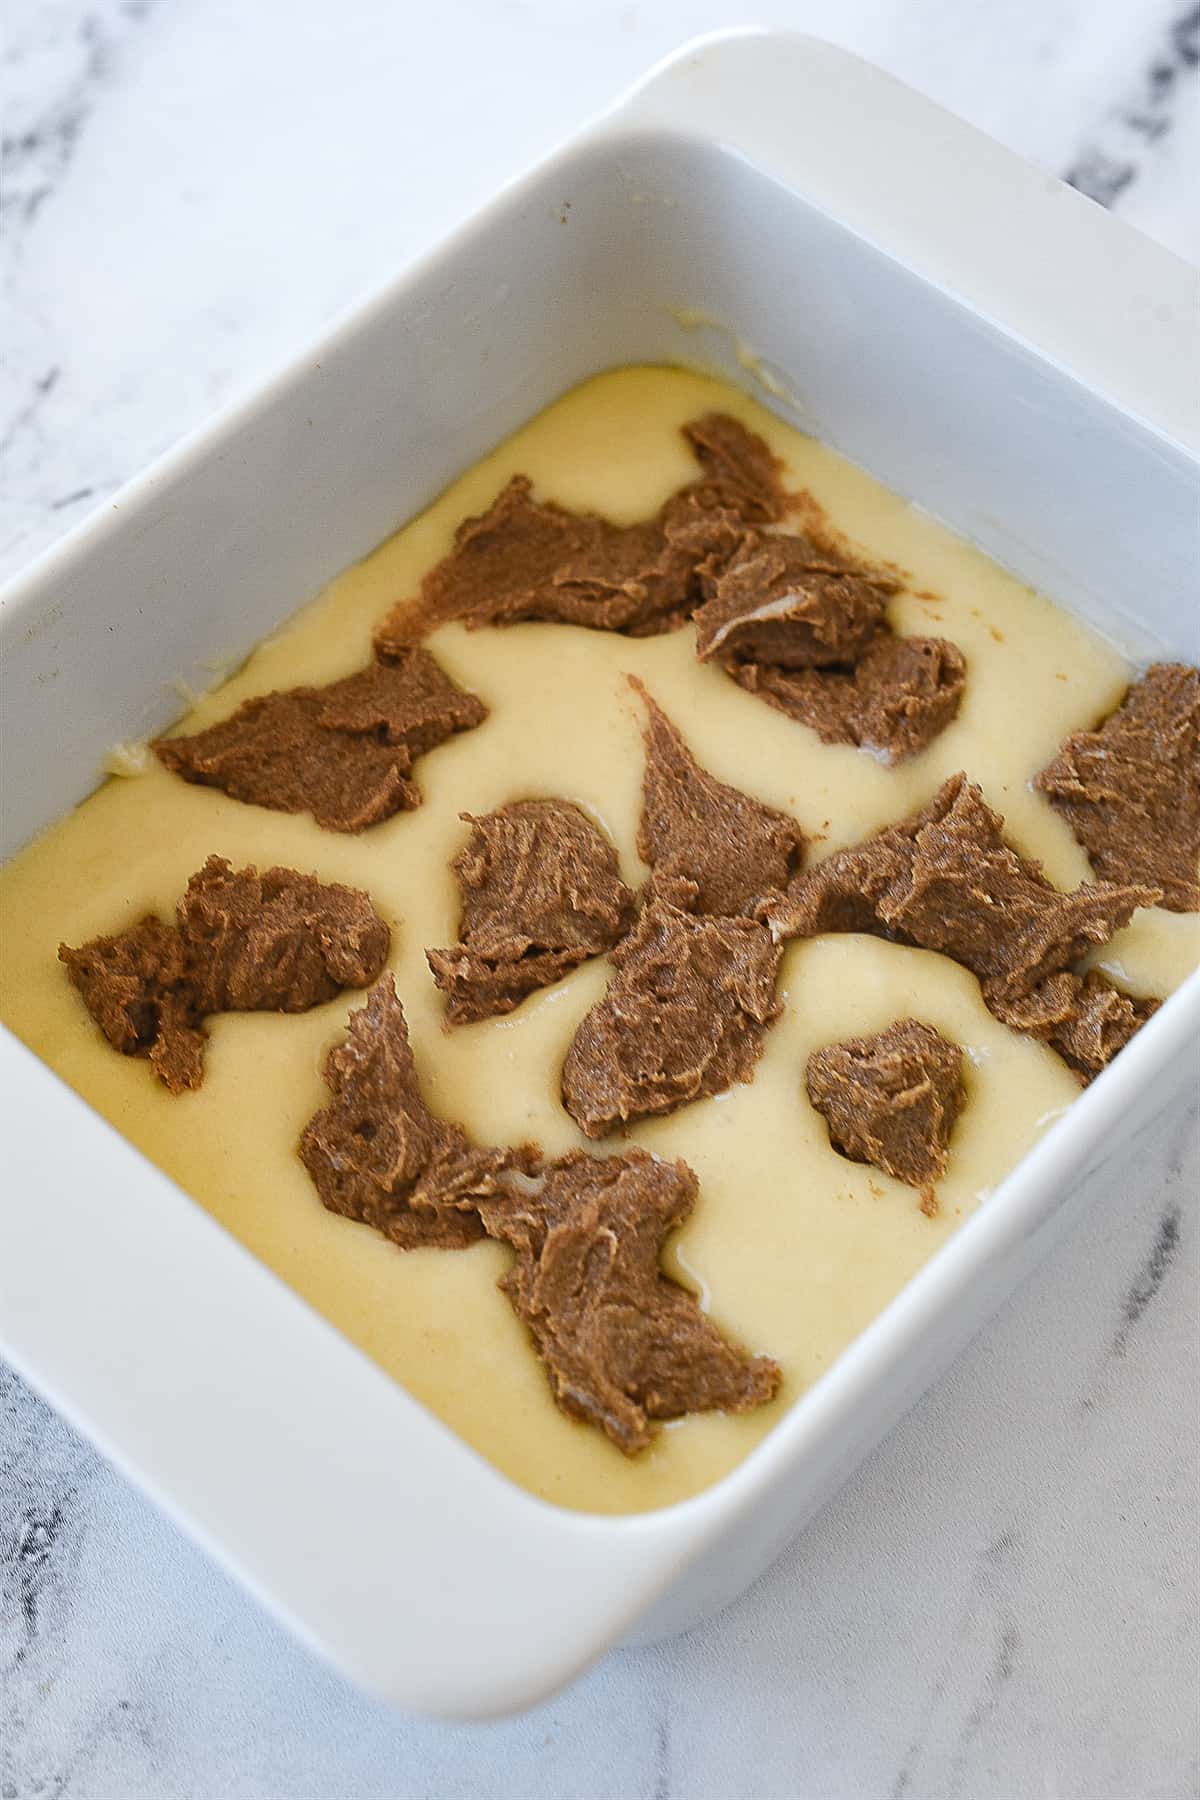
Spread mixture into a prepared baking dish and top with blueberries. Sprinkle with remaining sugar. Bake on the middle oven rack uncovered for 45 minutes to an hour, until the top is a light golden brown and a toothpick comes out clean.
Preheat oven to 350F degrees. Spray a 9×9-inch square baking dish with nonstick cooking spray and set aside.
In a medium bowl, stir together 1 cup self-rising flour with 1 cup granulated sugar. Add in 1 cup milk and then pour in 1/2 cup (1 stick) salted butter, melted and 1 teaspoon vanilla extract. Stir until combined.
Spread mixture into a prepared baking dish and top evenly with 2 cups fresh blueberries. Finally sprinkle the top evenly with 1/4 cup sugar
Bake on the middle oven rack uncovered for 45 minutes – hour, until the top is a light golden brown and a toothpick comes out clean.
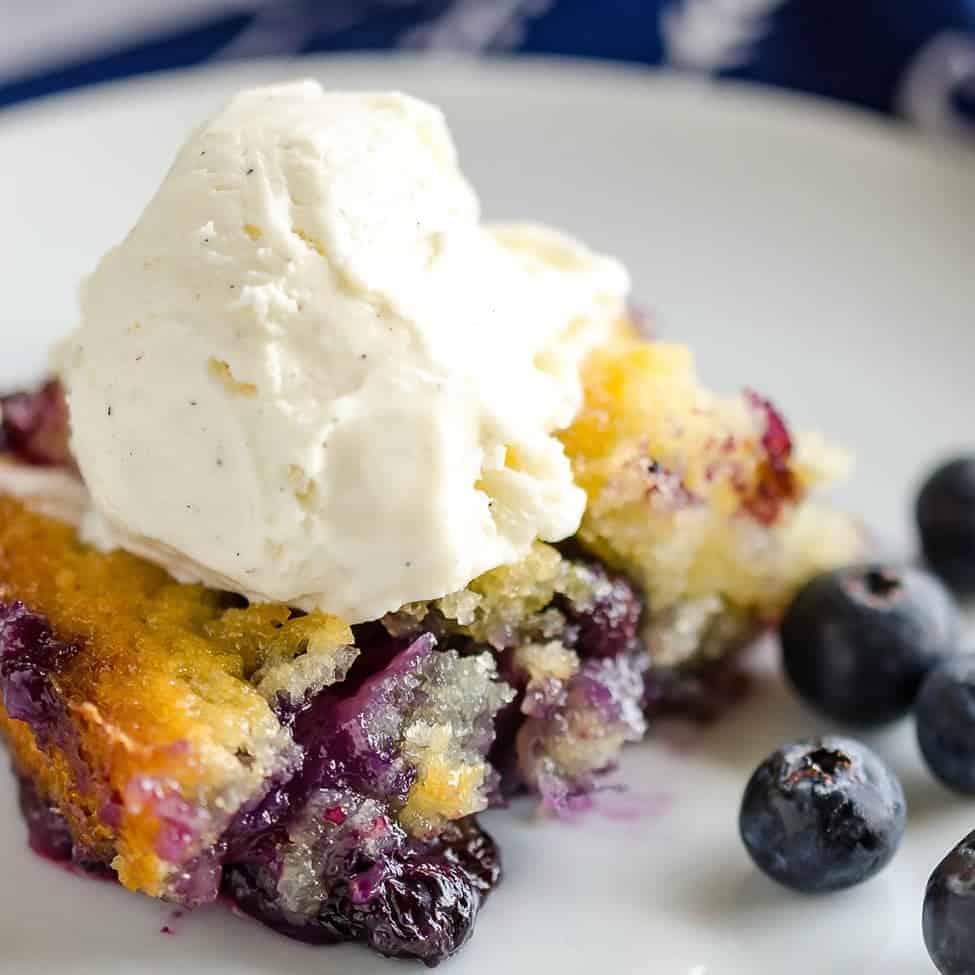
Allow to slightly cool before serving.
Video
Notes
To make self-rising flour: Whisk together one cup of all-purpose flour with 1 1/2 teaspoons of baking powder and 1/4 teaspoon of salt. Proceed with recipe as written.
This same recipe can be used with fresh strawberries, blackberries and raspberries.
]]>
https://mallize.com/blogs/news/how-to-declutter-a-house-to-sell-10-key-rooms-and-spaces2023-06-28T21:13:51-04:002023-06-28T21:13:51-04:00How to Declutter a House to Sell: 10 Key Rooms and Spacesadmin
After years of living in the same house, things might have become a bit…cluttered. The baby swing your eight-year-old won’t use again, the broken table you meant to fix, or closets overstuffed with clothes you haven’t worn in years. All of that is perfectly fine — why have a home if not to live in it? — until it comes time to sell. Now you may be asking, do I need to declutter to sell my house?
Decluttering your house can pay off — in both a higher sales price and fewer days on the market. Top real estate agent Michael Russo, who sells homes 57% faster than the average agent in Warwick, Rhode Island, says a home “will definitely sell quicker and for a higher price if the house is decluttered and looking good.”
But where to start? We’ll guide you through how to declutter a house to sell.
Connect with a Top Agent
If you’re starting to prepare your home for sale, hiring a great real estate agent is an important step to take. HomeLight data shows that top-performing agents sell homes faster and for more money than average agents.
Does decluttering and cleaning a house before selling really make a difference? Warwick says yes!
“When potential buyers are touring the house, they can better envision themselves and their possessions living there — their furniture, their belongings — which will enhance their interest and their offer amount,” he says.
One survey by Consumer Reports suggests that, as a home seller, you could see 3%-5% higher proceeds simply by decluttering and depersonalizing the space inside your home.
Here’s a list of decluttering benefits for home sellers:
You’ll receive higher offers
Your house feels larger and more open
Helps buyers imagine it’s their home
Your move will be easier
It highlights your home’s best features
Helps you emotionally separate from the house
You can redirect buyers’ eyes away from flaws
Helps with marketing and photography
Makes the home easier to stage
Room-by-room decluttering checklist to sell a house
If you’re overwhelmed and unsure where to start, take it room by room and try the “timer trick.” This method, favored by productivity and organization bloggers, gives you a structured chunk of time to focus solely on cleaning. Set a timer for 15 minutes, and devote the time to one step of the cleaning process. After all, anyone can do anything for 15 minutes, right? Repeat until your house is clutter-free.
Follow this 10-space checklist, and your home will be ready to sell in no time.
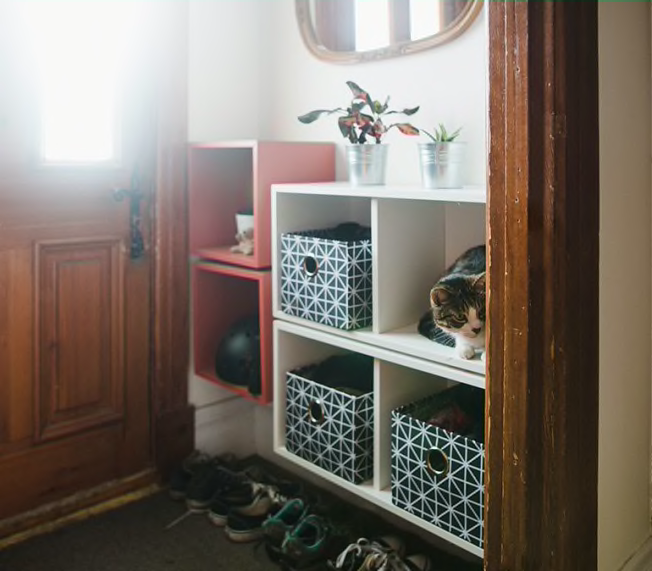
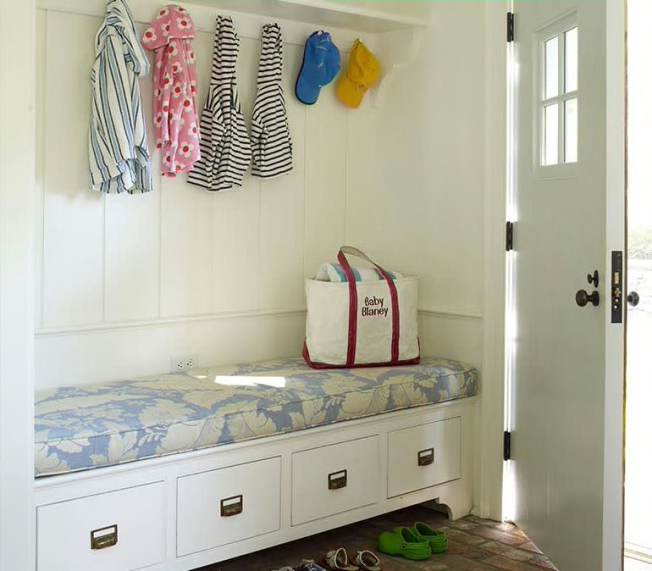
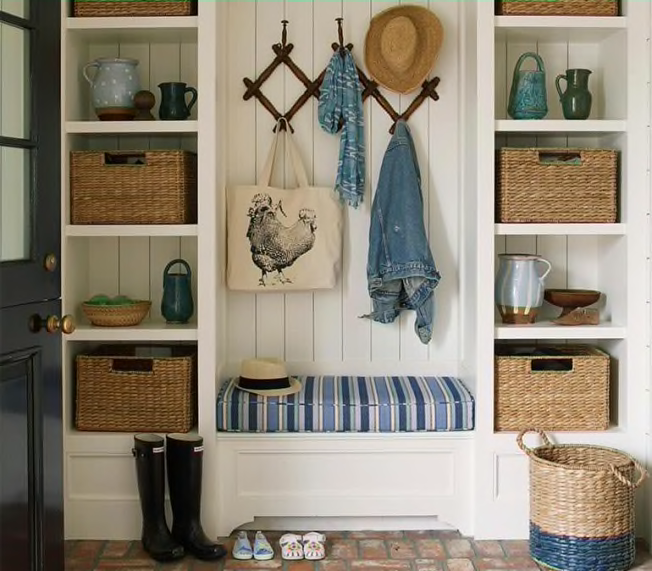
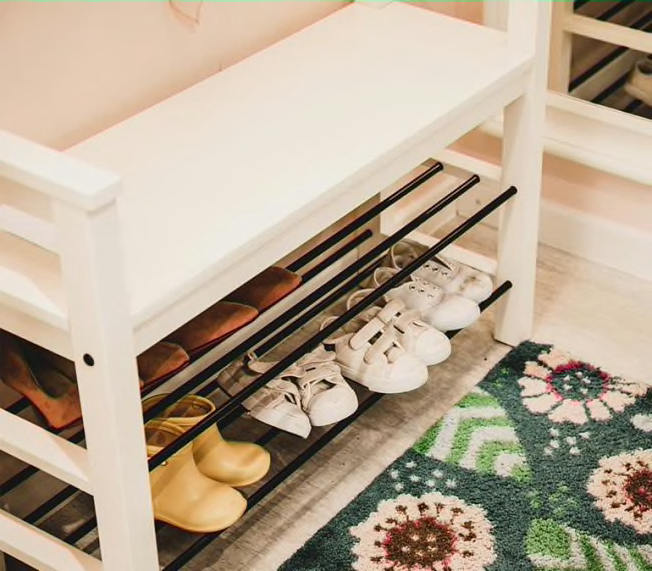
1. Entryway: Remove coats, shoes, hats, pet items
First impressions matter, so start at the front door. Remove and pack away out-of-season coats still hanging on the coat rack, multiple pairs of shoes, hats and gloves, and your dog’s leash. Get rid of the pile of mail and old cards sitting by the front door.
Professional organizer Andrew Mellen says that “Greeting cards with nothing more than a scribble in them have done their job — someone was thinking of you at a particular time and let you know it,” he says. “If they haven’t written anything significant, the moment has passed, and you can let go.” Sorting through some messes can take a considerable amount of time, and you might still need the dog’s leash within easy reach, so if you’re stuck here, place items in attractive storage boxes or baskets and hide them away.
If you’re pressed for time, Russo picked the kitchen and bath as the two most important rooms to declutter. “Remove all items from countertops, from on top of fridges, magnets on the front — make it look like nobody lives there,” he advises.
Toss out old, expired food, starting with the fridge and freezer and moving onto the cabinets and pantry. Throw away anything gross or mysterious. Budget 15 minutes per shelf, including time wiping down cabinet fronts and cleaning old spills.
While you’re throwing out expired foodstuffs, take a hard look at your pots and pans collection. Consider tossing any infrequently-used cooking tool, pot, pan, dish, or glass into a donation box. Tuck appliances into newly freed-up space in your cabinets, and consider bringing the toaster out for the five minutes a day that you use it.
3. Living room: Take away excess furniture, family photos
Old magazines in the rack beside the couch, books you haven’t read in years piled haphazardly on shelves, and that old armchair with the stuffing bursting from the arms — take a hard look at your living room when it’s time to get a house ready to sell. All of these will distract from the room’s appeal.
Start by clearing out everything that belongs in the trash or recycling bin — including old magazines or a broken lamp. If items from around the house have landed in the living room, sort them into bins color-coded by family members. Then, move them to their respective rooms.
And pack away personal photos and mementos — buyers have a hard time envisioning themselves living in a home if it’s your kid’s pictures hanging on the walls. You really need only one sofa and an accent table to indicate how to use the space. “A lot of times, we see that people just have too much furniture in the room for the size that it is,” Jeremy Kahler, a top real estate agent serving Rapid City, South Dakota, says. “Emptying that out helps it feel like a bigger area.”
4. Bedrooms: Open space in closets, drawers, under beds
In your bedroom, you want buyers to see that their bed, nightstands, and dressers will fit in the space. Making your own furniture visible can help. Clear off the bed so you’ll have somewhere to set laundry baskets, etc., while you clean. Tidy up books, tissues, and old glasses from the nightstand. Move under-bed storage out to the garage.
Sort through your clothes and donate items you haven’t worn in years. Create space in your closet, and make sure closet doors can open and shut easily. Buyers will be poking their noses behind closed doors!
Be picky about sentimental items — like your prom dress or a concert t-shirt. Mellen recommends paying close attention to these moments — namely, “the story you tell yourself” when you’re assessing whether or not to keep an item. “The story you may be telling yourself about how exciting the hunt to find it was, or how much fun you had when you were drinking cocktails with your friends are all good stories,” he says. “They just might not need to be stories you’re still telling yourself.”
In other words, if you’re holding onto an item for fear of losing a memory, let it go and trust yourself to remember the good.
5. Bathrooms: Organize towels, storage, bath and sink areas
According to Russo, “kitchens and baths sell houses.”
If you’re short on time, prioritize these rooms. In the bathroom, “remove all personal effects from showers, bathtubs, and vanity tops,” he says. Throw out half-empty bottles of shampoo and fold and hang up towels.
6. Home office: Remove paperwork, open up work surfaces
Russo says that before the pandemic, home offices weren’t as popular and could be smaller. But post-pandemic, people are still working remotely and prioritize them higher on their list. Clear away scraps of paper and books, but don’t think you have to get rid of everything.
“When it comes to decluttering, it’s okay to have your computer, your bookshelf, that shows that it’s functional and usable,” Russo says. “But you really want to keep it minimal, organized, and looking good.”
7. Child or playrooms: Thin down toys, furniture, kid’s art
It can be hard for kids to let go of beloved toys, but now is the time to weed out broken cars and playsets, stuffed animals that are less “stuffed” than split open, and toys they’ve outgrown. Take kids’ art down from the walls and consider repainting the dark black walls your teenager begged for. Homelight’s Top Agent Insights for Fall 2022 surveyed over 1,000 top agents nationwide, and 78% of them recommended that sellers paint tired rooms.
8. Hallways and windows: Clear sills, open walkways, add light
It’s easy for the windowsills to become a catch-all storage place for keys, paperwork, discarded gloves, and more. But cleaning them off allows your windows to shine (particularly if you’ve got a great view), lets in more light, and opens up the space. If shoes are piled in the hallways or on the stairs, clear them off. It should be easy for buyers to walk through your home.
9. Garage: Open up and organize space, throw out junk
If you’ve got the time, expand your decluttering beyond the house itself. Don’t worry if you’ve been using your garage as a place to store decluttered items. “You can put items in the garage if necessary, but organize them in a way where buyers can still see that, yes, you can actually put a car in here,” Russo says. The key is to organize tools, boxes, and the lawn mower so that buyers can see that the garage is usable.
10. Yard and garden: Mow, trim, plant, hide and toss
Adding a firepit, lighting, or seating can spruce up a starter home — 14% of agents in the Homelight survey recommended it. And these fixes are often cheap and add a lot to curb appeal. A new layer of mulch, some fresh flowers, and buyers may overlook some of the yard’s flaws.
While you’re at it, put in some sweat equity. Trim dead branches off trees and bushes, plant new bushes to hide unsightly fixtures like an air conditioning unit, and rake up any dead leaves.
Other benefits of decluttering
In a seller’s market, it’s easier to sell a house full of stuff. But, as many markets across the country have shifted, it’s more important to give your home every advantage. Removing clutter helps other professionals — all of whom are helping sell your house — do their job.
It’s easier for a photographer to navigate around the house and take the best pictures to highlight its features if they’re not tripping over or moving boxes of stuff. Stagers can come in and use an empty space.
And, as Kahler reminds us, “Neutralizing your space is important because buyers need to picture themselves and their family in the home.”
Conclusion: Declutter to sell — it’s only temporary
Maximalists may struggle to live in a minimal home, and it can be tough to stay on top of kids who want to haul all toys to play. So remember, “It’s for a short period of time,” Kahler says. “If you get the house ready and do it well, it’ll sell in a shorter amount of time so that you can basically make the move and get back to living and decorating it the way you want.”
Still not sure where to start decluttering? A top agent can walk through your home and give you a fresh perspective. They’ll point out where small tweaks can yield big rewards, and they’ll know what buyers in your market value. HomeLight can connect you with a top-performing, trusted agent in your market who can help you declutter and sell fast. We analyze over 27 million transactions and thousands of reviews to determine which agent is best for you based on your needs.
]]>
https://mallize.com/blogs/news/cruise-ship-restaurant-nirvana-the-9-best-meals-you-can-have-at-sea2023-06-27T21:13:52-04:002023-06-27T21:13:52-04:00Cruise ship restaurant nirvana: The 9 best meals you can have at seaadmin
When it comes to onboard restaurants and dining, cruise ships often get a bad rap. There’s a storyline out there that cruises are little more than gorge fests, prioritizing quantity over quality.
After writing about cruising for nearly 30 years, I can tell you this is far from the truth. Quality dining has always been a big part of the cruising experience, and cruise ship restaurant offerings only have improved over the years.
You’ll now find standalone restaurants on high-end cruise ships created and overseen by some of the world’s most famous chefs, including Thomas Keller and Jacques Pepin.
For more cruise guides, news and tips, sign up for TPG’s cruise newsletter.
But even on the largest mass-market cruise ships, the food is getting ever more elaborate and diverse. Norwegian Cruise Line brags that its biggest vessel, Norwegian Encore, has more than 20 different food venues — everything from a casual barbecue restaurant (with live country music) to a high-end Italian spot from the creators of New York City’s Scarpetta.
Some mainstream lines, such as Princess Cruises and Celebrity Cruises, even have called in chefs from Michelin-starred restaurants to help them design entire culinary programs.
Over the years, as part of testing and reviewing nearly 200 vessels operated by 41 different lines, I’ve eaten at pretty much every cruise ship restaurant.
Just like at resorts on land, there’s incredible diversity out there. Some are great. Some aren’t. Some are too pricey for what they are. Others are bargains.
But the bottom line is there are a lot of wonderful restaurants on cruise ships. Below are my picks for the very best cruise ship restaurants at sea. As you might expect, many of my favorites are on higher-end ships, but several of the top restaurants can be found on the bigger, more affordable cruise ships.
Manfredi’s
Where you’ll find it: All Viking ocean and expedition ships.
Manfredi’s on Viking Star. ANTHONY WELLER/VIKING
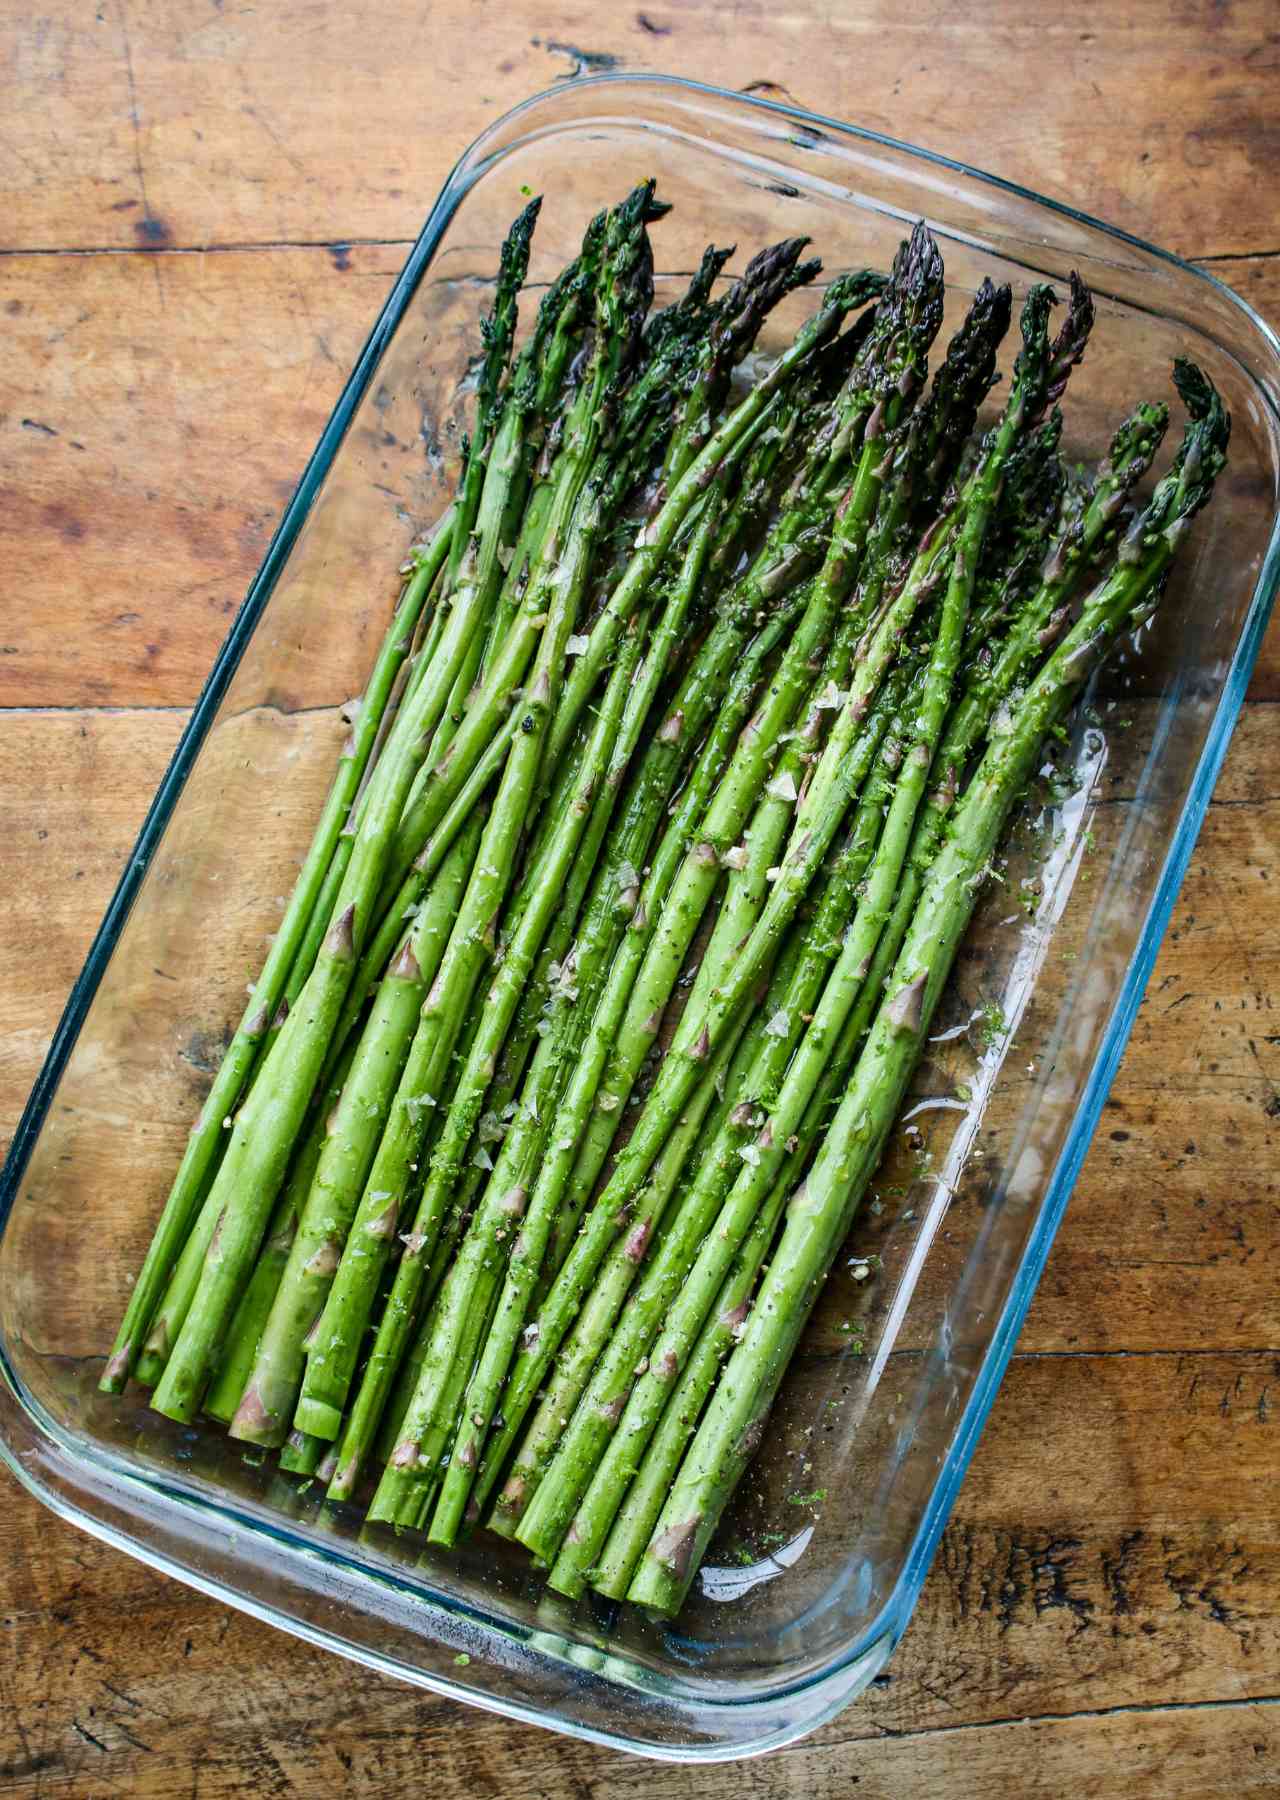
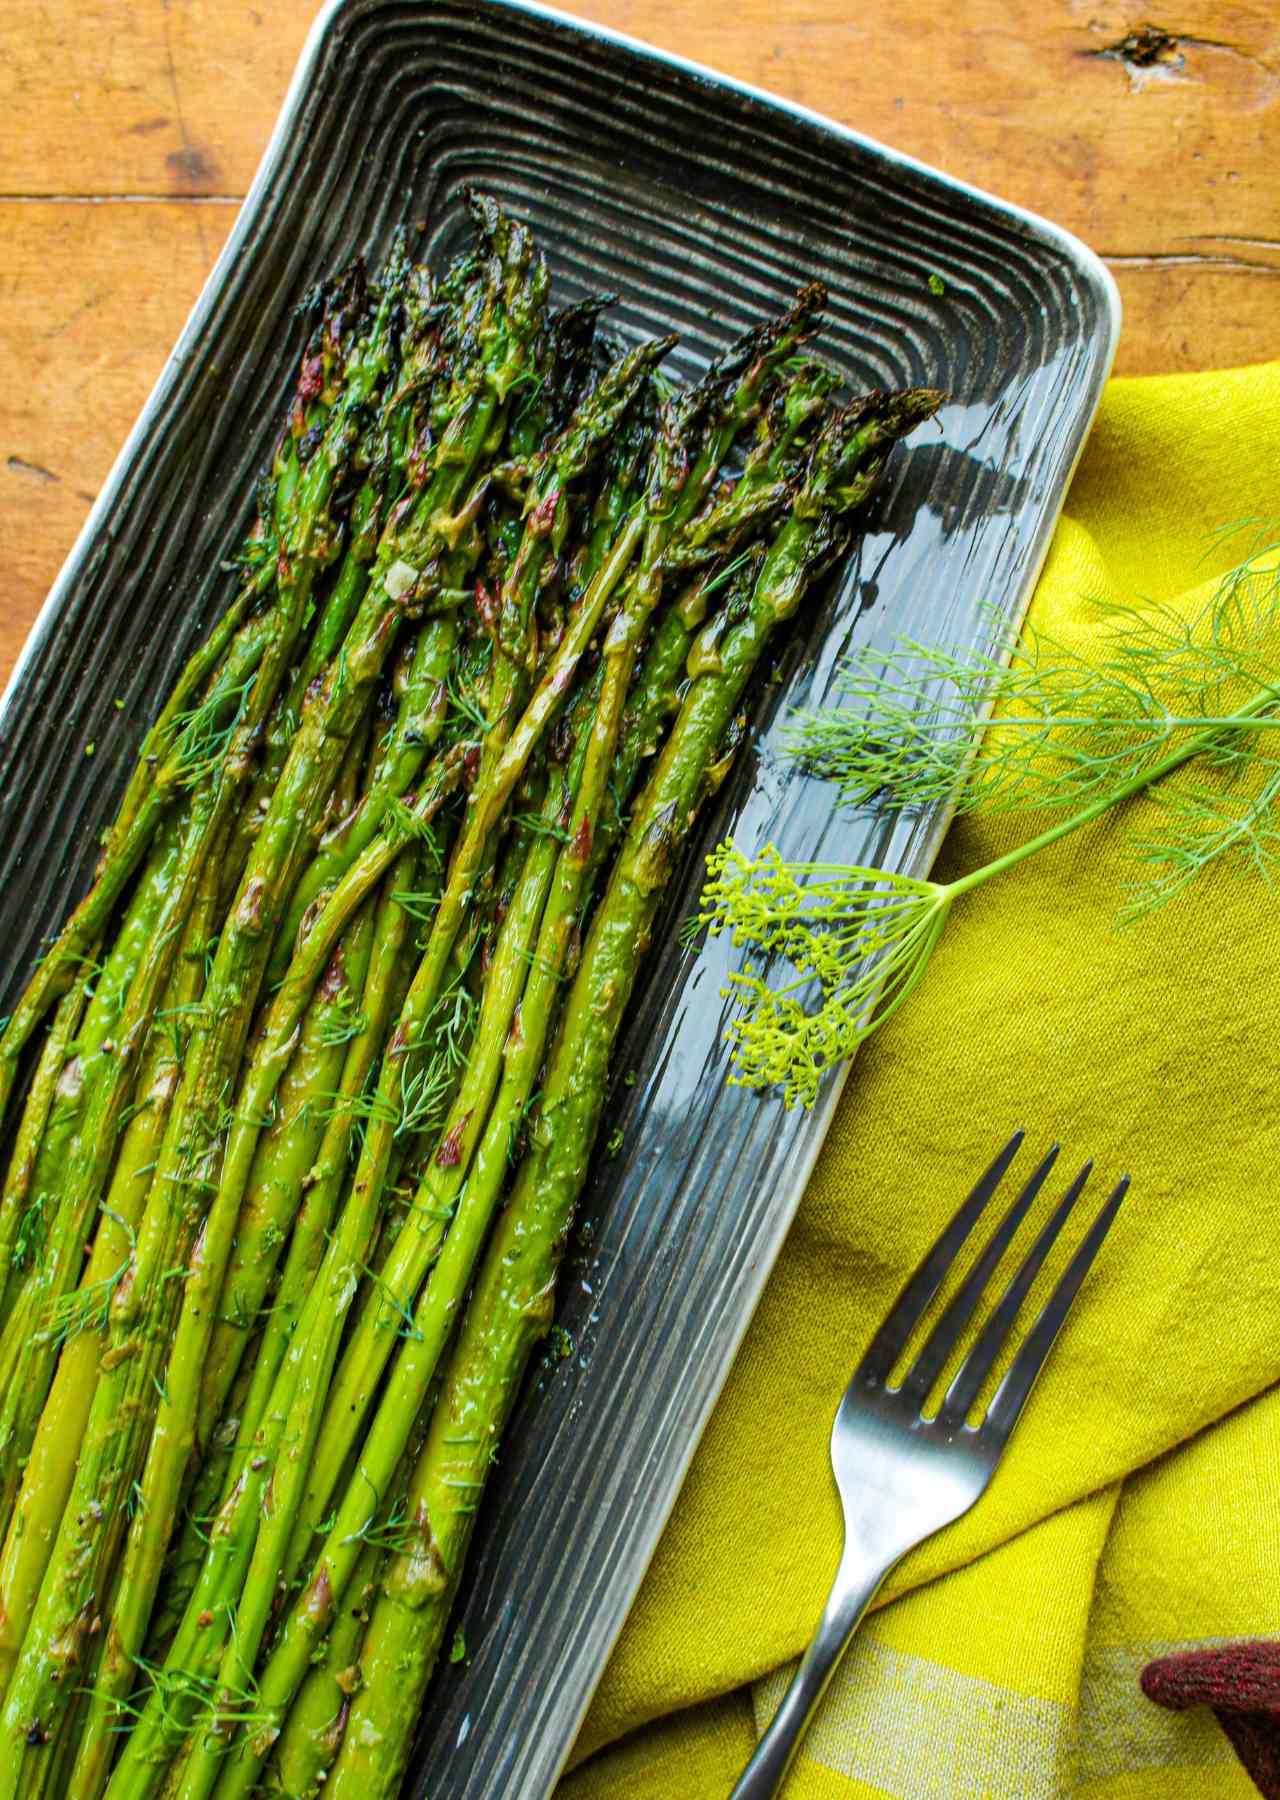
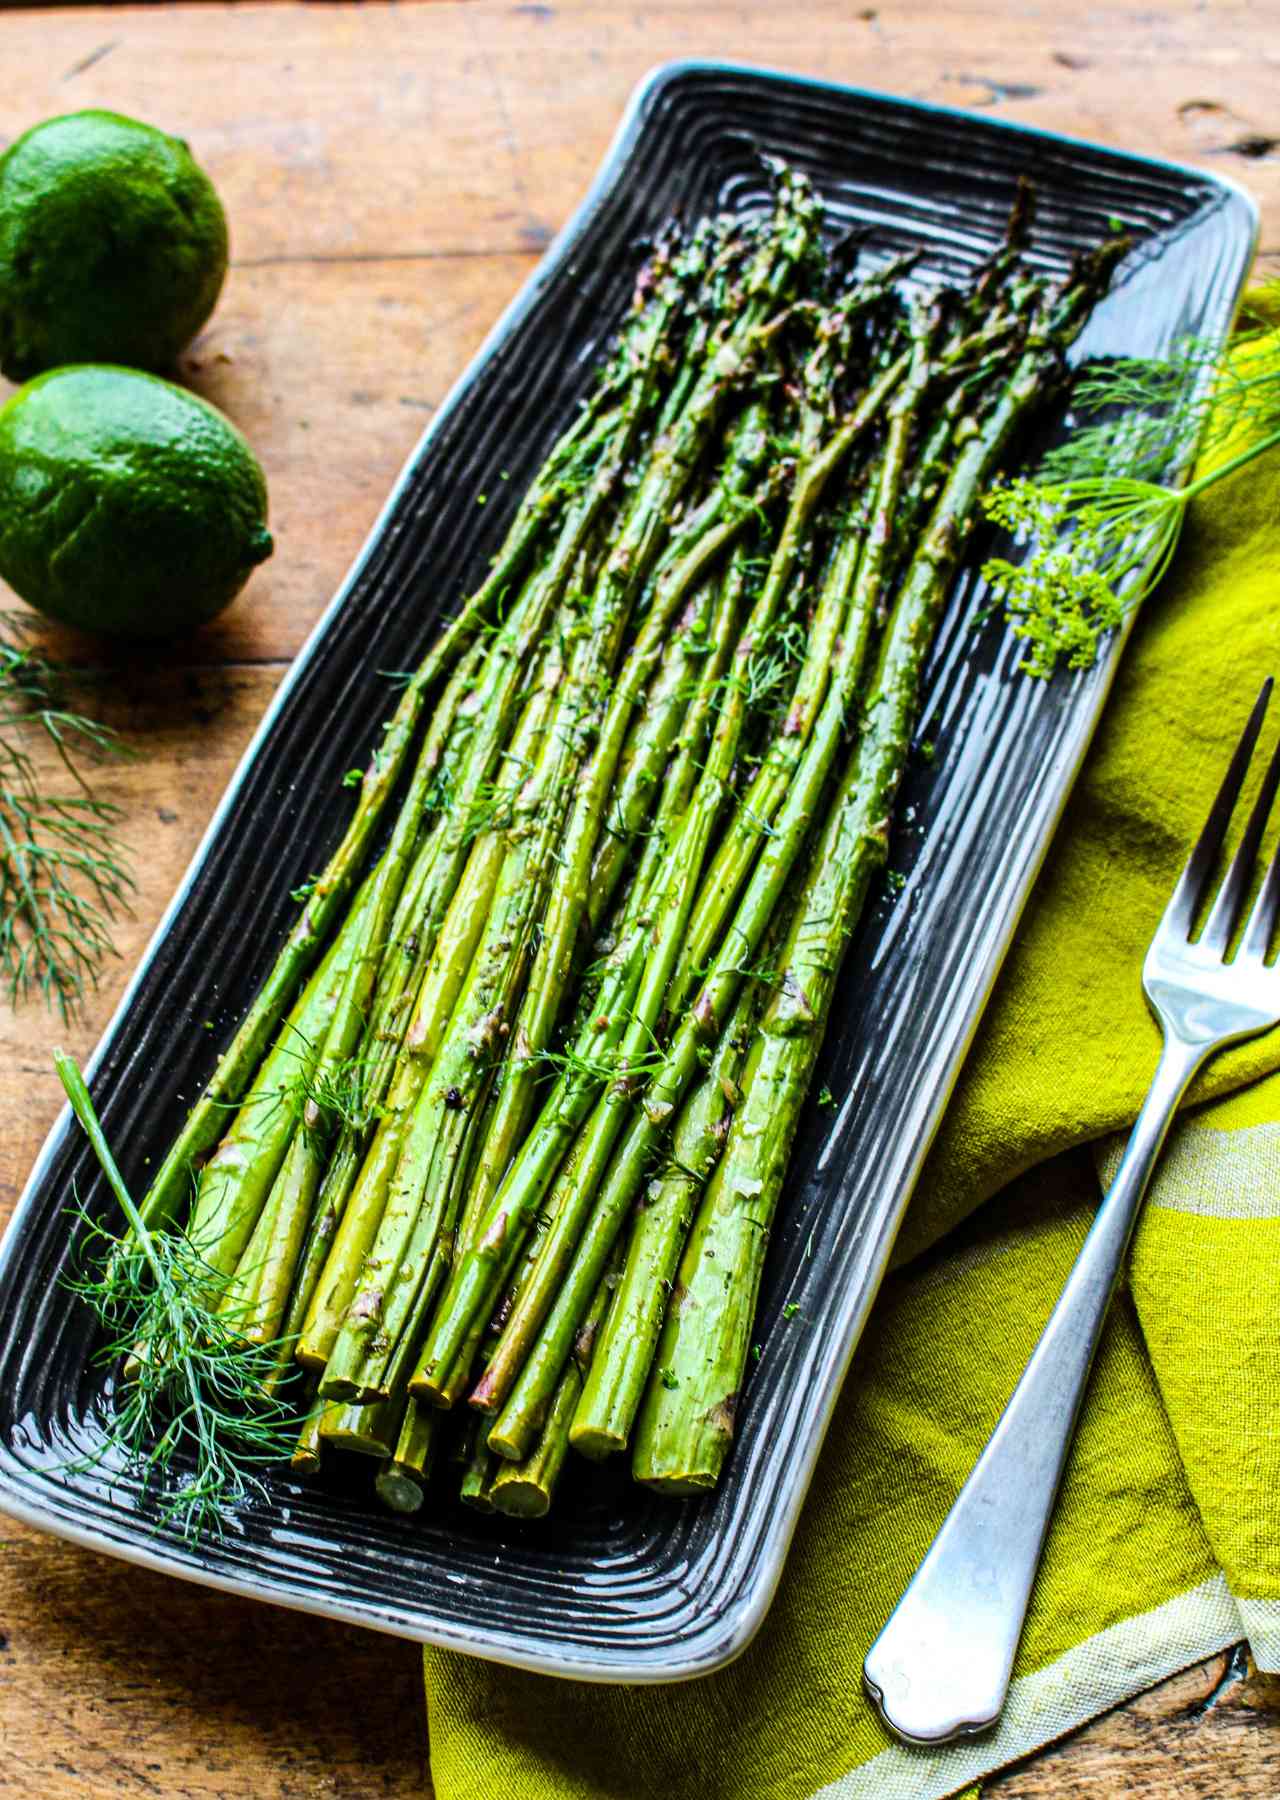
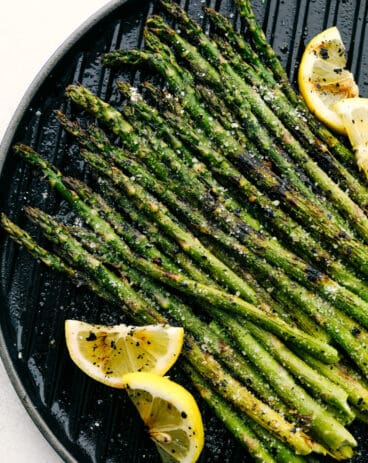
Found on every Viking ocean and expedition ship, Manfredi’s is our hands-down pick for the best Italian restaurant at sea. It serves up authentic and hearty Tuscan and Northern Italian specialties such as bistecca fiorentina and osso buco alla Milanese. Appetizers range from hand-cut beef tartare to — our favorite — a chilled asparagus and polenta dish that’s served with a perfectly poached egg, Parmigiano Reggiano and truffle dressing.
Here’s a bit of trivia: Manfredi’s was named after Manfredi Lefebvre d’Ovidio, who once owned one of Viking’s rivals, Silversea Cruises. Viking chairman Torstein Hagen and Lefebvre are friends. If you’re a cruising aficionado, be sure to hunt among the photos on the wall for the images of Lefebvre and Hagen experimenting with recipes during the restaurant’s creation. The Italy-born Lefebvre supposedly shared some of his favorite childhood recipes for the venue.
Cost: There’s no extra charge to dine at Manfredi’s, but reservations are required. Passengers are entitled to one visit per voyage (those staying in top suites can go twice).
Red Ginger
Where you’ll find it: Oceania Cruises’ Marina, Riviera, Sirena and Vista.
The Red Ginger restaurant on the Oceania Cruises ship Sirena. OCEANIA CRUISES
Red Ginger may be the most gorgeous restaurant you’ll ever see on a cruise ship. With a nod to feng shui, it radiates harmony and tranquility with ebony woods, a soothing waterfall wall and striking, modern Asian artworks. But it’s not just a pretty place: It’s a den of yumminess, too.
Found on four Oceania Cruises ships — Marina, Riviera, Sirena and Vista — Red Ginger offers classic Asian dishes with a contemporary twist, all dreamed up by Oceania’s well-regarded, in-house culinary team with input from famed chef Jacques Pepin. We’re talking about miso-glazed sea bass wrapped in a hoba leaf, and sole tempura with an orange ponzu sauce and spicy daikon. For dessert, don’t miss the lemongrass creme brulee.
Cost: There is no extra charge to dine at Red Ginger, but reservations are required. Passengers are entitled to one visit per voyage (those staying in top suites can go twice).
The Grill by Thomas Keller
Where you’ll find it: All Seabourn ships except Seabourn Venture and Seabourn Pursuit.
The Grill by Thomas Keller on Seabourn Encore. SEABOURN
Getting a table at one of Thomas Keller’s restaurants on land isn’t easy; if you manage to snag one, you’ll pay for the privilege. For instance, the price of a dinner at Keller’s flagship in New York, Per Se, is fixed at $390 per person for a nine-course tasting menu, not including drinks or tax (the latter alone adds another $35 per person to the tab).
But you can avoid the hassle of snagging a reservation for a Keller meal — and the cost — by booking a Seabourn cruise. Every passenger on Seabourn’s ships can sample Keller’s cuisine throughout the main restaurants.
Most Seabourn vessels also have a dedicated restaurant, The Grill by Thomas Keller, which offers Keller’s take on classic American chophouse fare with New York Strip steak, lobster thermidor and Dover sole meuniere. For dessert, there are ice cream sundaes and a seven-layer coconut cake.
In my view, Keller’s extraordinary talents are wasted a bit on such traditional fare (his creativity comes through much more with the dishes he created for Seabourn’s main restaurants), but the dishes at The Grill by Thomas Keller are done superbly.
Cost: There’s no extra charge to dine at The Grill by Thomas Keller, but reservations are recommended. Passengers can make reservations in advance of their sailings online on a first-come, first-served basis, up until 15 days before departure. Reservations also can be made on board.
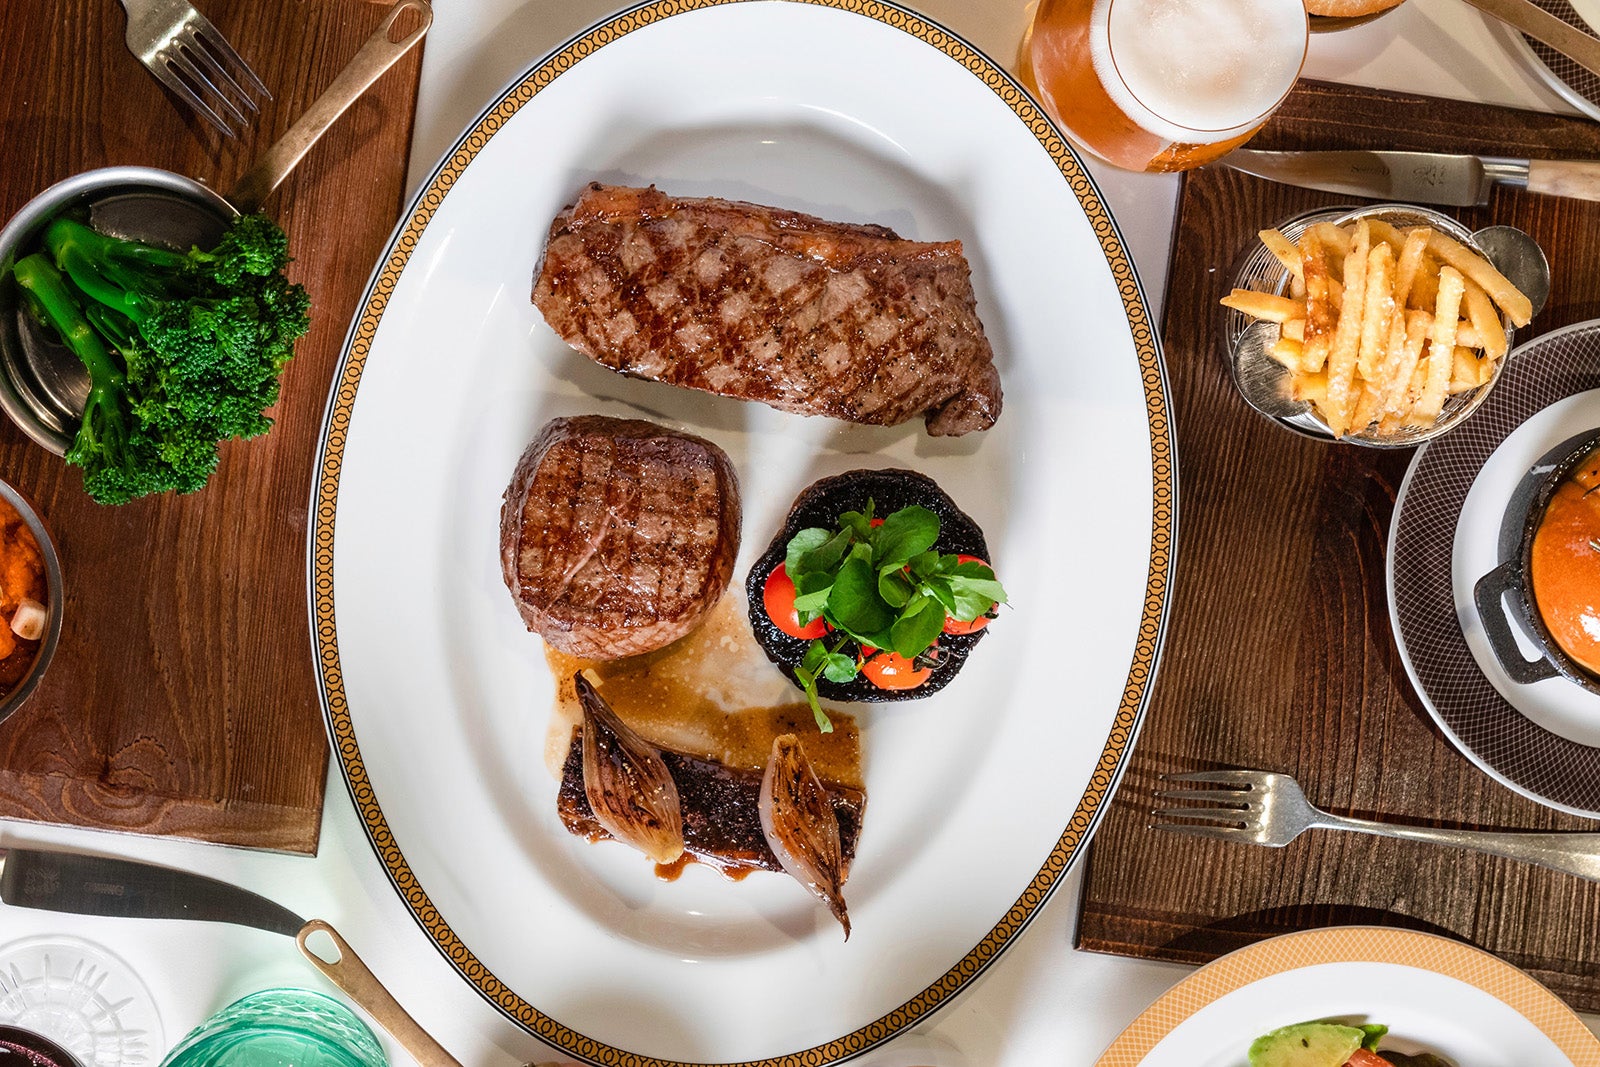
A server presents entree options at the Fahrenheit 555 steakhouse on Carnival Breeze. ANDY NEWMAN/CARNIVAL CRUISE LINE
One of the great paradoxes of the cruise world is that one of the lowest-cost operators — Carnival Cruise Line — has one of the best steakhouses at sea. At a fixed price of $48 per person, Fahrenheit 555 also is a relative bargain compared to similar steakhouses on land.
Found on Carnival’s six most recently built ships plus a few others, Fahrenheit 555 offers all the steakhouse staples, from a 14-ounce New York strip to a nine-ounce filet mignon (both USDA Prime, aged 28 days). Other entree choices include an appropriately marbled hunk of Australian Wagyu beef, grilled lamb chops and Dover sole. Starters include Heritage Berkshire pork belly, bone marrow and hand-cut beef tartare, and — of course — jumbo shrimp cocktail.
Carnival has a long tradition of offering high-end steakhouses on its ships. The line began rolling out steakhouses in 2001 with the debut of its Spirit-class ships (where, in one of the great quirks of cruise ship design, the steakhouses are located in red domes that form the forward portions of the ships’ funnels). There now are steakhouses on 23 of Carnival’s 25 vessels, with varying names and decor. When it comes to culinary offerings, they’re all similar to Fahrenheit 555.
Cost: $48 per person.
La Dame
Where you’ll find it: All Silversea ships except Silver Explorer and Silver Origin
La Dame serves high-end French cuisine. SILVERSEA CRUISES
The premier restaurant on Silversea Cruises ships is a temple to high-end French cuisine. Named after La Dame de Paris, aka the Eiffel Tower, it serves such classic dishes as filet of Limousin beef, grilled rack of lamb and pan-fried Dover sole. The menu includes two different styles of foie gras, as well as caviar.
As you might expect for a fancy French venue, the service is all white-glove elegance in a refined but contemporary setting. As you might not expect on an upscale all-inclusive cruise line, the restaurant does have a hefty cover charge.
Cost: $60 per person.
Pacific Rim
Where you’ll find it: Regent Seven Seas Cruises’ Seven Seas Explorer and Seven Seas Splendor. It’ll also be on Seven Seas Grandeur, which debuts in late 2023.
Pacific Rim serves Asian cuisine in a stylish setting. REGENT SEVEN SEAS CRUISES
Another one of my favorite cruise ship restaurants is Pacific Rim, found on the two largest Regent Seven Seas Cruises vessels. Serving pan-Asian cuisine, it’s elegant and upscale — as you would expect from one of the world’s leading luxury lines — and has a mouthwatering menu. Signature dishes include grilled Korean barbecue lamb chops (served with wok-fried Brussels sprouts and gochujang sauce) and a miso black cod wrapped in a hoba leaf. Signature appetizers include a crispy soft-shell crab served with a kizami wasabi mayo.
For dessert, don’t miss the chili chocolate mousse. True to its name, it’s infused with chile and wonderfully spicy. For something more neutral, my pick is the green tea panna cotta, served with mango and a lychee ragout.
Cost: There’s no extra charge to dine at Pacific Rim, but reservations are required.
Where you’ll find it: Celebrity Cruises’ Celebrity Edge, Celebrity Apex and Celebrity Beyond. It’ll also be on Celebrity Ascent, which debuts in December 2023.
STEVE DUNLAP/CELEBRITY CRUISES
Celebrity Cruises has created a temple to gastronomy with Eden Restaurant, found on its new Edge-class ships. Located at the back of each vessel in a whimsical glass-walled and plant-filled dining and entertainment space called Eden, it offers a recently revamped, fixed-price menu with a choice of three appetizers, three entrees and two desserts.
In a sharp departure from Eden Restaurant’s original concept of mesmerizingly imaginative dishes with fanciful names and often exotic ingredients, the new menu offers such classic dishes as filet mignon and mini short rib Wellington with mashed potatoes, vegetables, mushrooms and bordelaise sauce, and slow-cooked halibut — all cooked perfectly.
Cost: $65.
Remy
Where you’ll find it: Disney Cruise Line’s Disney Dream and Disney Fantasy.
Remy restaurant on Disney Dream. MATT STROSHANE/DISNEY CRUISE LINE
For the most part, the food on Disney Cruise Line ships is just so-so (in my opinion, at least). It’s a line you book for its great family entertainment, not cuisine. But Remy is the great exception — a dining experience that is among the finest at sea.
Created by two renowned chefs (Arnaud Lallement of France’s three-Michelin-starred l’Assiette Champenoise and Scott Hunnel of Disney World’s high-end Victoria & Albert’s), it offers exquisitely presented, French-inspired cuisine of the highest quality in an elegant setting at one of the highest prices of any cruise ship eatery.
Like pretty much all venues on Disney ships, Remy has some whimsical Disney touches. Named after the rat hero in the Disney animated film Ratatouille, it has his stylized likeness worked into the art nouveau design. But there’s nothing Mickey Mouse about the restaurant’s sophisticated decor and finishings, which include high-end Frette linens, Riedel glassware, Christofle silverware and gold-cushioned stools to hold ladies’ purses. This is a fine dining establishment where you wear a jacket or cocktail dress to dinner while savoring mouth-watering small plates of duck, quail, Wagyu beef, king crab and the like.
Cost: Tasting menus for $125 per person, not including wine; $230 per person including wine pairings with each course. A brunch service also is available for $75 per person.
Steakhouse at the Verandah
Where you’ll find it: All Cunard Line ships
Steakhouse at The Verandah. CUNARD
Steakhouse lovers will find another great option in Steakhouse at The Verandah, located on all Cunard vessels. It’s a shrine to the most indulgent, marbled and mouth-watering cuts of beef, from 35-day dry-aged Scotch grass-fed Black Angus to Australian grass-fed Wagyu beef (the latter for an $30 upcharge). It also serves up seafood options such as grilled whole Dover sole and Maine lobster. Appetizers include clam chowder and lobster cocktail.
At a price of just $45 per person if booked in advance of sailing (with a few supplemental charges for premium items), it’s a great bargain in my book — at least compared to fine steakhouses on land.
Cost: $45 per person if booked in advance of sailing; $50 per person if booked on board. A few premium dinner items come with extra “supplemental” charges. The steakhouse also is open for lunch at a cost of $25 per person if booked in advance of sailing; $30 per person if booked on board.
Bottom line
Good food is plentiful on cruise ships, where you will even find a few truly world-class restaurants. Some of the same chefs behind the best-known restaurants on land have turned their attention to restaurants at sea in recent years, making it easier than ever to have a knockout meal during your cruise.
]]>
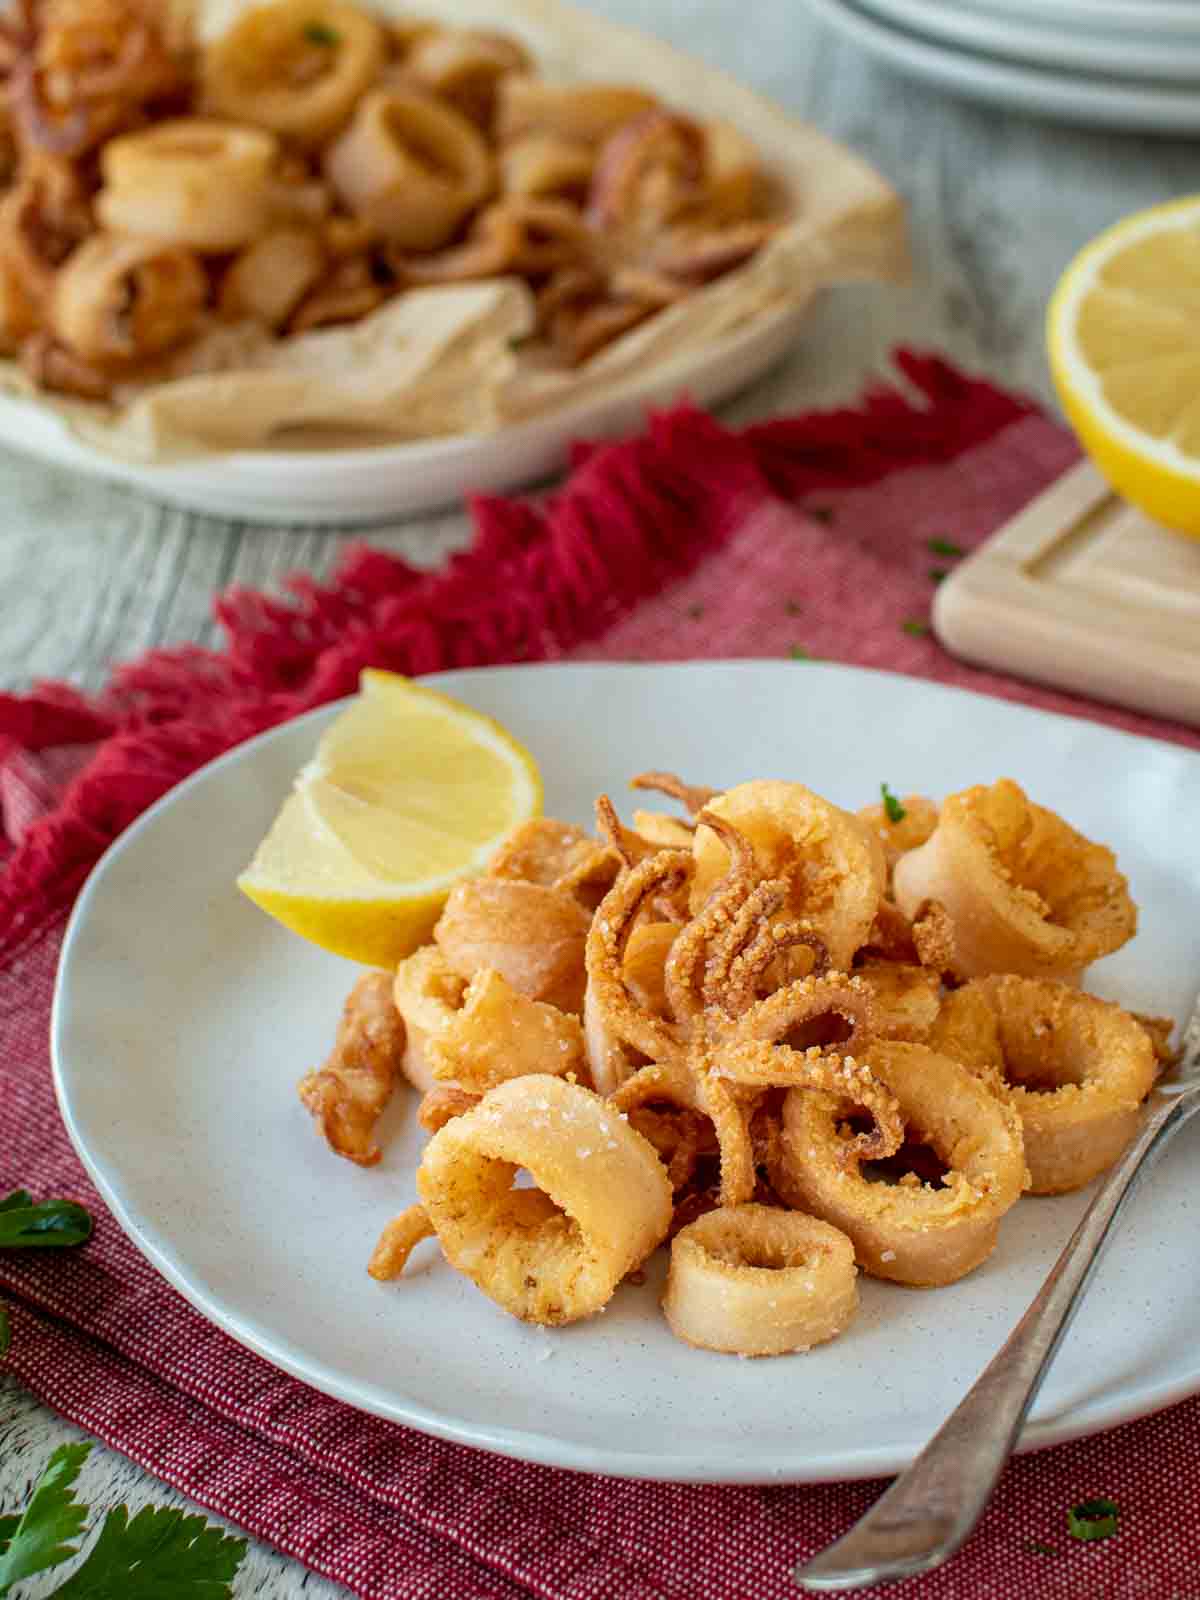
https://mallize.com/blogs/news/how-to-make-roman-style-pan-pizza2023-06-27T09:13:52-04:002023-06-27T09:13:52-04:00How to Make Roman Style Pan PizzaadminUncover the secrets of creating an authentic Roman-style pan pizza at home and master the art of crafting its signature thick, airy crust.
Roman-style pan pizza, or ‘pizza al taglio’ as it’s known in Italy, is a quintessential part of Roman food culture that traces its roots back to the bustling pizzerias of post-World War II Rome. During a time when resources were scarce and convenience was key, innovative bakers created a pizza that could be baked in large rectangular trays, cut into easily manageable squares, and sold by weight. The result was a thick yet airy crust, crispy on the outside and fluffy within, providing a satisfying bite with each piece.
As time passed, this style of pizza evolved from being a symbol of a city recovering from the ravages of war to a culinary masterpiece representative of the laid-back and inclusive dining culture of the Eternal City. From simple cheese and tomato to gourmet combinations like ham and truffle oil, the variety of toppings mirrors the diversity and vibrancy of Roman life itself.
Roman-style pan pizza is more than just a meal. It’s a communal experience shared between friends, family, and strangers, an edible emblem of Rome’s enduring spirit. Unlike its thin-crust sibling, which is often eaten on the go, this heartier version invites you to sit down, slow down, and savor the moment. It’s a testament to Rome’s resilient past, its dynamic present, and its promising future, all wrapped up in one delightfully flavorful package.
Baking a Roman-style pan pizza at home is an adventure in culinary artistry that rewards your patience with incredibly tasty bites of pizza. Here are some tips to ensure success:
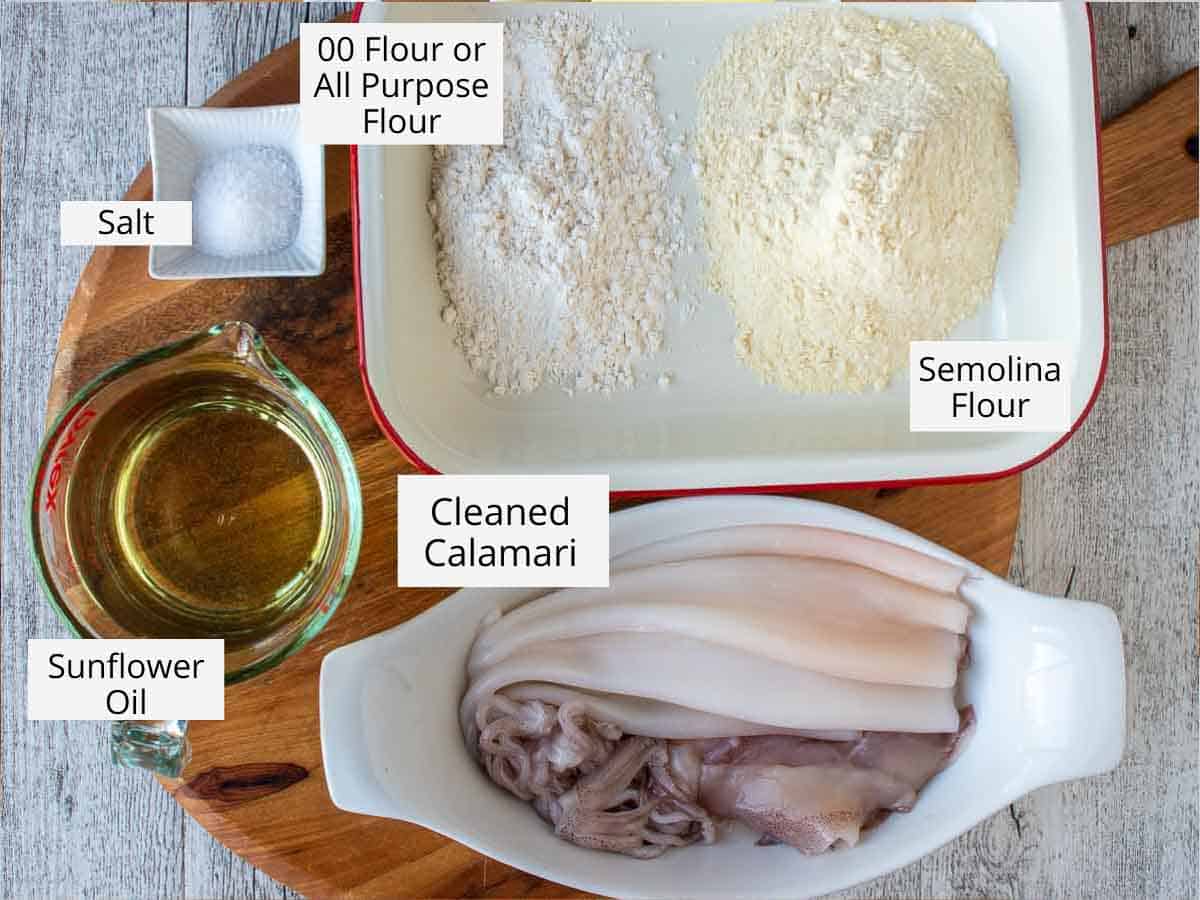
Choose Quality Ingredients:
Start with top-tier tipo 00 flour, like Mulino Marino from Eataly, and use high-quality dried or instant yeast. The Pelati tomatoes, with their vibrant taste, bring a unique touch of Italy to your dish. Extra virgin olive oil and sea salt are key for flavor.
Mixing and Kneading:
Your dough mixture will be wet, but don’t fret. The hydration leads to a perfectly crispy yet airy crust. When folding on your floured work surface, treat the dough delicately to preserve air bubbles which contribute to the desirable texture.
Rest and Fold:
The dough needs time to rest and develop gluten strength, so remember to give it those 15-minute breaks between folds. It’s a gentle process of tending to your dough which will become less sticky and more springy with each pass.
Fridge Time:
Allow your dough to rest in the refrigerator for 24 hours. This slow fermentation develops a deeper flavor, creating a more complex and tasty pizza.
Preparation:
Let the dough come to room temperature before working with it. This will make it easier to shape. Preheat your oven to a blazing 500°F to mimic the powerful ovens found in Roman pizzerias.
Shaping the Dough:
Gently press down the dough, starting from the edges moving to the center. This method helps to maintain the air bubbles within. Then, flipping and massaging the dough further helps distribute it evenly.
Pan Time:
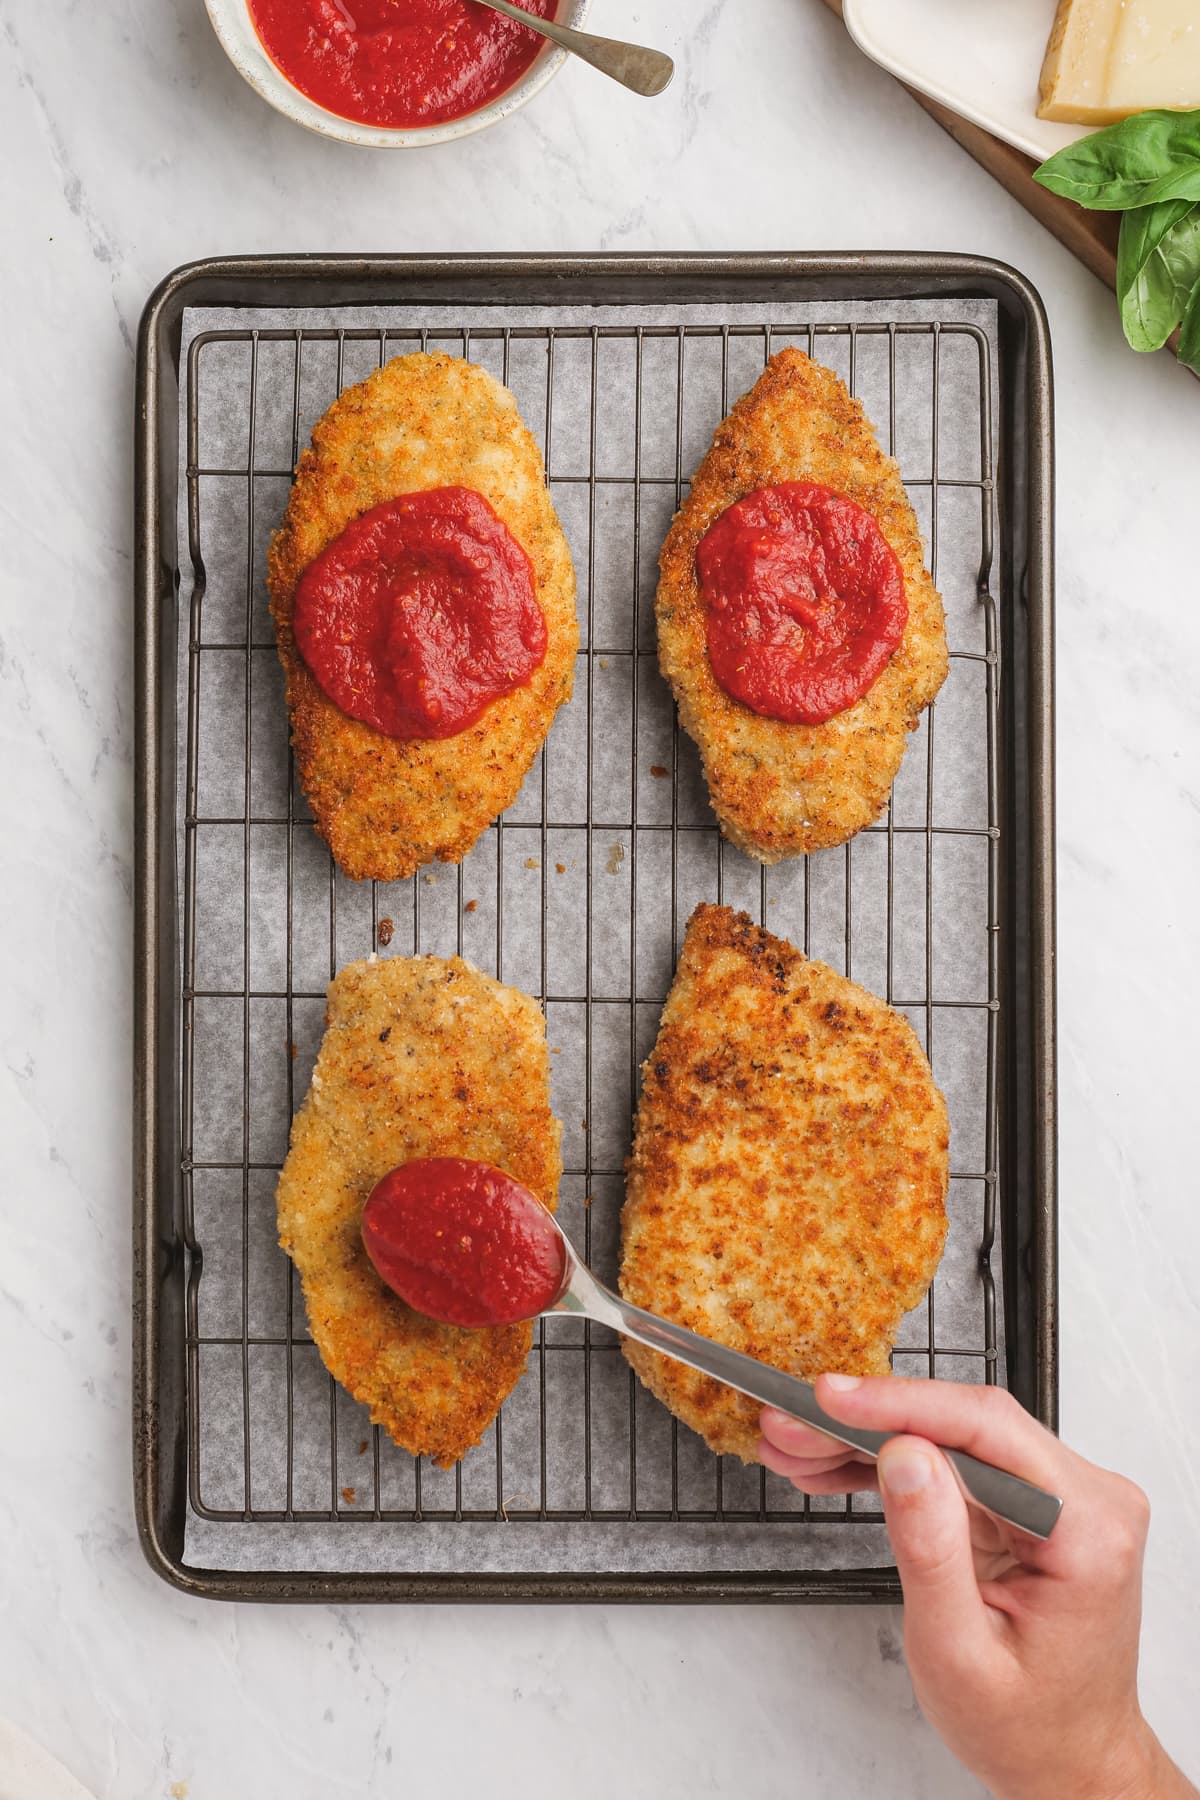
The dough’s final home is your oiled baking sheet. Stretch it gently toward the edges of the pan, being careful not to deflate the dough. Add your crushed, seasoned tomatoes evenly across the top, drizzling with olive oil for an extra flavor boost.
Bake:
For the first 5 minutes, place your pan on the bottom floor of the oven. This blast of heat kickstarts the crust’s crunch. Then move it to the bottom-middle rack for an additional 15 minutes to ensure even cooking.
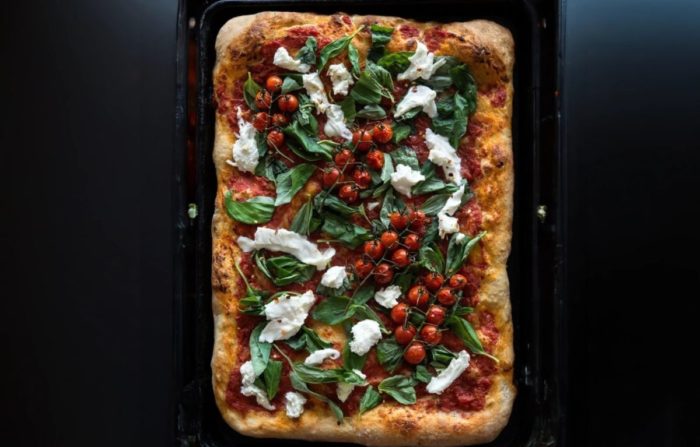
Topping and Serving:
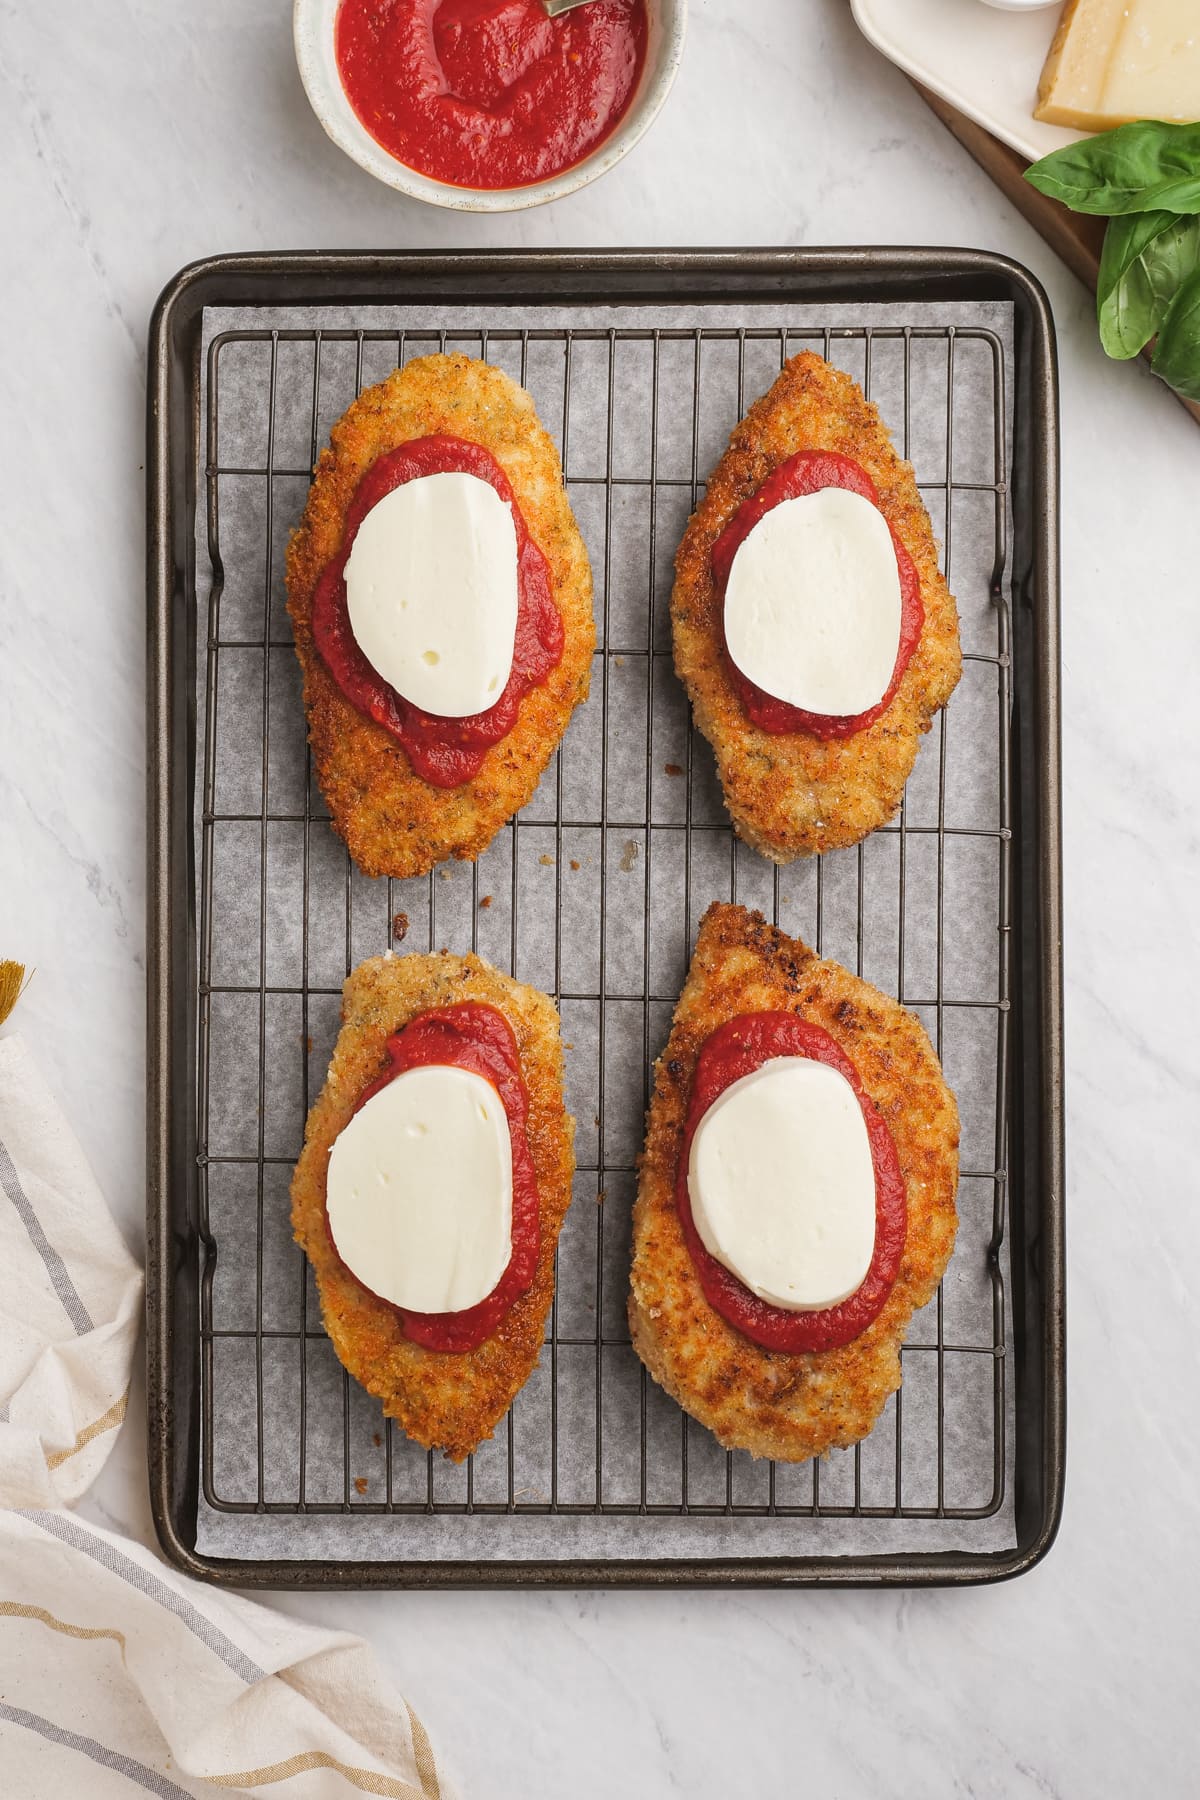
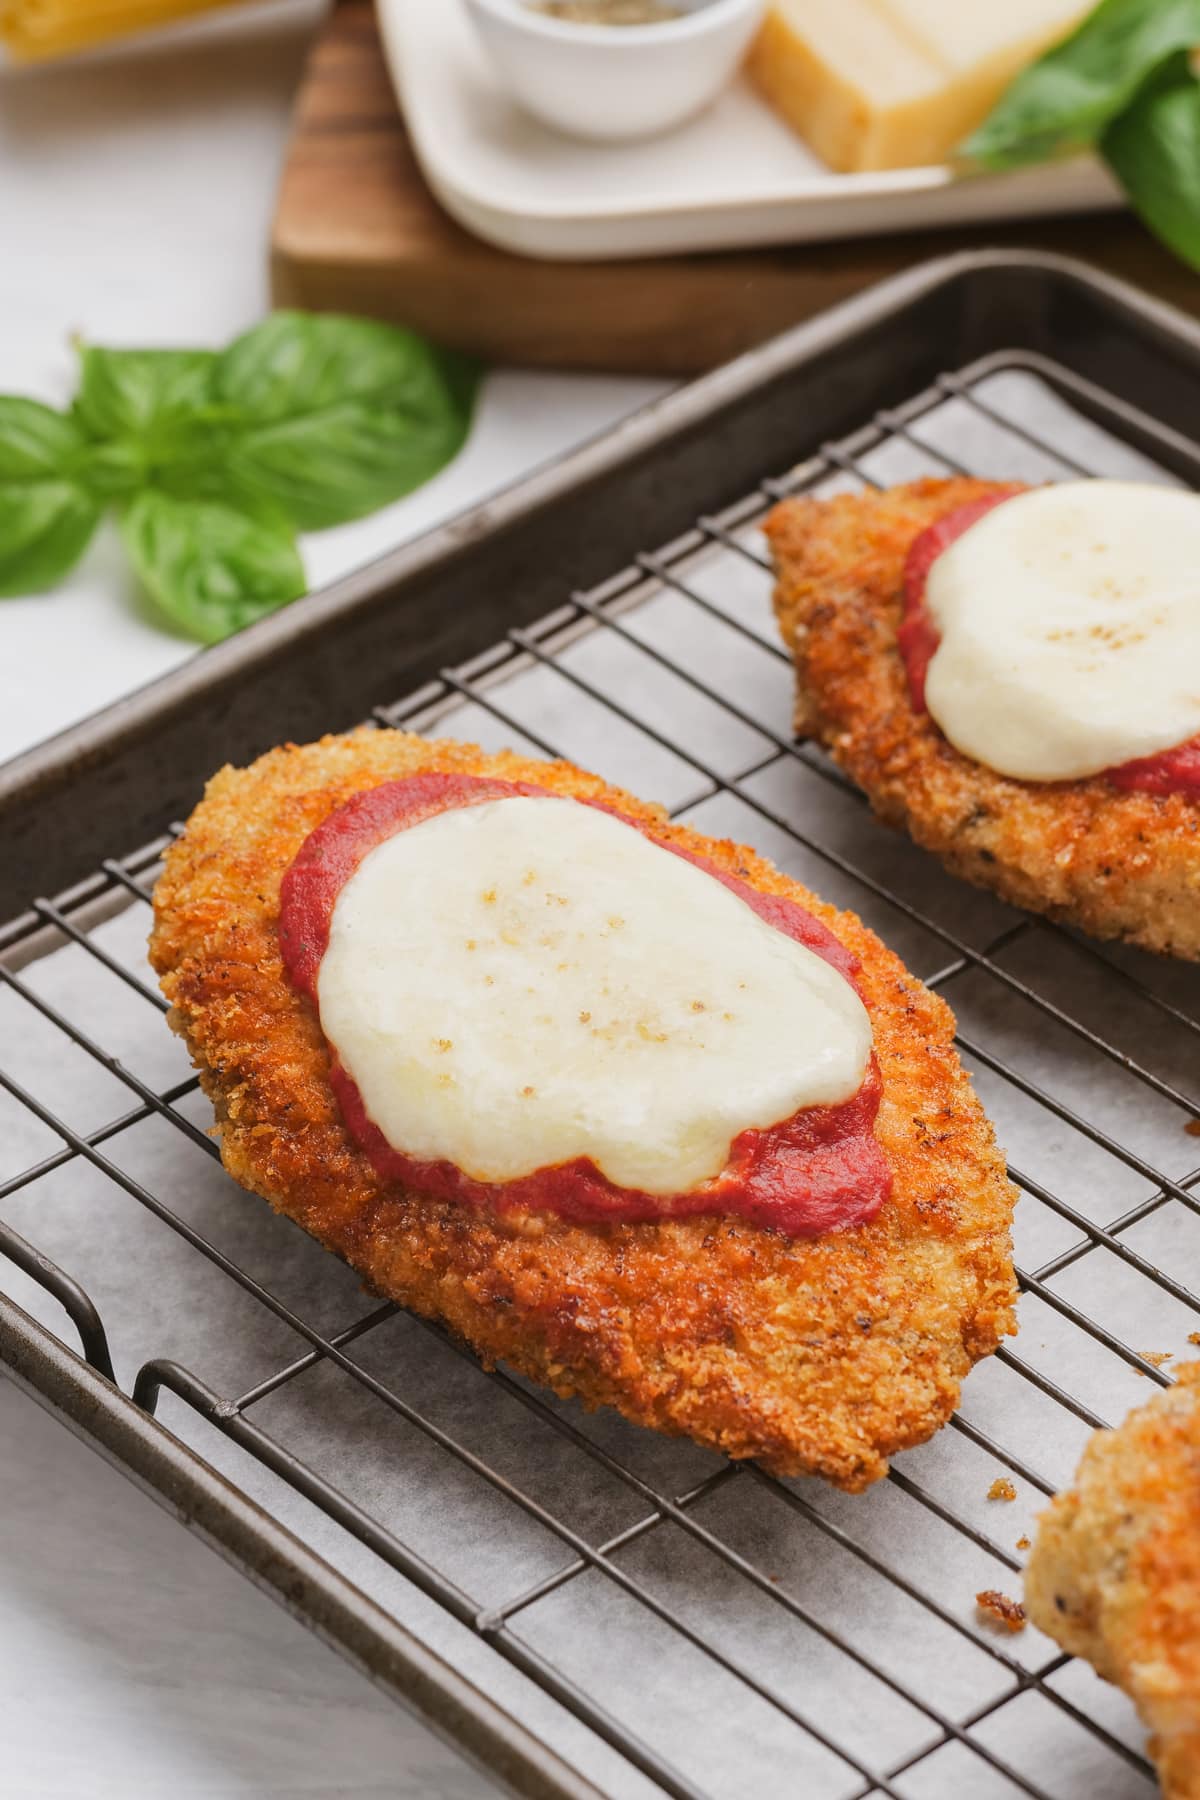
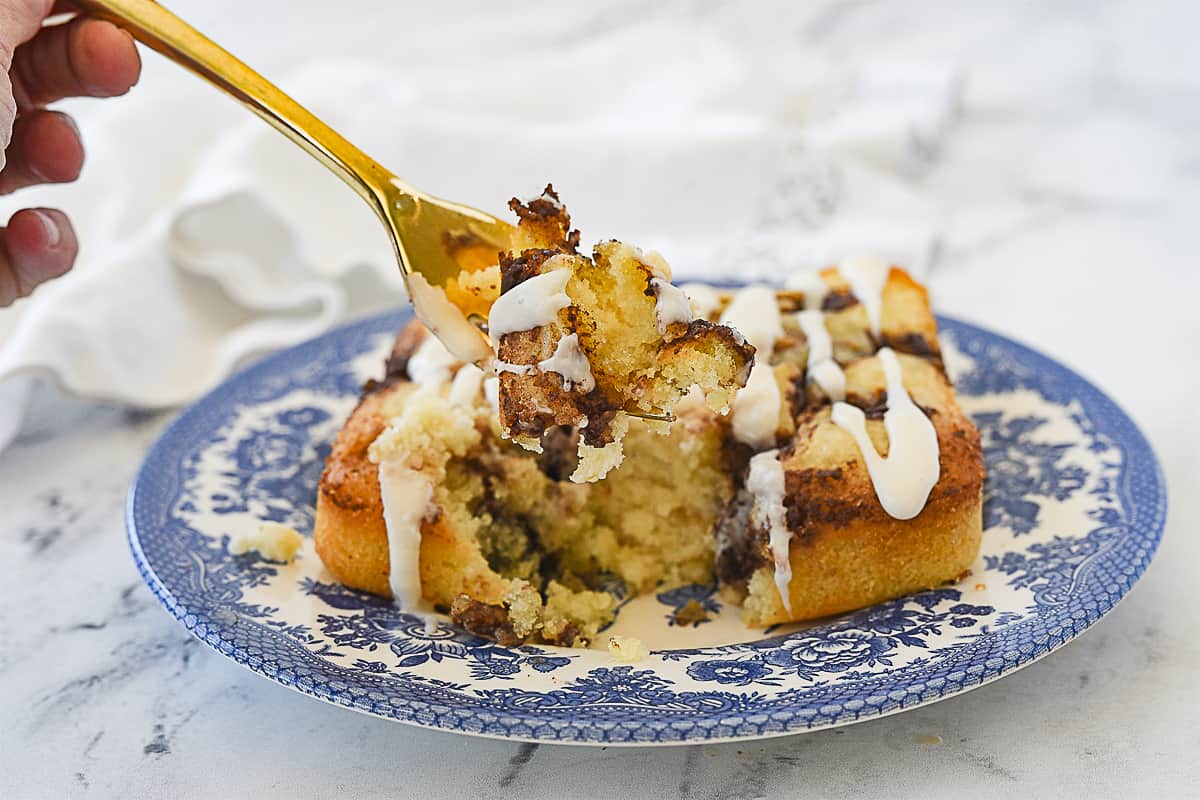
Once removed from the oven, top your pizza with mozzarella and fresh basil. A final drizzle of olive oil gives a glossy, flavorful finish. Cut into squares, and savor each bite of your homemade Roman-style pan pizza, a slice of Italian history right in your kitchen.
Uncover the secrets of creating an authentic Roman-style pan pizza at home, mastering the art of crafting its signature thick, airy crust and vibrant toppings.
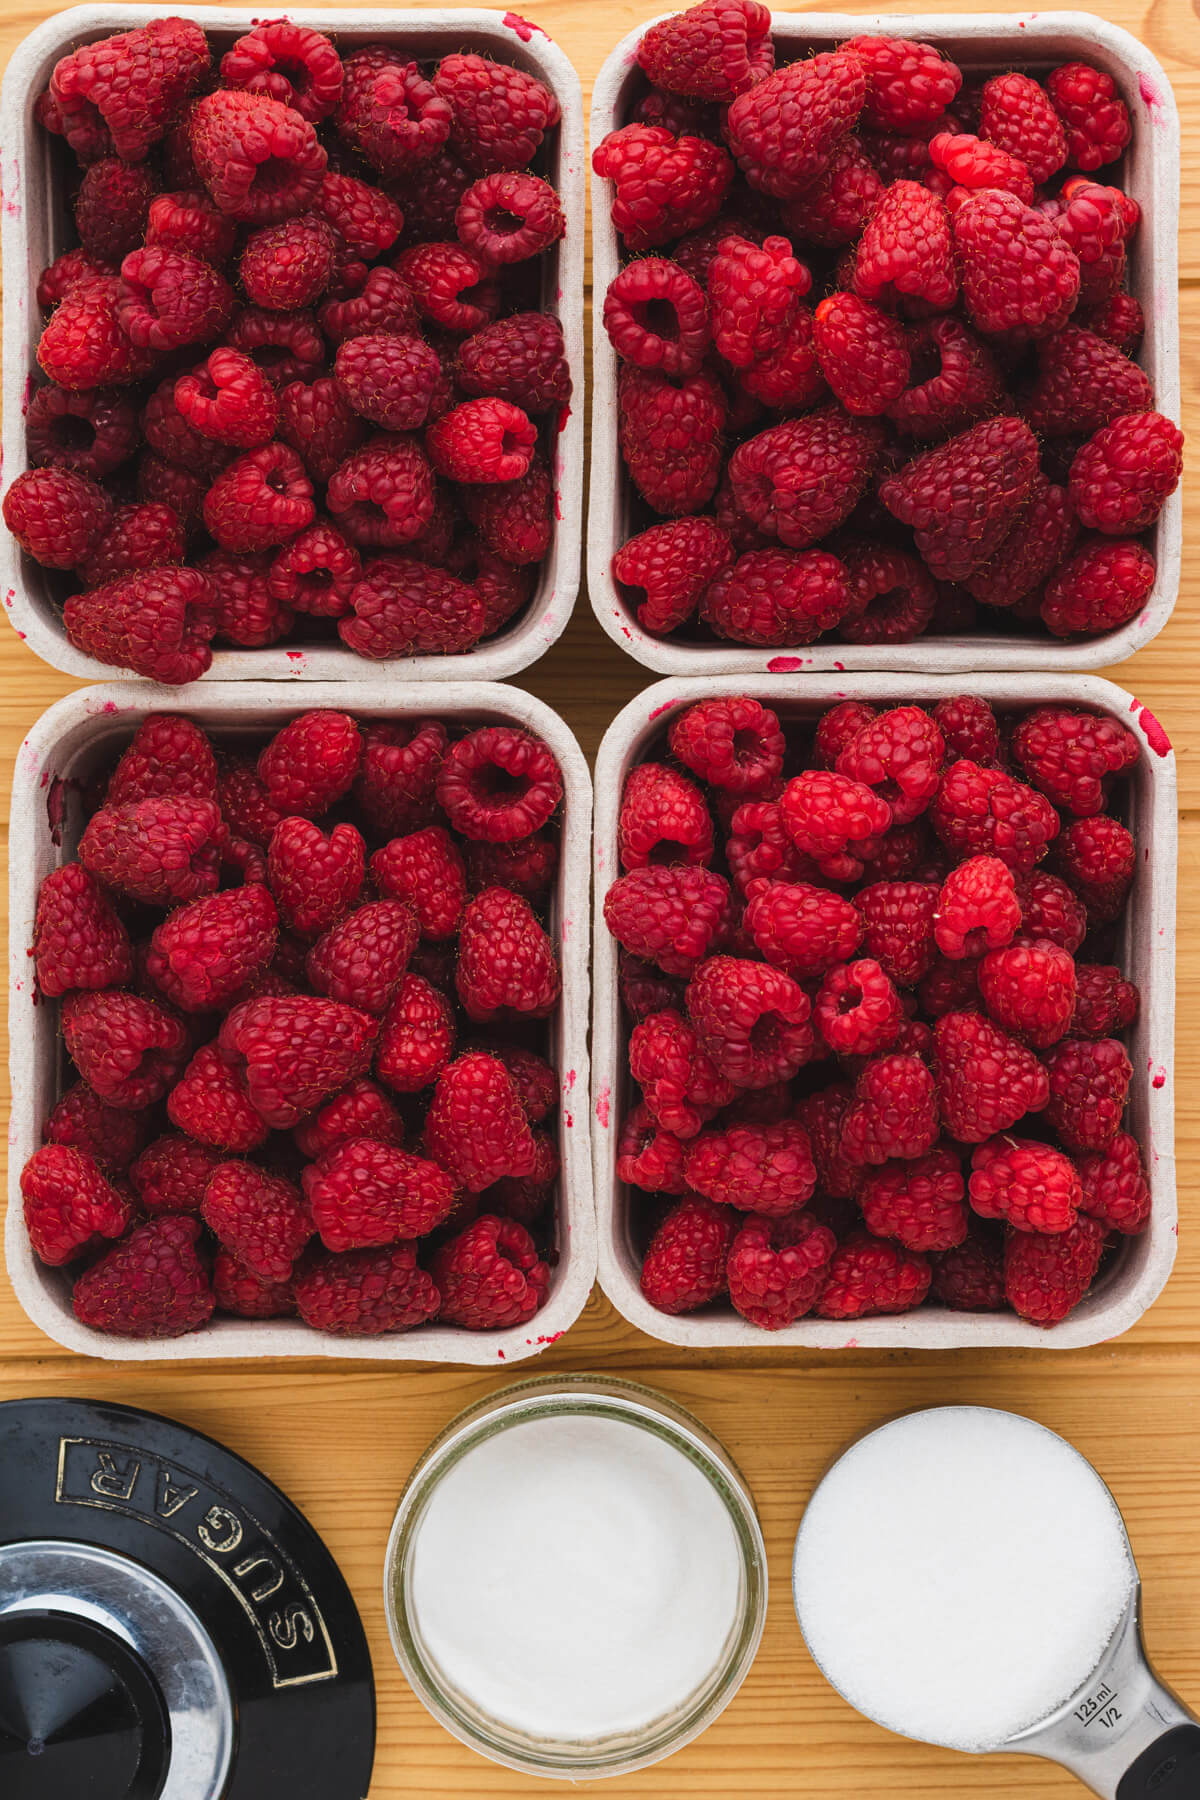
Ingredients
Units
1pound tipo 00 flour (used Mulino Marino flour purchased from Eataly, NYC)
1 1/4 teaspoons dried or instant yeast (I like this brand)
1 14– ounce can Pelati (peeled, whole tomatoes, crushed and seasoned with sea salt)
Instructions
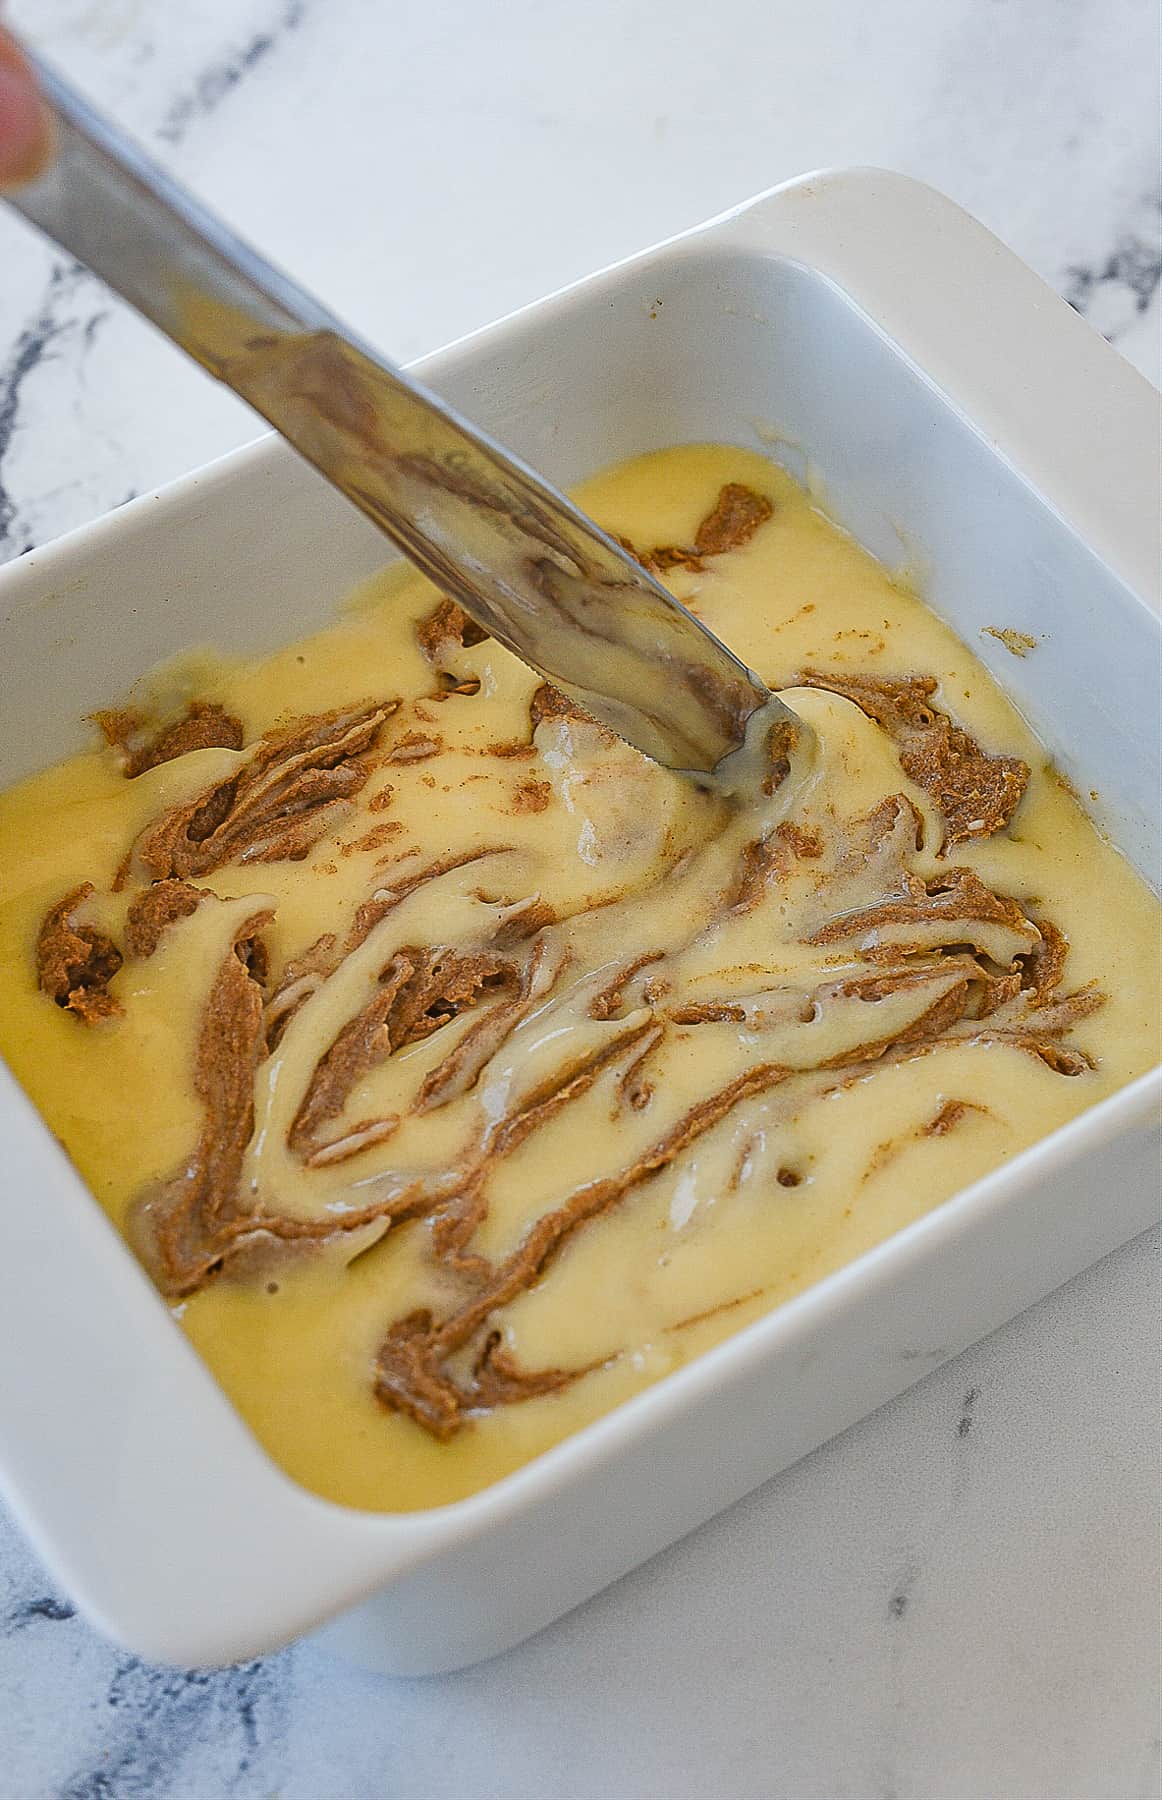
Mix the flour, yeast, and water in a large bowl with a spoon. When most of the lumps are gone, add the olive oil and salt. It will be wet. The wetter the better.
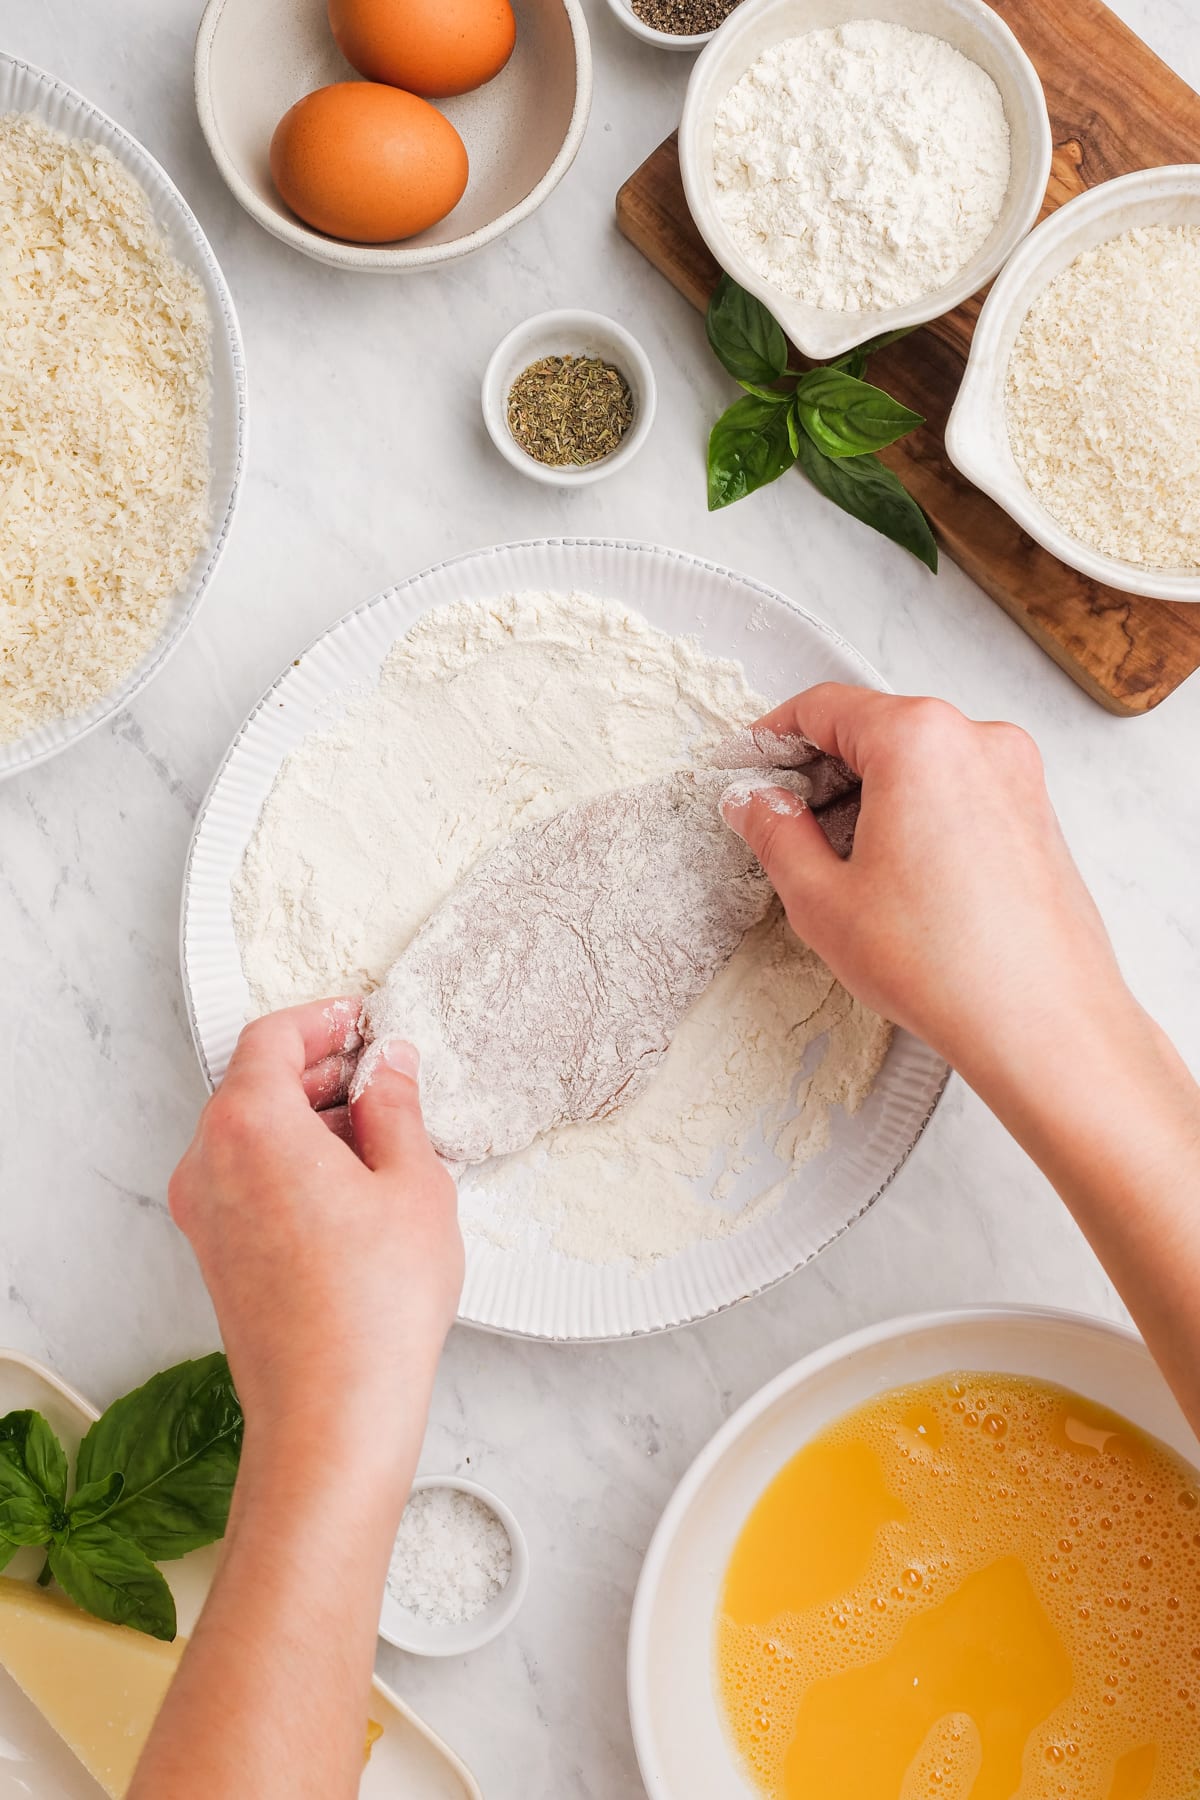
Flip onto a floured work surface and gently fold the dough in half, over itself, toward you. Grab the dough by the corners facing you, pick it up like an envelope and turn 90 degrees and place back on the floured surface. Gently fold and turn. Repeat a few more times.
Place the dough in a lightly oiled bowl, cover, and let rest 15 minutes. Then repeat the folding and turning action as above. By the third pass, the dough will be springy and less sticky.
Place the dough in a lightly oiled bowl, cover tightly with plastic wrap, and place in the refrigerator for 24 hours.
The next day, take the dough out of the refrigerator and let it come to room temperature, about 1 hour. While the dough is coming to room temperature, preheat the oven to 500°F.
Lightly oil a 9″x 13″ baking sheet.
Lightly flour your work surface. Place the dough on the work surface. Start with the edges of the dough and press down gently and then go to the center and press down. After the first pass, flip the far end over, so the top becomes the bottom. Make sure your flour is evenly distributed under the dough and continue to gently massage the dough, so the balls of air remain intact. Flip again and repeat until the dough is evenly distributed.
Pull the dough over your arm and then pull the other side over your other arm (as pictured above) with your palms facing down. Transfer the dough to the baking pan and distribute the dough toward the edges of the pan. Press down, distributing the dough evenly, but gently.
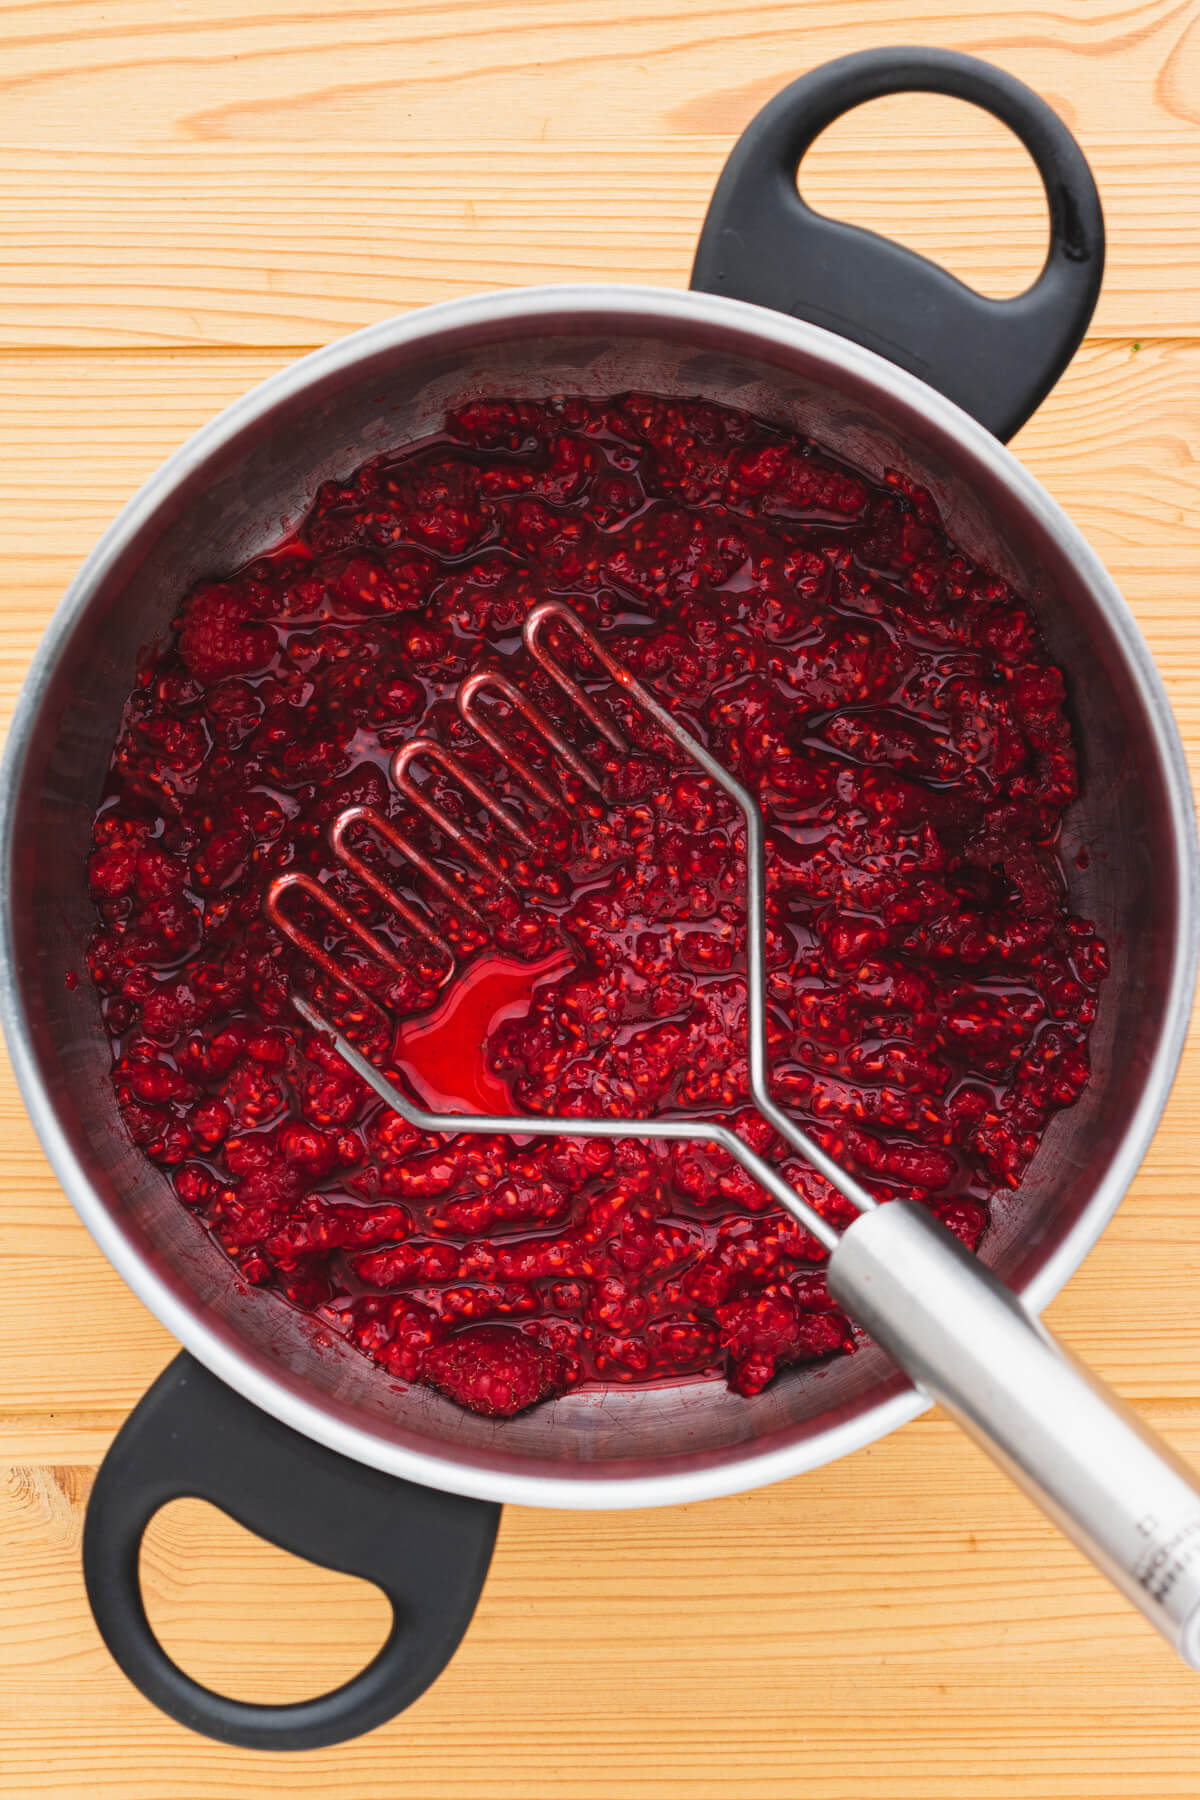
Add the pelati tomatoes. Distribute evenly over the dough. Drizzle with extra virgin olive oil.
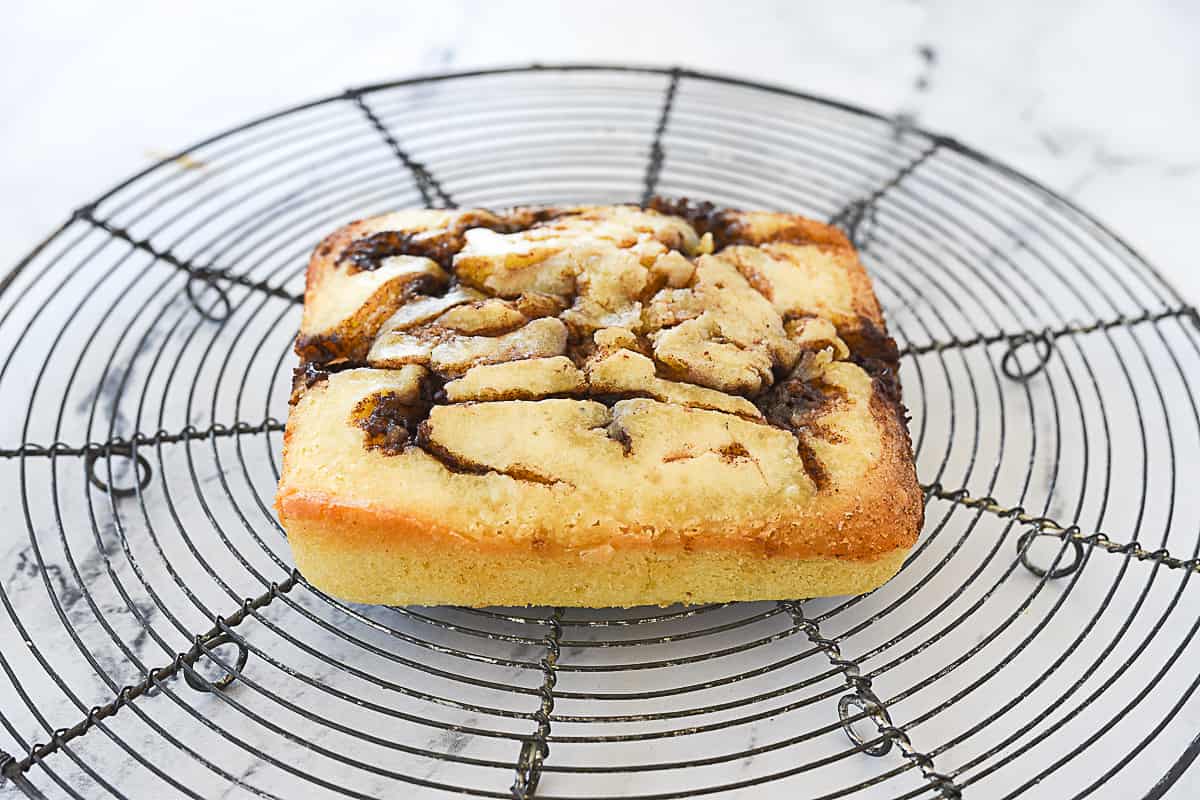
Place the pan on the bottom floor of your oven for the first 5 minutes. Then transfer to the bottom-middle rack of your oven and cook another 15 minutes. Remove the pizza from the oven.
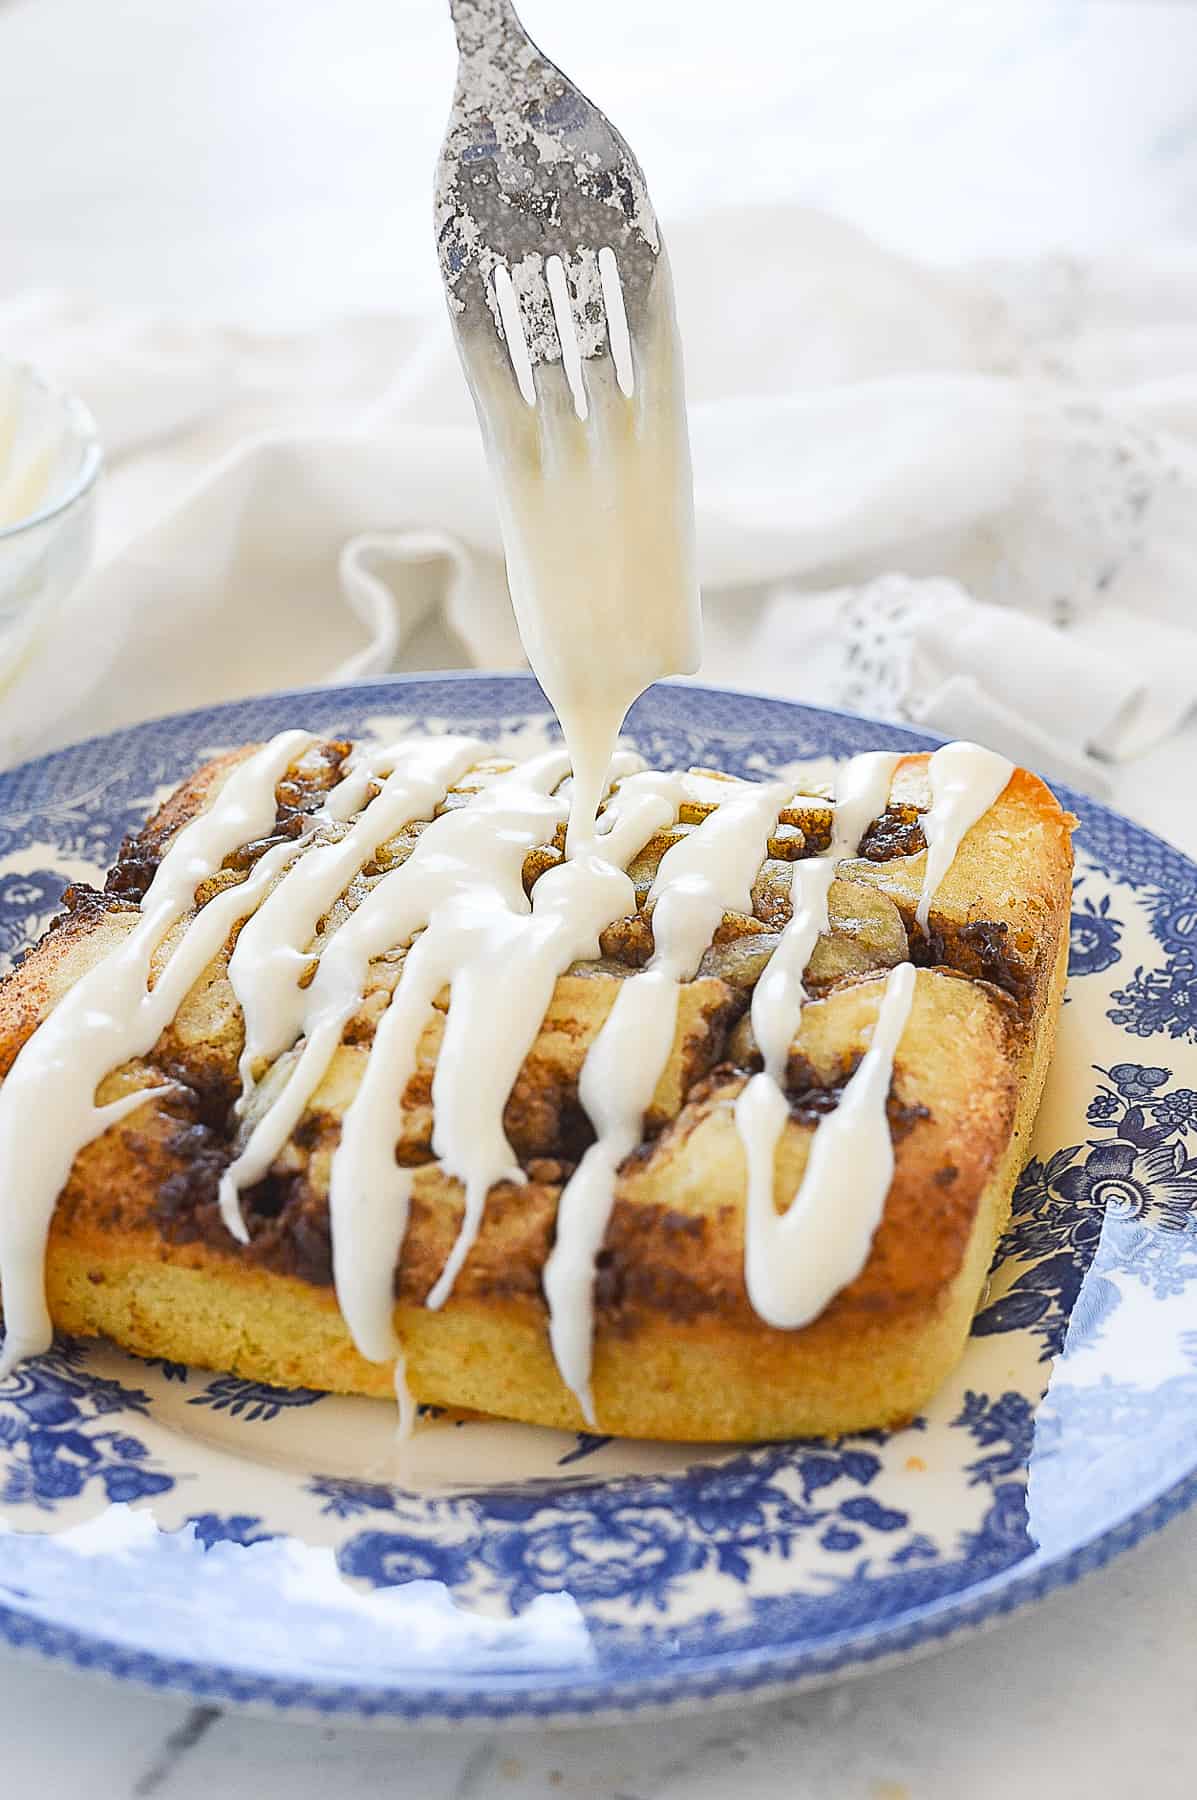
Add mozzarella cheese and basil. I like to finish with a drizzle of extra virgin olive oil.
Prep Time:1.5 hour
Resting Time:24 hours
Cook Time:10 minutes
Category:Primi
Method:Baking
Cuisine:Italian
Keywords: Pizza, italian american, italian, rome, roman, flat pizza, pan pizza, tomatoes, mozzarella
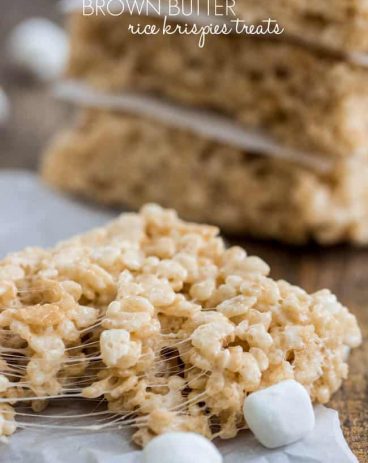
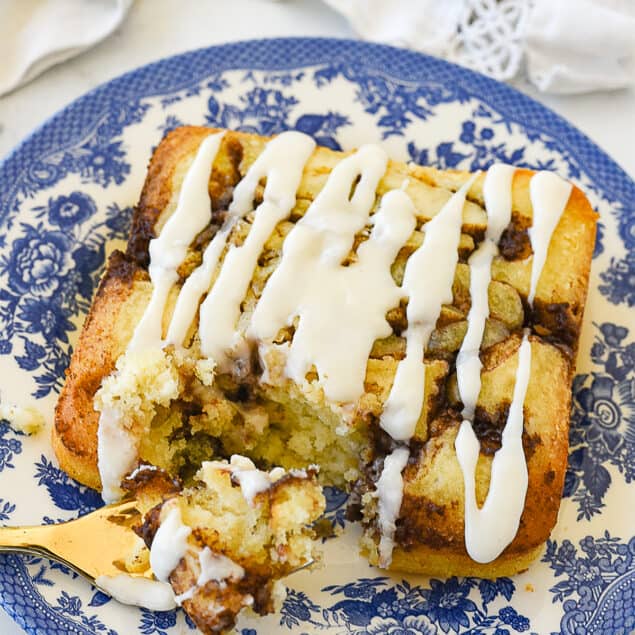
This recipe takes snickerdoodles to the next level! Made with brown butter and a salted caramel core, each bite is a sweet and nutty dream!
When it comes to dessert, you can never go wrong with a batch of homemade cookies! If you love snickerdoodles as much as I do, you’ll have to try these cream cheese snickerdoodles or snickerdoodle bars next!
Brown Butter Snickerdoodles With Salted Caramel Filling
These cookies are seriously amazing. Snickerdoodles have always been one of my favorite cookies, it brings back so many memories when I was little helping my mom make them in the kitchen for a Sunday treat. My favorite part was rolling the cookie balls in the cinnamon sugar. I really didn’t think it could get any better than traditional snickerdoodles, but I’m pretty sure this recipe for brown butter salted caramel snickerdoodles has changed my mind.
I mean, you really can’t go wrong with brown butter. And to make these snickerdoodles even better, they have a salted caramel core! The ooey-gooey center and nutty flavor from the brown butter makes these cookies some of the best that I’ve ever tried. I know that you guys will love these just as much as I do! Also, I will not be held responsible for any brown butter addictions that may develop. (But you should definitely try these brown butter blondies or zucchini bars with brown butter frosting next.)
Cookie Ingredients
These delectable cookies are a perfect combination of rich flavors and textures. The brown butter and salted caramel add a delightful twist to the classic snickerdoodle recipe. You’ll love them! Here is everything you’ll need to whip up a batch. (Measurements can be found below in the recipe card.)
All-Purpose Flour: The base of the brown butter snickerdoodle cookie dough.
Baking Soda: This helps the cookies rise and become nice and fluffy.
Cream of Tartar: Gives the cookies a tangy kick and that chewy texture!
Ground Cinnamon: The warm spice that adds flavor to the dough and the cinnamon-sugar coating.
Sea Salt: Balances the sweetness and enhances the overall taste. Look for the chunky kind for some extra texture.
Unsalted Butter: We’re gonna brown this bad boy to give the cookies a nutty, caramelized flavor. If you only have salted butter, just use less additional salt.
Dark Brown Sugar: Adds sweetness and a rich caramel undertone to the dough. Light brown sugar also works, but it will change the flavor of the snickerdoodles slightly.
Granulated Sugar: Sweetens things up and contributes to the texture. It’s also used for the cinnamon sugar mixture that the dough is rolled in!
Large Egg: Keeps things together and adds moisture.
Egg Yolk: Makes the cookies extra rich and tender.
Plain Greek Yogurt: Keeps the cookies moist and tender. If you don’t have Greek yogurt, sour cream works too.
Caramel Squares: These little nuggets of gooey goodness melt into pockets of pure caramel bliss.
Coarse Sea Salt: Sprinkle this on top of the finished brown butter salted caramel snickerdoodles!
How to Make Brown Butter Salted Caramel Snickerdoodles
Fire up the oven, because it’s time to make the best brown butter snickerdoodles of your life! These brown butter salted caramel snickerdoodles are so easy to make, and even easier to devour. Be sure to grab a few for yourself, because if your family is anything like mine, these cookies will be snatched up in seconds!
Preparing the Cookie Dough
Mix Dry Ingredients: In a medium-sized bowl, whisk the flour, baking soda, cream of tartar, cinnamon, and set aside.
Brown the Butter: To brown the butter, heat a medium saucepan to medium high heat. Add the sliced butter, whisking frequently. You will notice the butter starting to become frothy on the top and brown specks will start to form along the bottom. You have to watch it closely because the turn happens quickly and you don’t want it to burn. You will start to smell a nutty aroma and once it turns to a brown color, remove from heat and let it cool to room temperature.
Caramel Pieces: While the butter is cooling, cut the caramel squares into quarters.
Sugar Mixture: In a stand mixer, combine the brown butter and brown sugar, and ½ cup granulated sugar. (The ¼ cup sugar will be used for rolling in the cookies). Mix until blended and smooth.
Combine Wet and Dry Ingredients: Beat in egg, yolk, vanilla and yogurt and mix until combined. Slowly add the dry ingredients until combined.
Chill the Dough: Form the dough into a ball and cover with plastic. Chill in the refrigerator for at least 30 minutes or overnight.
Baking
Preheat Oven, Prepare Cookies: Once you are ready to bake preheat the oven to 350 degrees. Measure about 2 tablespoons of dough and roll into a ball. Flatten the ball and place 1-2 caramel squares inside, wrap the cookie dough over the caramel and roll back into a ball. Make sure it is completely covered so that the caramel won’t stick to the pan.
Roll in Cinnamon Sugar: Mix ¼ cup sugar and cinnamon in a small bowl and roll each cookie in the mixture. Place cookies on a parchment paper-lined baking sheet 2 inches apart. Sprinkle lightly with sea salt. (I used course sea salt)
Bake: Bake for 8-10 minutes, or until the edges turn lightly brown. The centers will be soft. Allow to cool for 2-3 minutes, then transfer your brown butter snickerdoodles to a wire cooling rack to cool completely.
Tips for Making the Best Brown Butter Snickerdoodles
Check out these simple tips to make your brown butter salted caramel snickerdoodles taste even better. I’ve also included some fun variations for you to try!
Get Your Butter Nice and Toasty: Take your time when browning the butter, letting it turn a beautiful golden color and giving off a nutty smell. This gives your cookies an incredible caramelized flavor. Just watch out so you don’t accidentally burn the butter – that’s a flavor we want to avoid!
Don’t Overbake: I like to pull my cookies out of the oven while the centers are still a little soft. The cookies will continue to cook on the pan for a minute or two, and then you’ll end up with the perfect texture.
Mix Up the Caramel: Don’t feel restricted to plain caramel squares. Go wild and try different caramel fillings! Homemade caramel sauce, butterscotch chips, or even flavored caramel candies like salted caramel or espresso caramel. Just make sure to chop them up into small bits so they melt evenly.
Extra Mix-Ins: If you want a little extra oomph, throw in some mix-ins like chopped nuts (pecans, walnuts, or almonds) or chocolate chips. These will give your brown butter snickerdoodles a satisfying crunch or bursts of melty goodness.
If You Have Leftovers:
Keep your brown butter salted caramel snickerdoodles in an airtight container at room temperature. They will stay good for about a week! For that just out of the oven effect, pop them in the microwave until warmed through before you enjoy them again.
More Brown Butter Dessert Recipes
If you’re a lover of brown butter like me, then these are a few recipes you need to try out! The brown butter adds an extra rich and nutty element to each dish, making them absolutely delicious.
This recipe takes snickerdoodles to the next level! Made with brown butter and a salted caramel core, each bite is a sweet and nutty dream!
Course Dessert, Snack
Cuisine American
Keyword brown butter salted caramel snickerdoodles, brown butter snickerdoodles, Snickerdoodle recipe, snickerdoodles
Prep Time 30 minutesminutes
Cook Time 8 minutesminutes
Total Time 38 minutesminutes
Servings 24Cookies
Calories 229kcal
Author Alyssa Rivers
Ingredients
2 1/2cupsall-purpose Gold Medal flour
1teaspoonbaking soda
2teaspoonscream of tartar
1/2teaspoonground cinnamon
1/2teaspoonsea salt
1cupunsalted buttersliced
1 1/4cupdark brown sugar
1/2cupgranulated sugar
1large egg
1egg yolk
1tablespoonvanilla extract
1tablespoonplain Greek yogurt
1cupcaramel squarescut into 1/4’s
1/4cupgranulated sugar
2teaspoonsground cinnamon
Coarse Sea salt for sprinkling on completed cookies
Instructions
In a medium sized bowl, mix the flour, baking soda, cream of tartar, cinnamon, and set aside.
To brown the butter, heat a medium saucepan to medium high heat. Add the sliced butter, whisking frequently. You will notice the butter starting to become frothy on the top and brown specks will start to form along the bottom. You have to watch it closely because the turn happens quickly and you don’t want it to burn. You will start to smell a nutty aroma and once it turns to a brown color, remove from heat and let it cool to room temperature.
While the butter is cooling, cut the caramel squares into 1/4's.
In a stand mixer, combine the brown butter and brown sugar, and ½ cup granulated sugar. (The ¼ cup sugar will be used for rolling in the cookies). Mix until blended and smooth.
Beat in egg, yolk, vanilla and yogurt and mix until combined. Slowly add the dry ingredients until combined.
Form the dough into a ball and cover with plastic. Chill in the refrigerator for at least 30 minutes or overnight.
Once you are ready to bake preheat the oven to 350 degrees. Measure about 2 tablespoons of dough and roll into a ball. Flatten the ball and place 1-2 caramel squares inside, wrap the cookie dough over the caramel and roll back into a ball. Make sure it is completely covered so that the caramel won’t stick to the pan.
Mix ¼ cup sugar and cinnamon in a small bowl and roll each cookie in the mixture. Place on a cookies on a parchment lined cookie sheet 2 inches apart. Sprinkle lightly with sea salt. (I used course sea salt)
Bake for 8-10 minutes, or until the edges turn lightly brown. The centers will be soft. Allow to cool for 2-3 minutes, and transfer to a wire cooling rack to cool completely.
Notes
Originally posted July 12, 2013Updated on June 26, 2023
]]>
https://mallize.com/blogs/news/what-is-this-thing-139-times-people-stumbled-upon-mysterious-objects-and-the-internet-offered-them-an-explanation-new-pics2023-06-26T09:13:53-04:002023-06-26T09:13:53-04:00“What Is This Thing?”: 139 Times People Stumbled Upon Mysterious Objects And The Internet Offered Them An Explanation (New Pics)admin
The answers come to those who seek them. Especially on the subreddit 'What Is This Thing?'
This online community is home to 2.3 million members who are always ready to help people identify the mysterious objects they found.
The gig is simple: someone uploads a photo of whatever it is they want the name of, and the gang starts commenting under it, offering their input until, inevitably, a person shows up who knows exactly what it is.
However, even if you're not posting anything, scrolling through their solved cases feels like an interesting challenge, where you can test (and expand) your own knowledge. So we invite you to do just that!
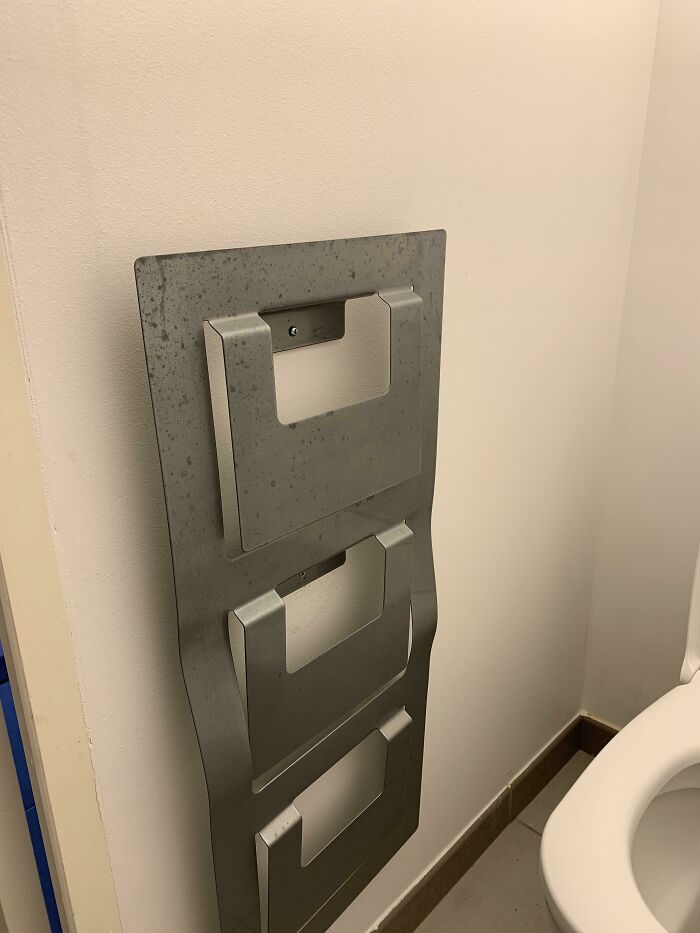
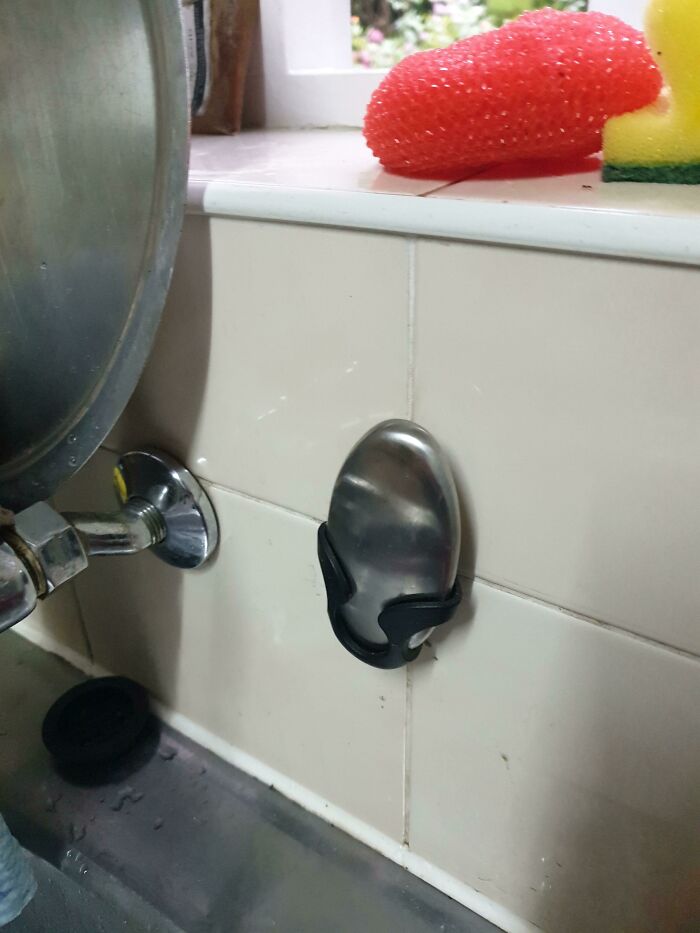
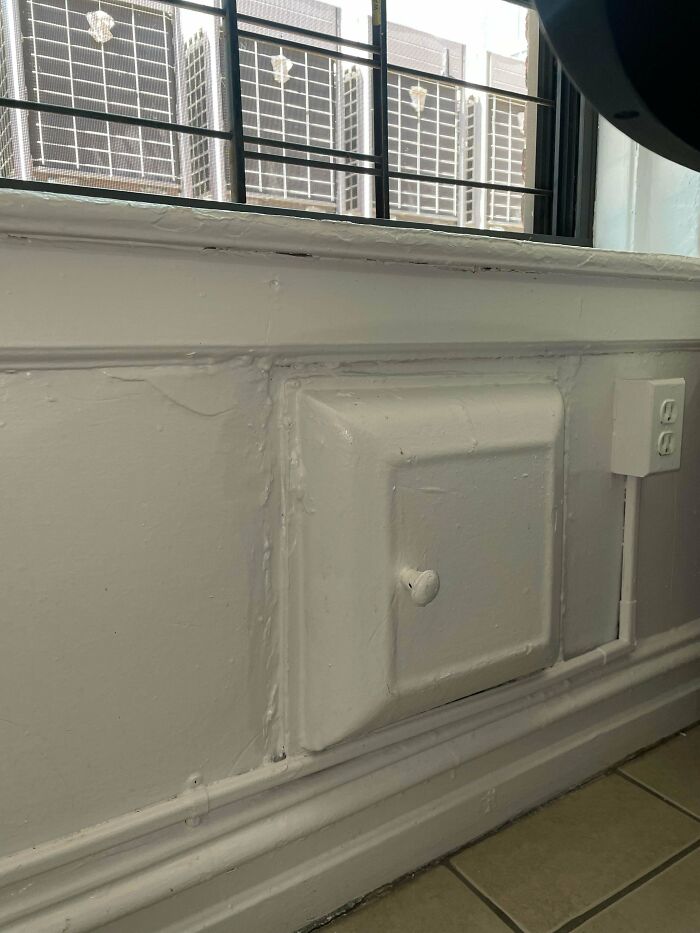
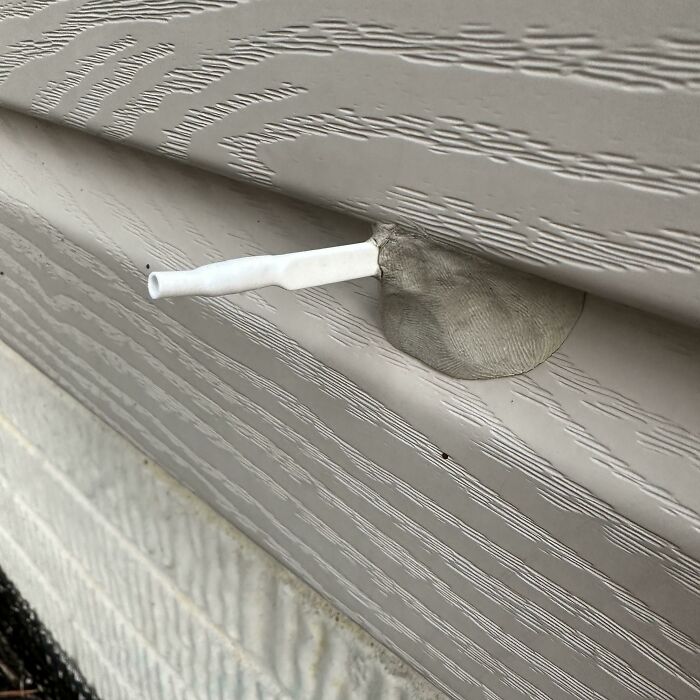
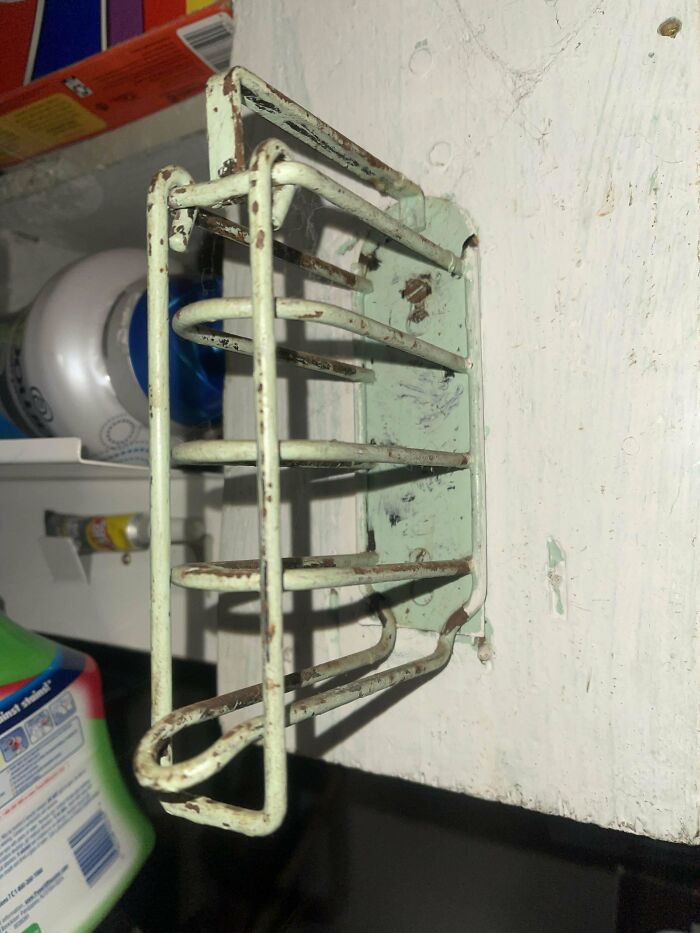
#1 This Metal Piece Is Attached To The Wall In A Wc In My Airbnb In France
Answer: It's a magazine rack installed upside down because people decorating Airbnb's don't know what they're doing.
#2 Saw This In A Restroom Which Has Faucets And Drain Down Low And A Dryer
Answer: This setup prevents Muslims from having to lift our legs up dangerously high while trying to stick our feet in the sink one at a time. The alternative to that is we have to take a handful of water and pour it onto our feet below the sink causing the floor to get wet. Muslims also have to keep their feet clean before praying, which is obviously problematic in a bathroom where everyone pisses on the floor and walks with their shoes between the stalls and the sink, so you might see them trying to keep one shoe on while washing the other foot and then switching. It’s also why we take our shoes off before praying and use prayer rugs to avoid touching unclean things while praying.
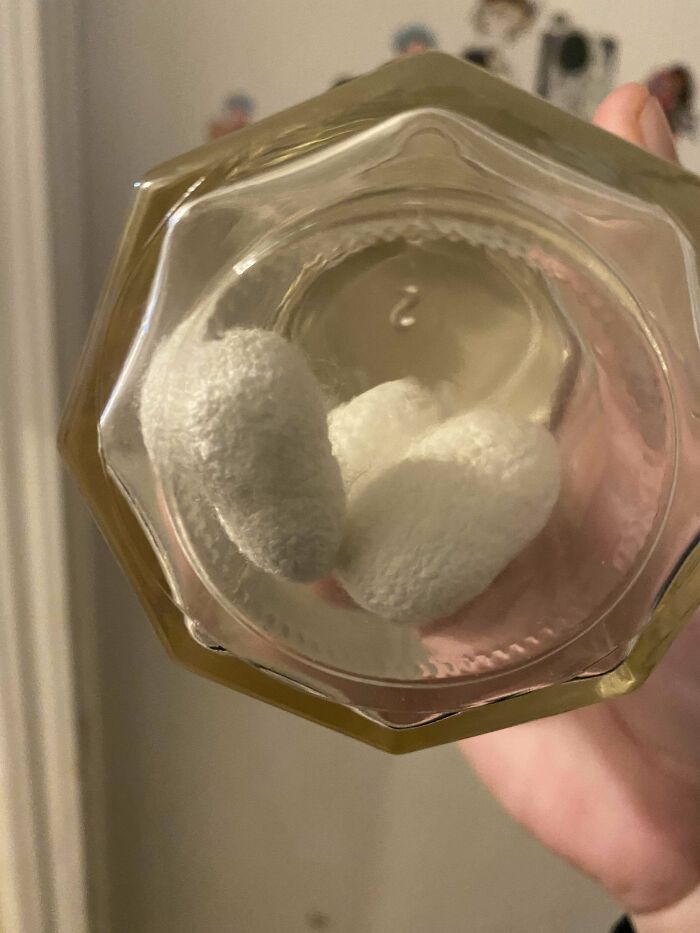
#3 We Found This On Top Of A Bookcase While Cleaning Our Office. It Appears That The Jar Is Sealed. The White Things Inside Weigh Next To Nothing. We Didn’t Want To Open It Until We Have Some Idea As To What It Is. They Look Pretty Soft. Nothing Identifying On The Jar Itself
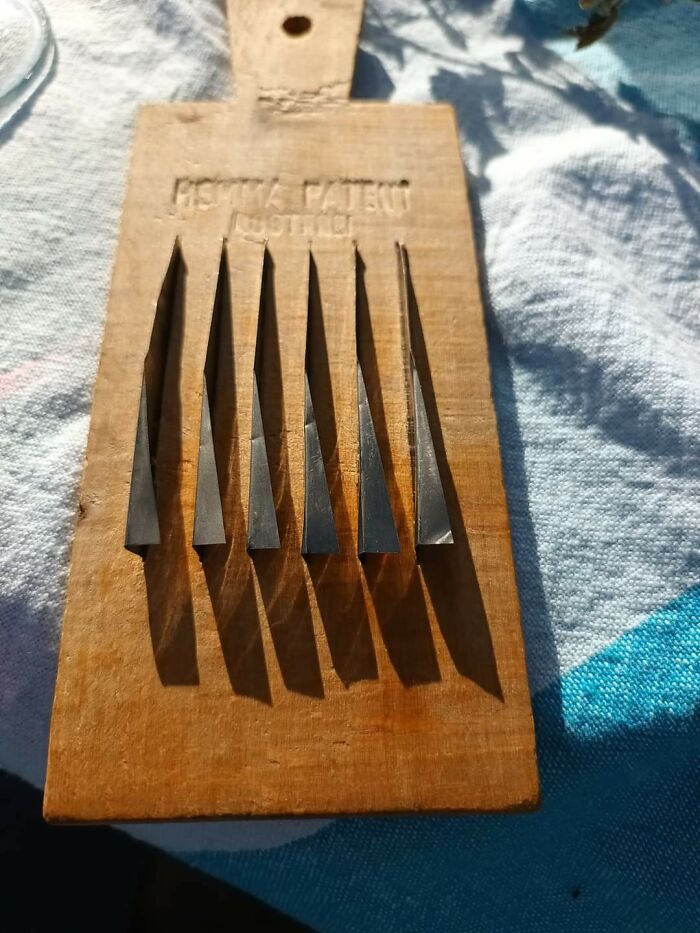
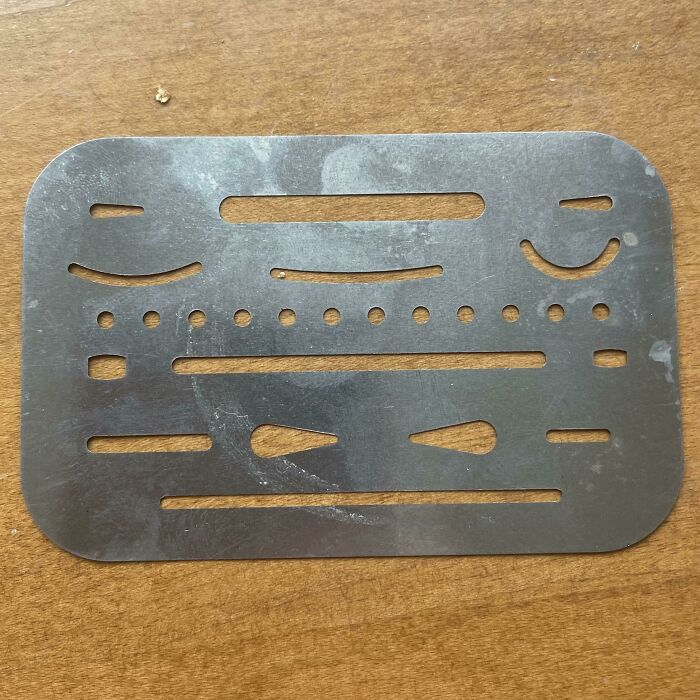
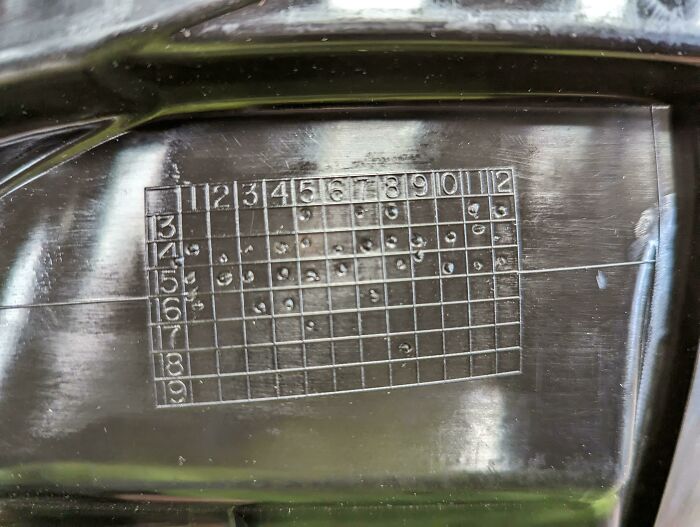
#6 Weird Semi Circle Wires With Various Beads On A Wooden Plank Found In An Older House
Answer: A Himalayan Calendar. The outer ring as 12 balls, each corresponding to a month. The next two rings have a tens and ones digit. The tens has three balls for up to the 31st, and the next has nine balls, for 0 to 9. And then four rings for the year, up to 9999.
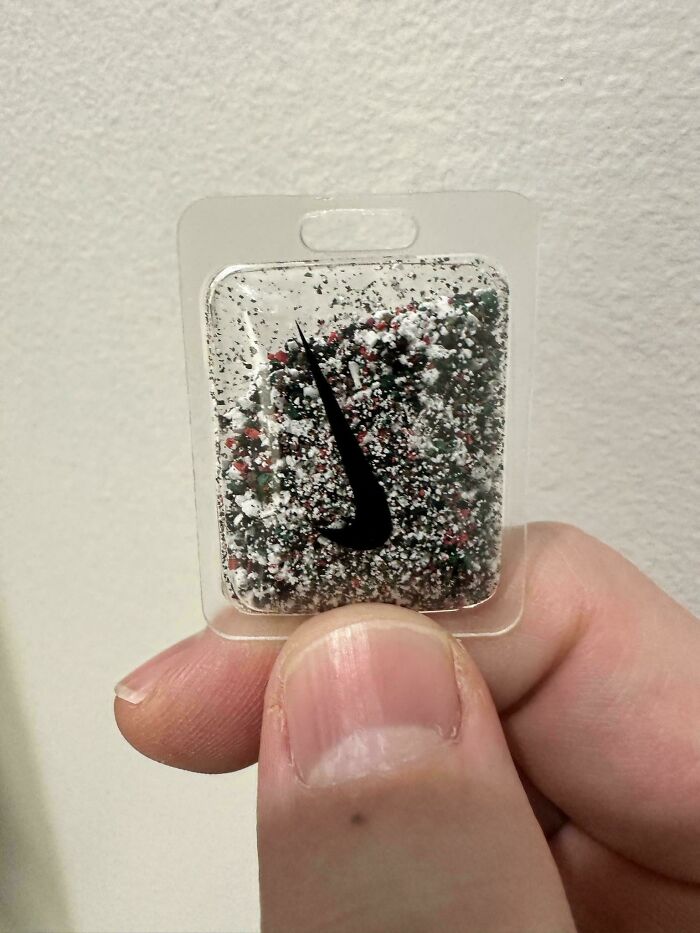
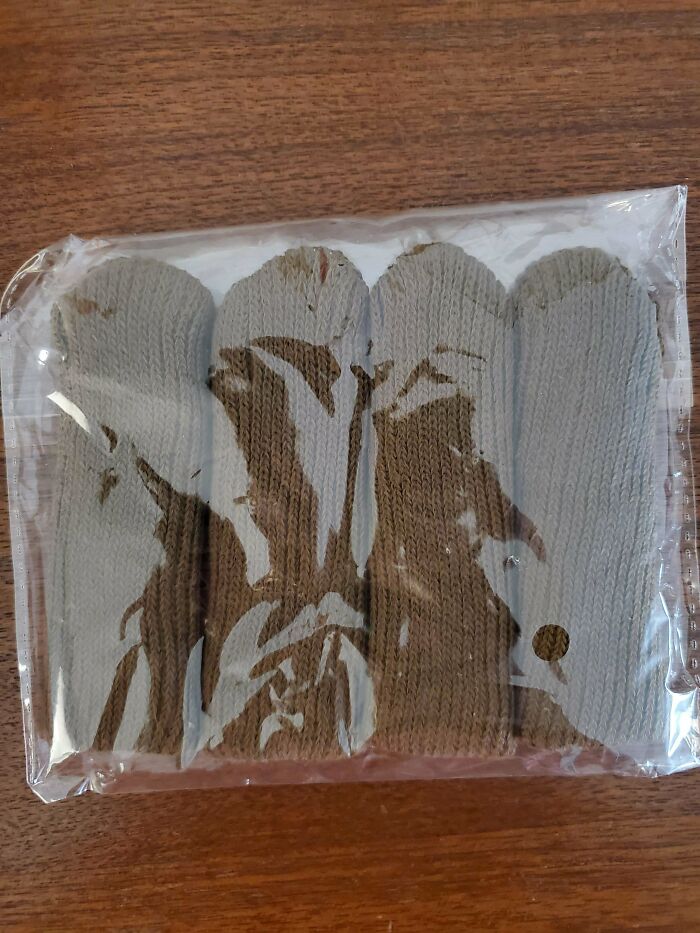
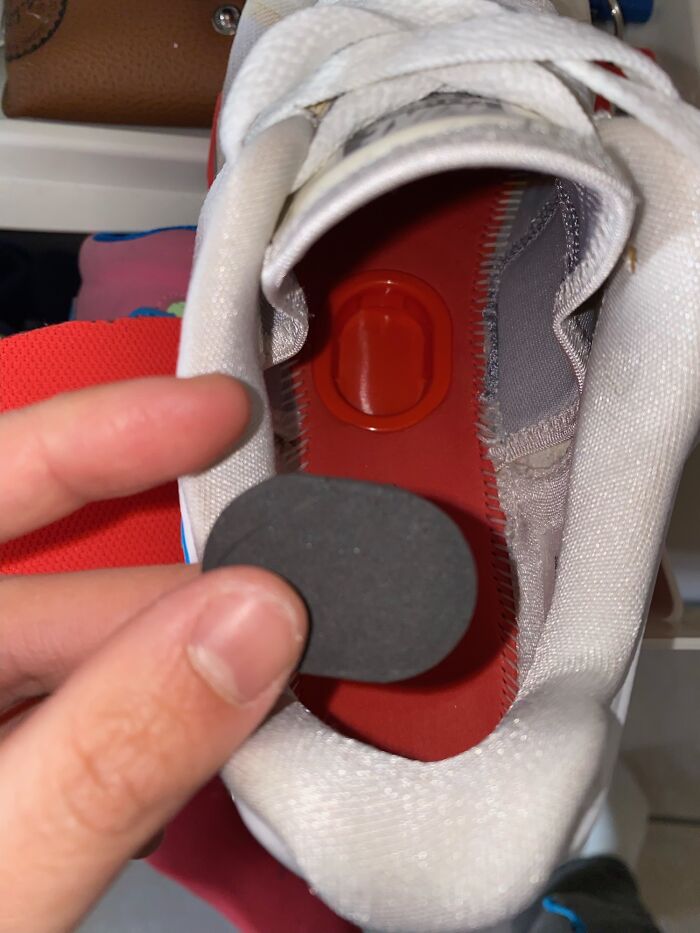
#7 Bought A New Pair Of Nike Shoes. Inside The Box Was This Small, Plastic Bubble, Filled With Air, And What Looks Like Tiny, Colorful Micro Plastics. Has A Loophole On The Top And Is About An Inch Long
Answer: Micro plastic particles. Probably to show how Nike helps to clean up our planet. Greenwashing at best.
#11 Steel, Engraved, Hooked Tool Hidden In The Foundation Of An Old House
Answer: My wife says horse hoof cleaning tool, and she's a major horse gal. Also, burying an iron object within the foundation of a home was once considered good luck.
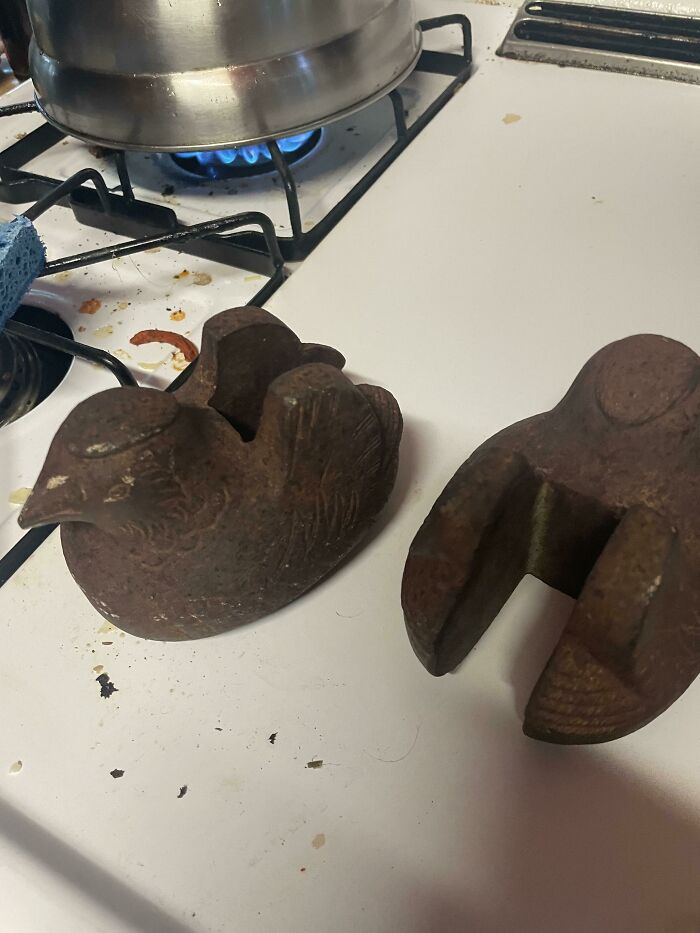
#13 What Are These Heavy Metal Objects I Found In A Thrift Store?
Answer: You hang weights on chains to power mechanical cuckoo clocks. One powers the clock mechanism, and the other powers the cuckoo. The weight turns gears in the mechanism as the chain drops. To wind the clock, you pull on the other end of the chain and bring the weight back up, and the same for the chain that powers the cuckoo.
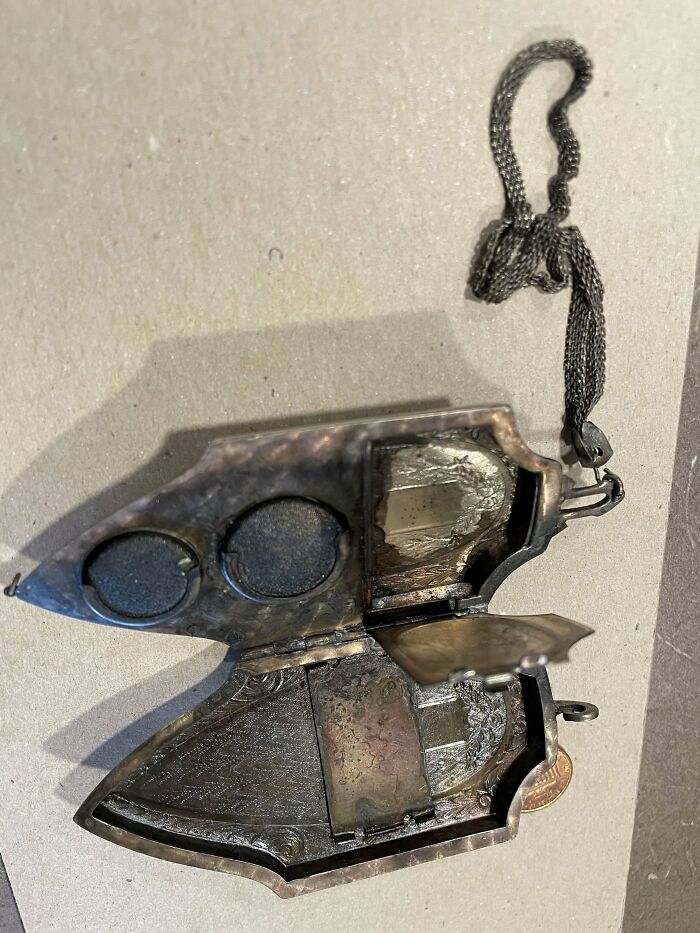
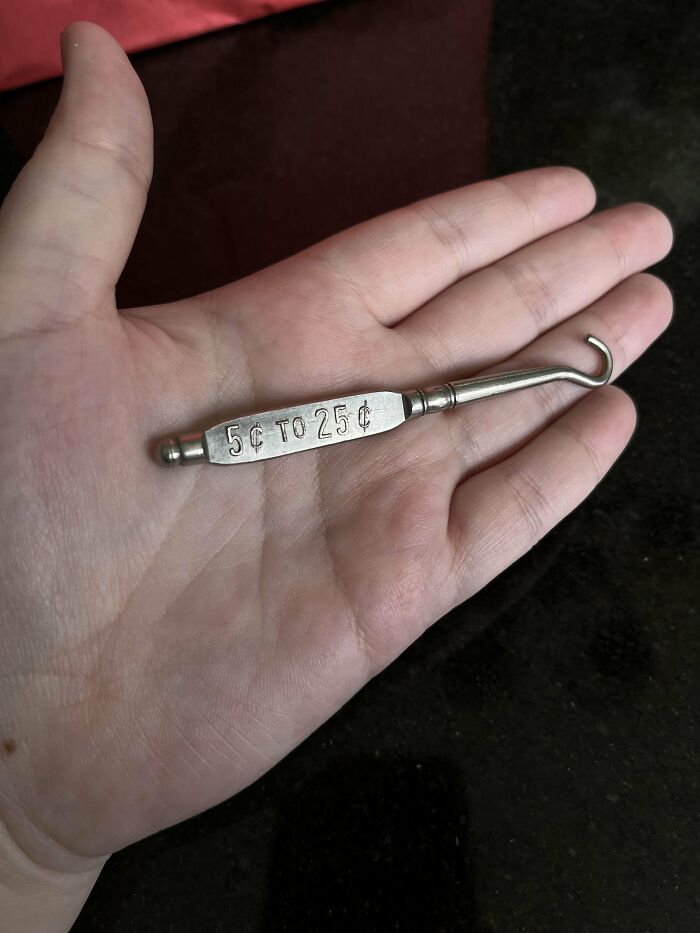
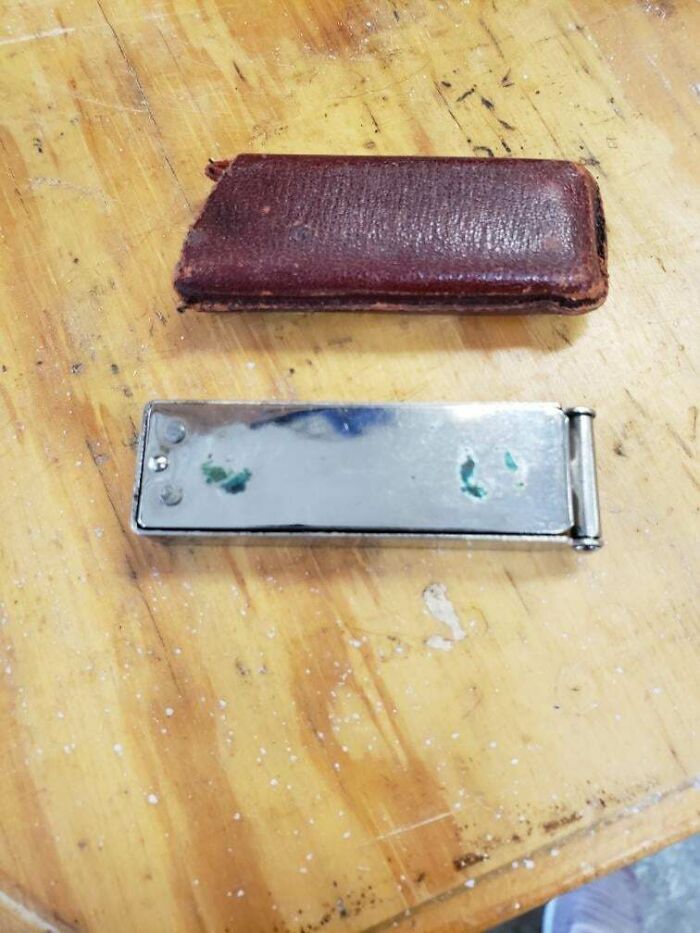
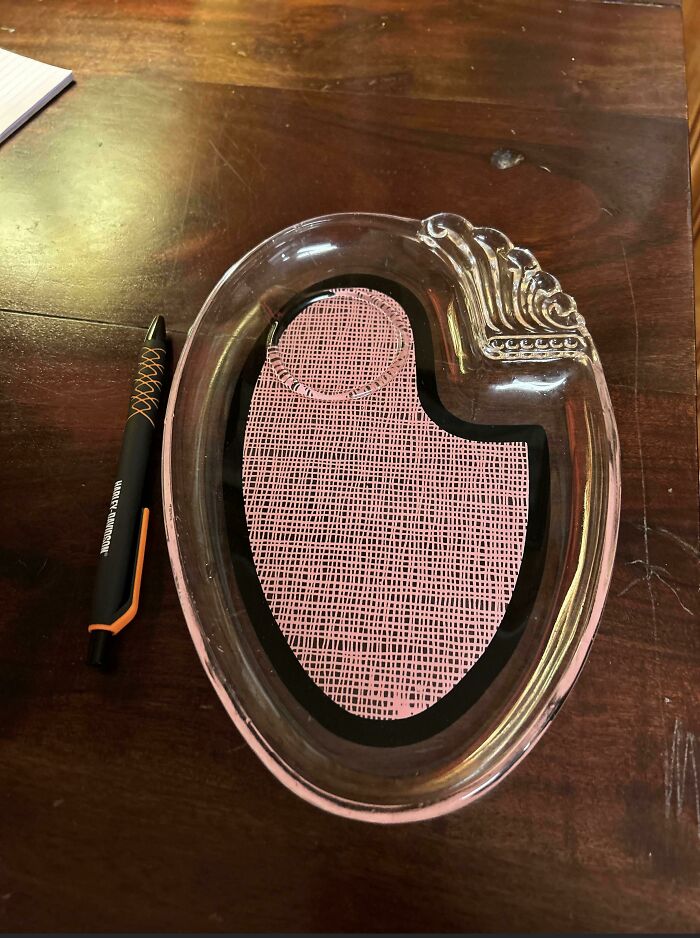
#17 What Would This Antique Silver “Locket” Have Been Used For? It Looks Like Possibly Ink Residue On The Two Pads Inside, But No Indication That The Inside Door Would Have Been Sealed Tightly Enough To Be A Reservoir
Answer: It's actually a purse. There's space in there for some coins for bus/cab fare, some powder makeup (behind the little door), and calling cards.
#18 I Spotted A Few Of These Wrought Iron Poles On A Road In Central London, They Must Have Had Some Historical Usage, But I'm Not Sure What. Perhaps For Lamps? Did The Circle At The Top Used To Hold Something? Was The Arm On The Right For Hanging Something?
Answer: It's an early 19th C Gaslamp. The gas is piped up the pole, and a copper pipe would have extended into the glass lamp house, which fitted into the hoop.
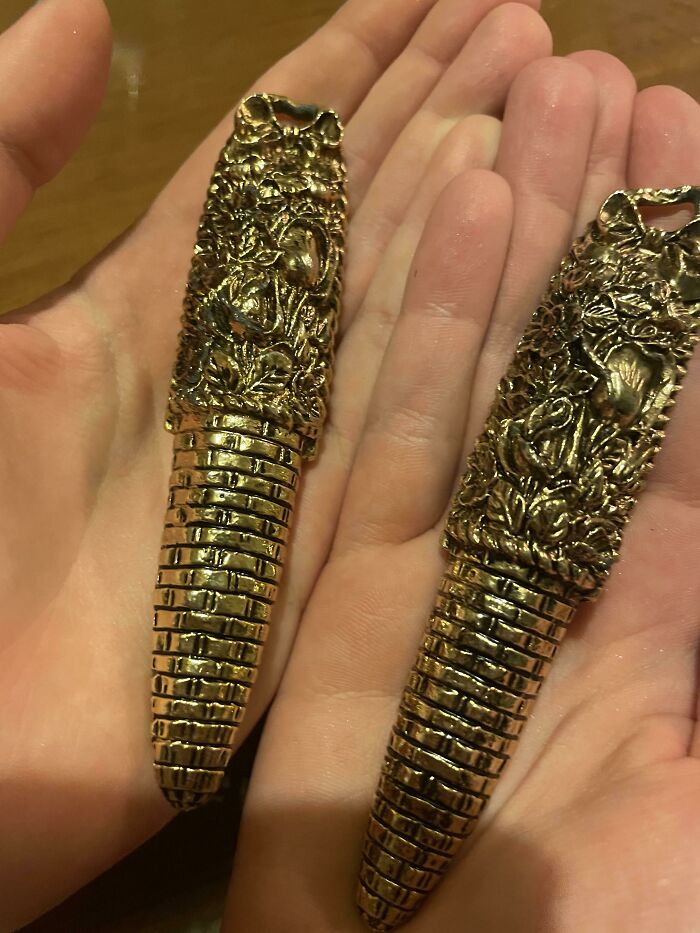
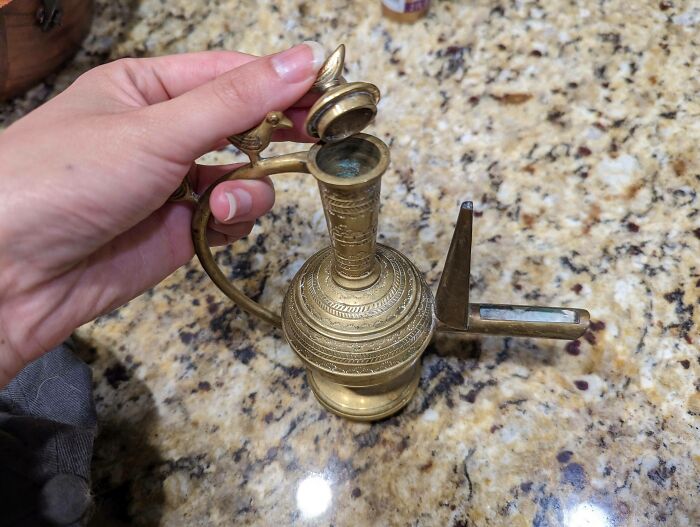
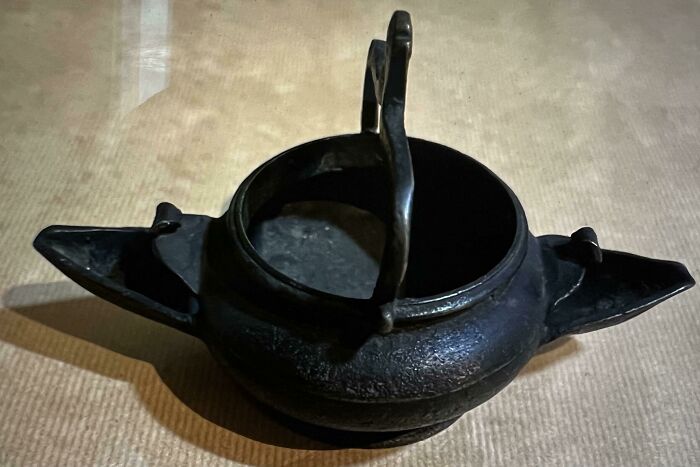
#20 What's This Heavy, Brass, Genie Lamp-Like Object With Both A Weird Cutout Spout And A Narrow Upwards Spout?
Answer: It’s a lamp. It’s literally an oil lamp, to be used to create light. The wick goes in the spout. The oil goes in the belly. You light the wick and a flame will burn on the end of the spout like a little candle, and you can carry your lantern around with you.
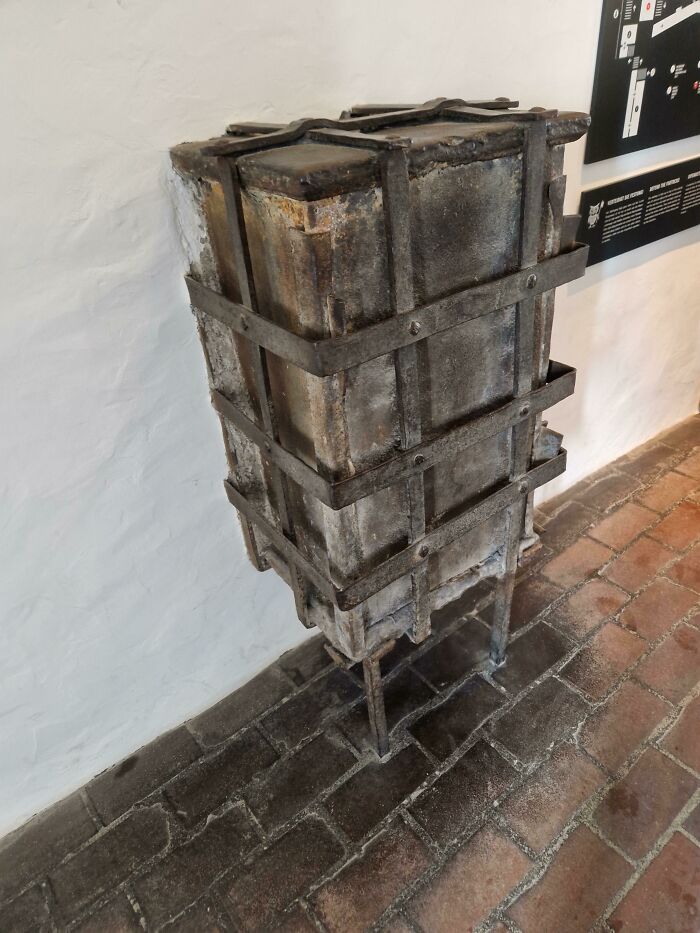
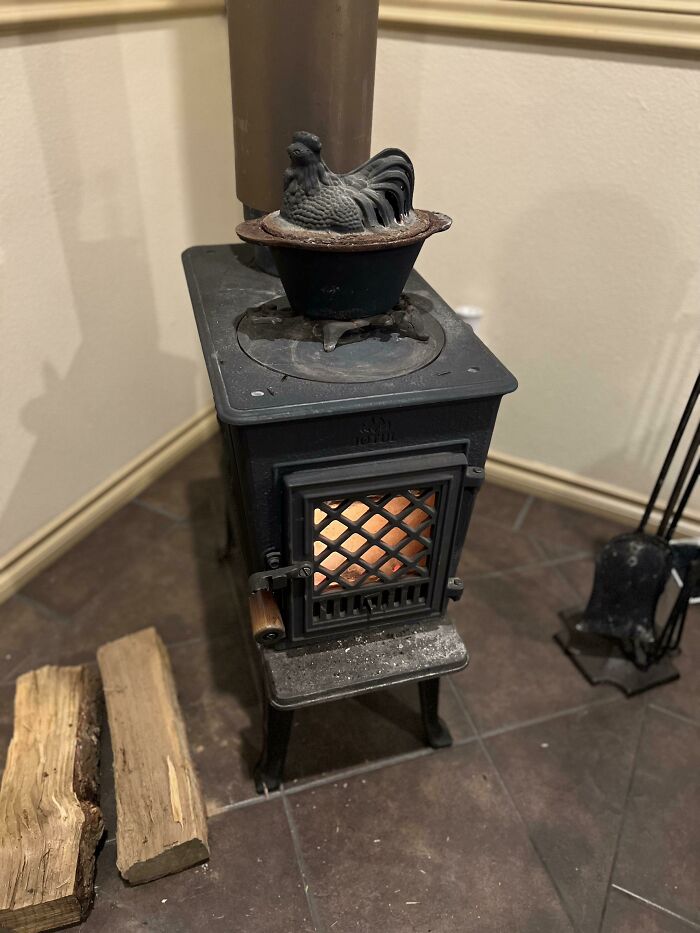
#23 What Is This Wall Mounted Metal Thing That Was Seen In Hohensalzburg Fortress? There Were 3 Or 4 Rooms With One Of These Objects And None Had An Explanation
Answer: These are pretty much radiators that were filled with embers and/or hot stones when needed.
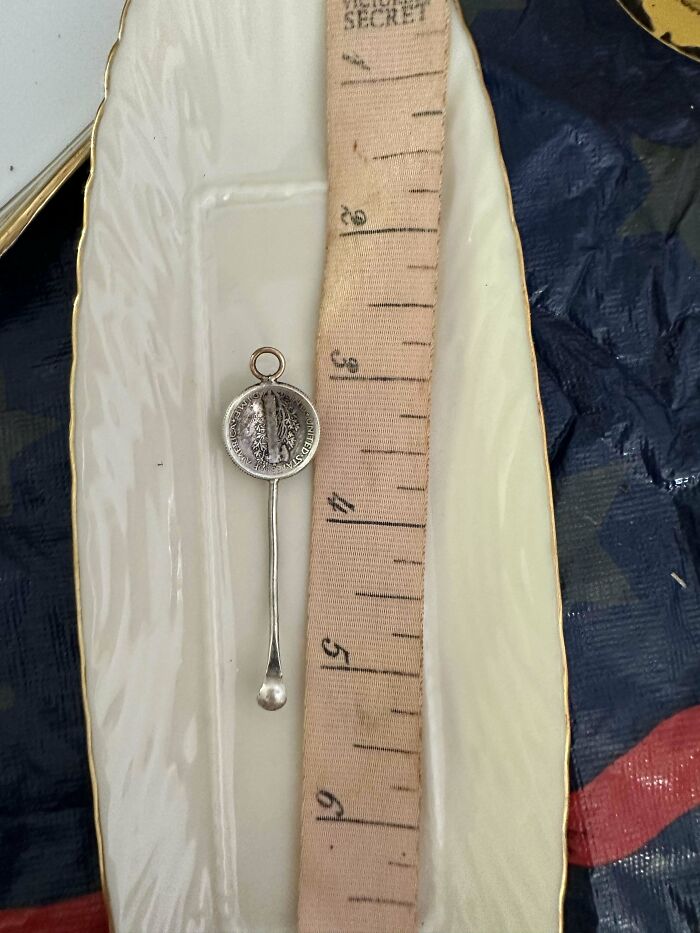
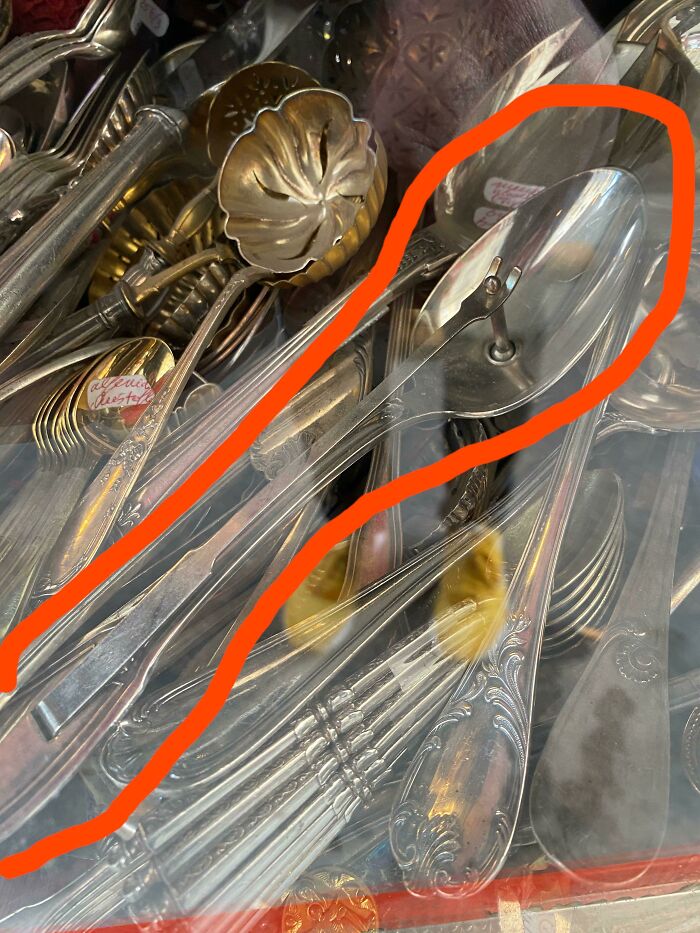
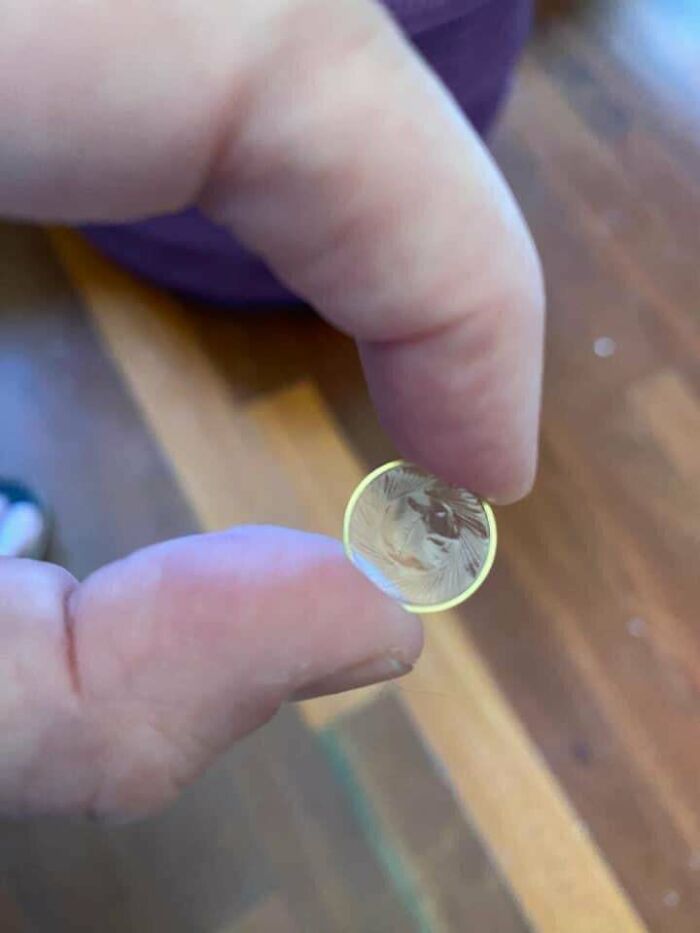
#26 1940 Mercury Dime Turned Into A Two Sided Spoon Of Some Sort With Fused Ring At The Top. Came With Odds And Ends From Deceased Older Relative From Ohio
Answer: A vintage spoon pendant used for illegal substances.
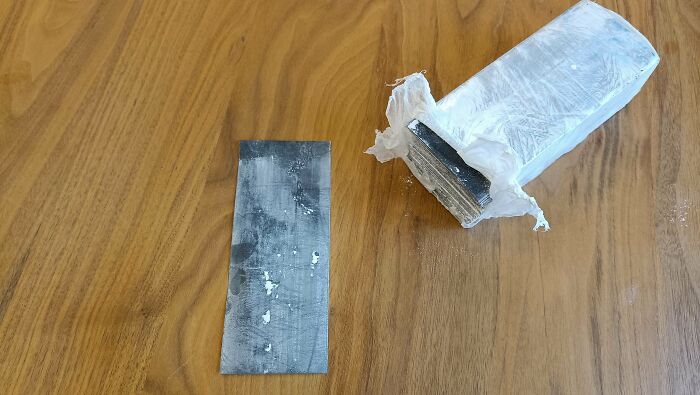
#32 Found In A Safe In A Deceased Man's House: 11 Identical Stacks Of Thin Black Paper Strips, Wrapped In Plastic Foil, Covered In Fine White Dust. Measurements Of Each Strip Approximately 16 Cm X 6,5 Cm, Height Of Each Stack Approximately 5 Cm. Other Than That, The Safe Was Empty
Answer: "Black Money Scam". It's construction paper or similar, he was scammed to believe it was currency dyed to be smuggled and could be restored.
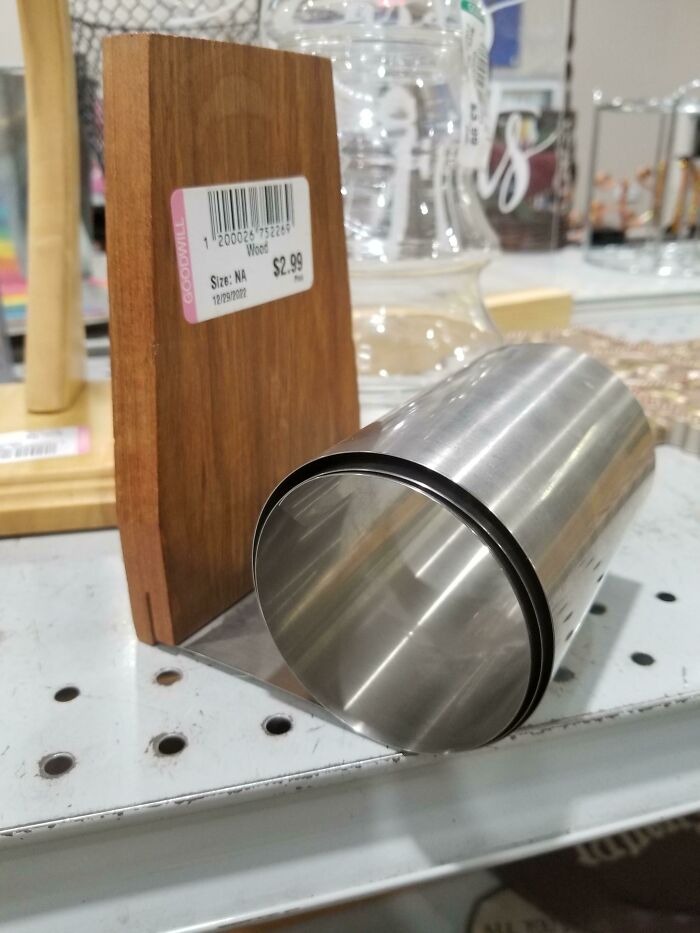
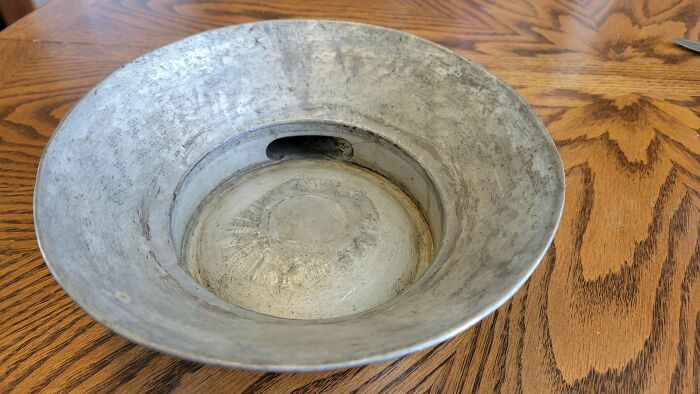
#35 What Is This? It’s Made Like A Barrel But Looks Like A Carrier Of Some Kind?
Answer: It is a Vasculum, a sturdy collection container used by botanists on field excursions in which plant specimens can be collected without damaging them.
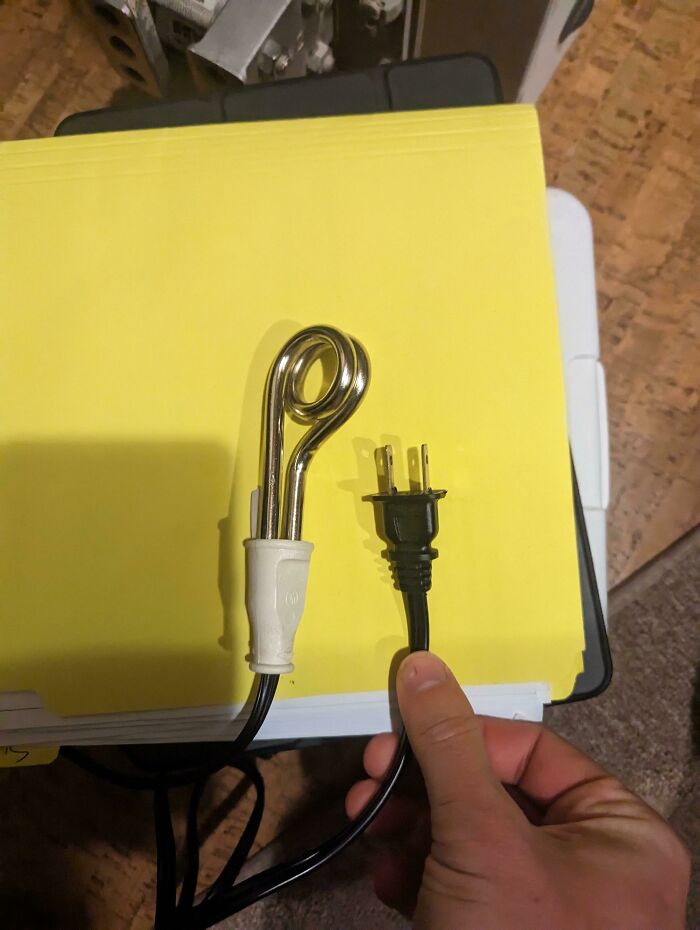
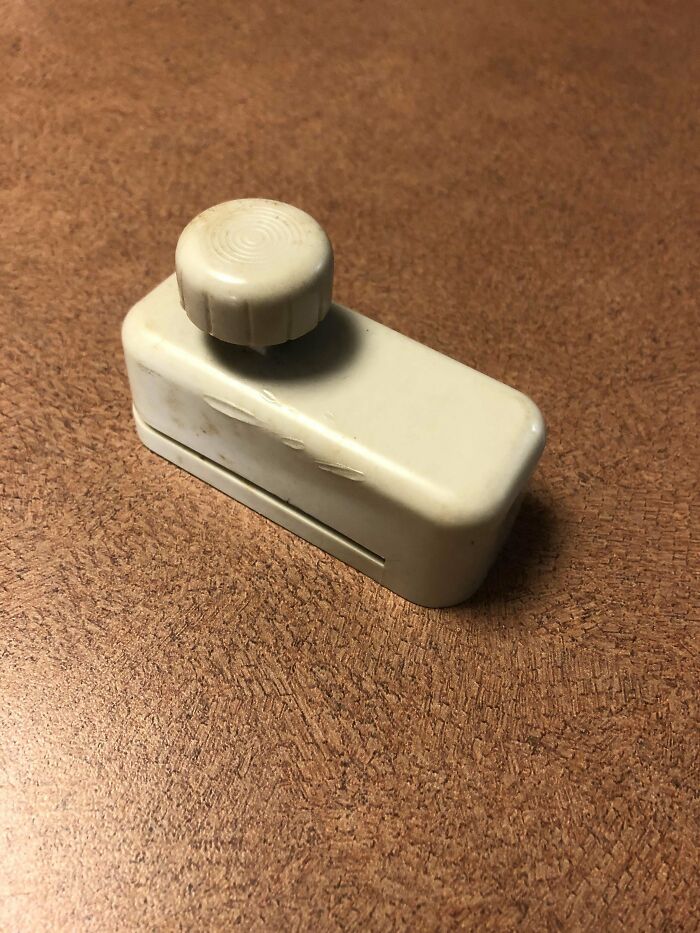
#39 A Short Thick Metal Coil That Can Be Plugged Into An Outlet. Doesn't Seem Very Safe At All. I'm Thinking It's Missing A Larger Piece That Creates It's True Purpose
Answer: Immersion heater. The metal piece goes into a cup of water and heats it.
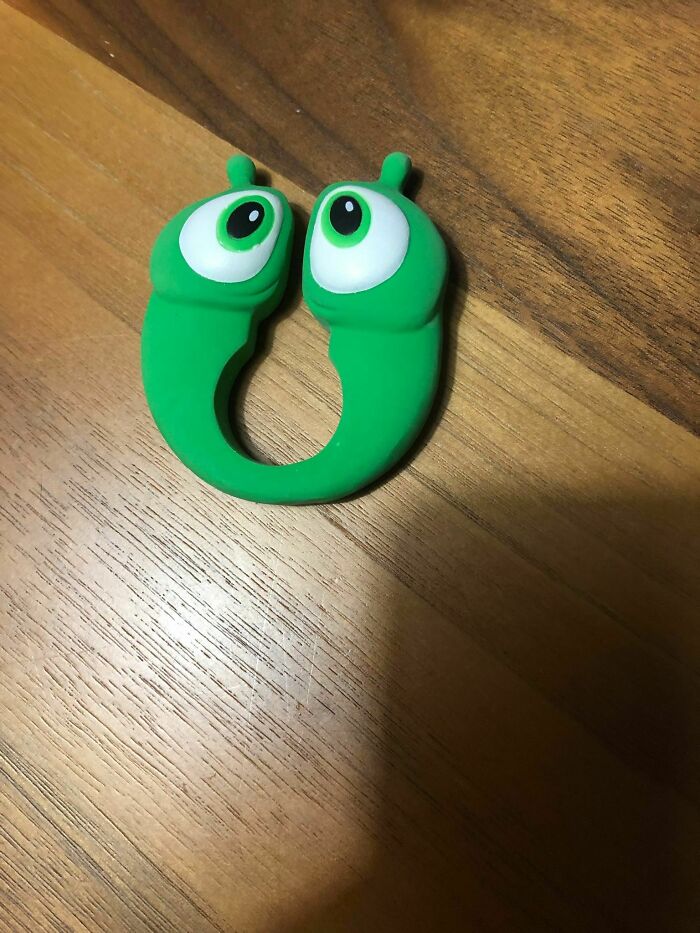
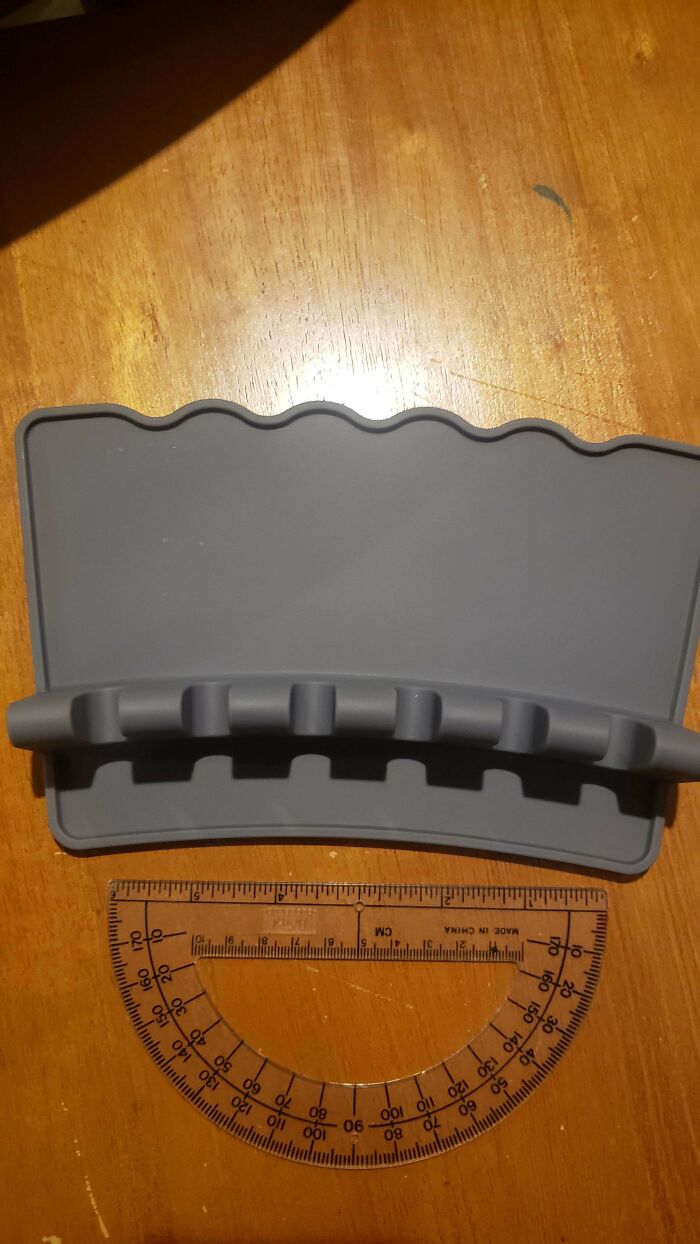
#40 A Foam Rubber Promo Item From The Local Water Authority. What Is It For?
Answer: YVW Water Watchers! Initiative to remind children to conserve water when possible. This is insanely clever. The Hawthorne effect is when people behave differently when they know or feel like they’re being watched—choosing a healthier meal at lunch with your fit friends, or being more productive at work when you sit near the boss’s office.
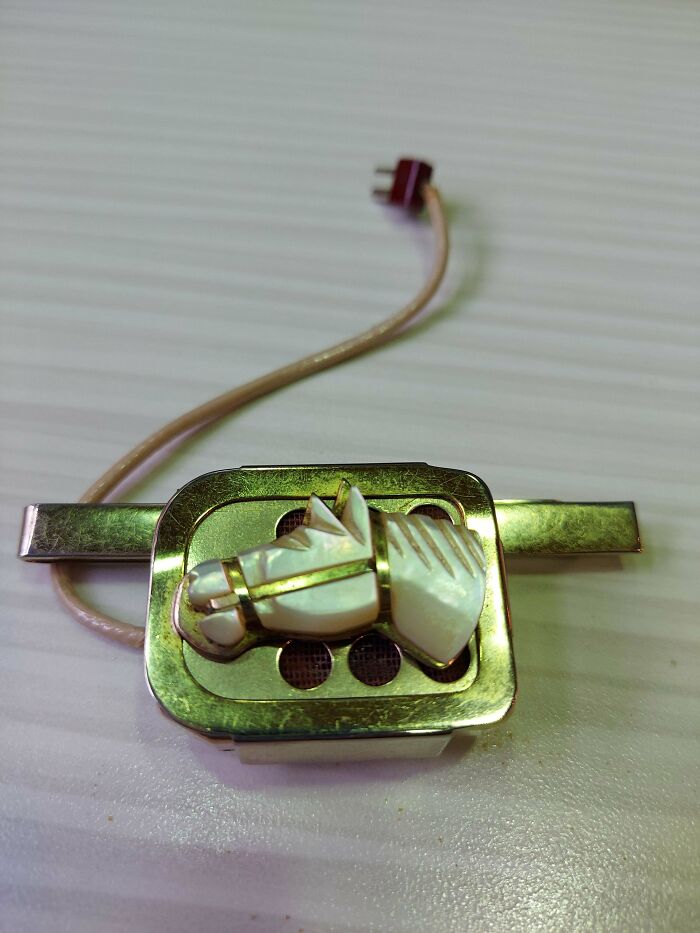
#42 Found This In Our Donation Bin, We're A Nonprofit, We Recycle Eyeglasses And Hearing Aids. It's A Gold Plated Speaker With A Short Cord With 2 Prongs At The End, It Also Has A Gold Plated Clip With An Opal-Like Material Of A Horse On It
Answer: An old Beltone type hearing aid. There's a transistor in the tie clip, and it plugs into a cord for the hearing aid.
#45 My Neighbor Had A Sink Hole In His Yard. It's Been Dug Up And There Are 3 Chambers. There Was A Cement Slab Over All The Chambers And At Least 6 Inch Walls All Around. One Of The Ceiling Slabs Gave Out And Exposed A Dry Empty Hole
#48 What Are These Little Dots On Our Hotel Mirror? They Seem To Be Behind The Glass
Answer: Mirror guy here, there are lots of things related to the adhesive that can pull off or degrade the silver backing, including: forceful detachment of the adhesive which pulls off the silver, using an acid curing adhesive instead of a neutral curing adhesive, putting the adhesive onto unpainted Sheetrock which screws up the curing process, or drawing a closed shape with the adhesive so air gets trapped in it when the mirror is pressed against the wall.
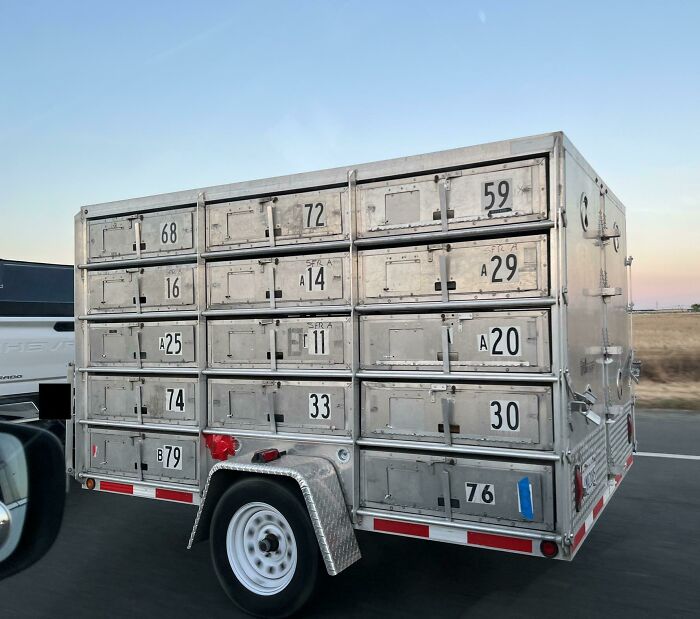
#50 About 2 Feet Long Numbers 1-10 On Both Sides. At A Restaurant (Shari's)
Answer: Worked at a Ponderosa back in my teens as a line cook and we had one of these. When an order was up we would press a button on a box and it would light up a number, so a server would know their order was ready for a table.
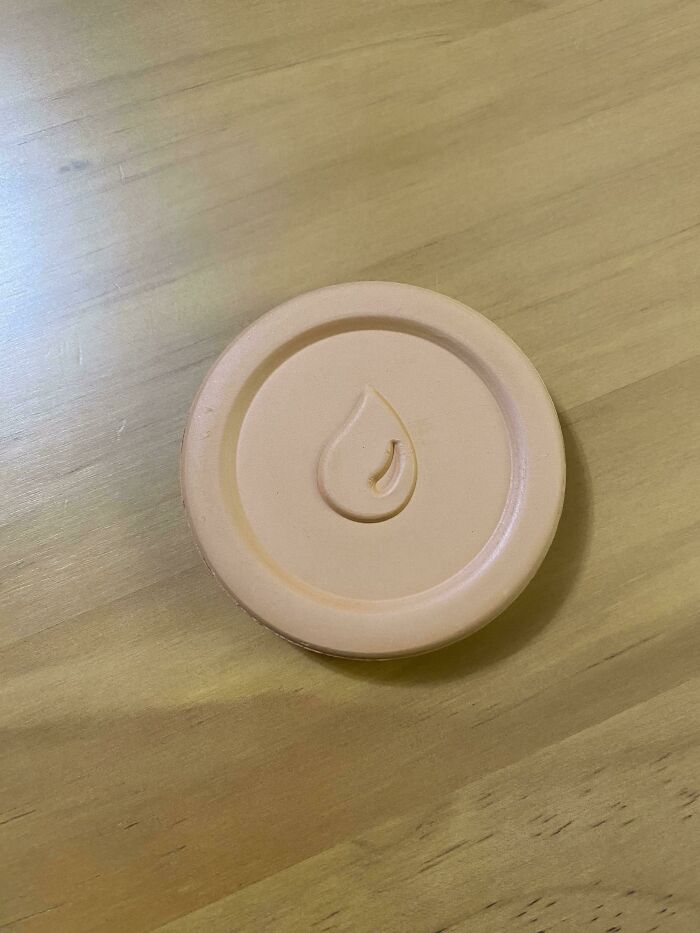
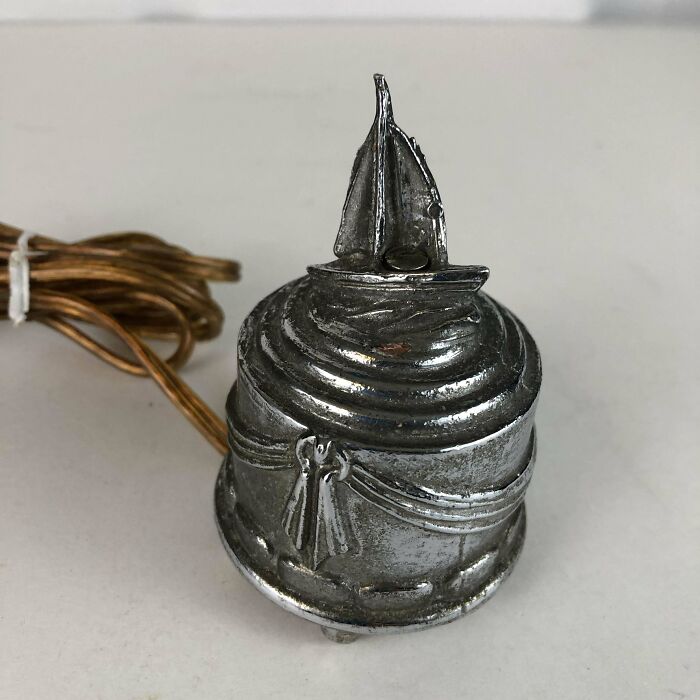
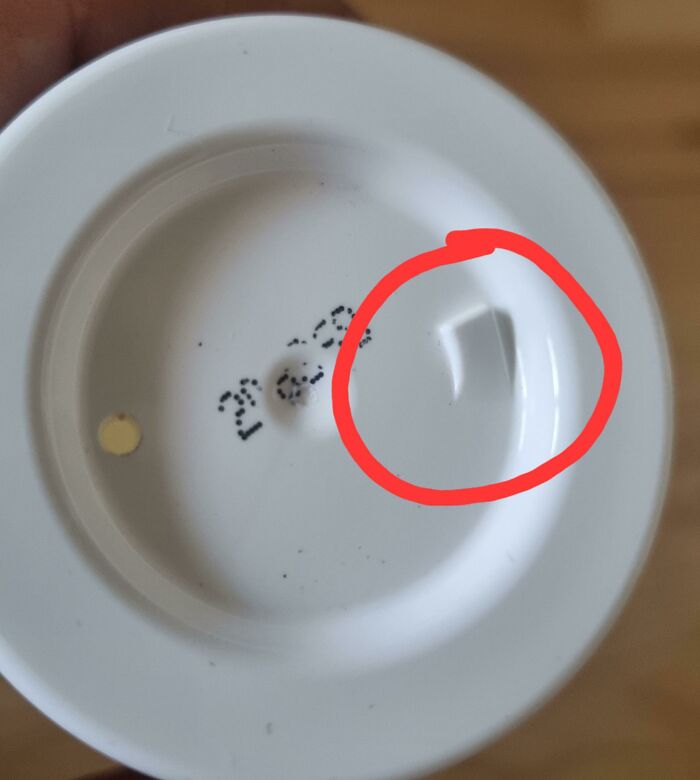
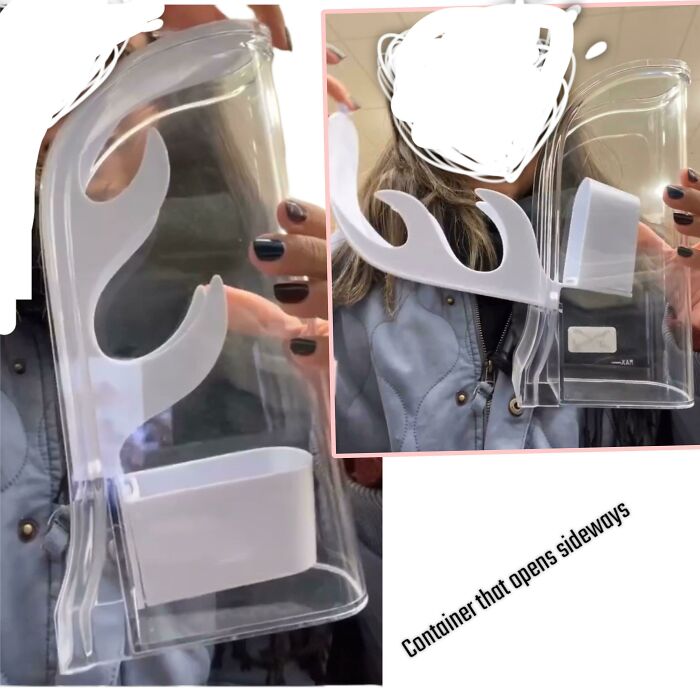
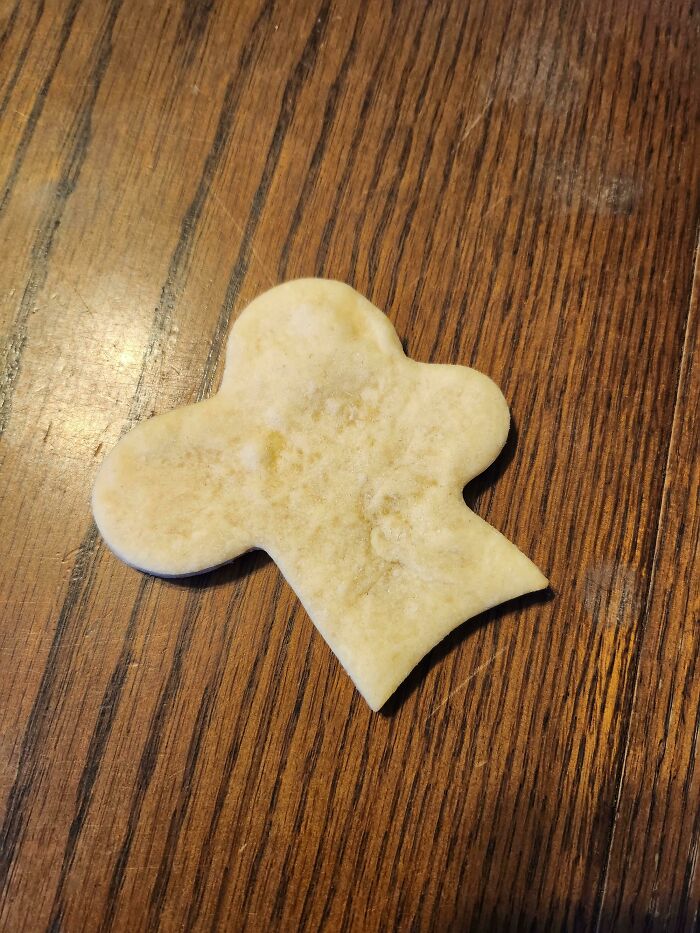
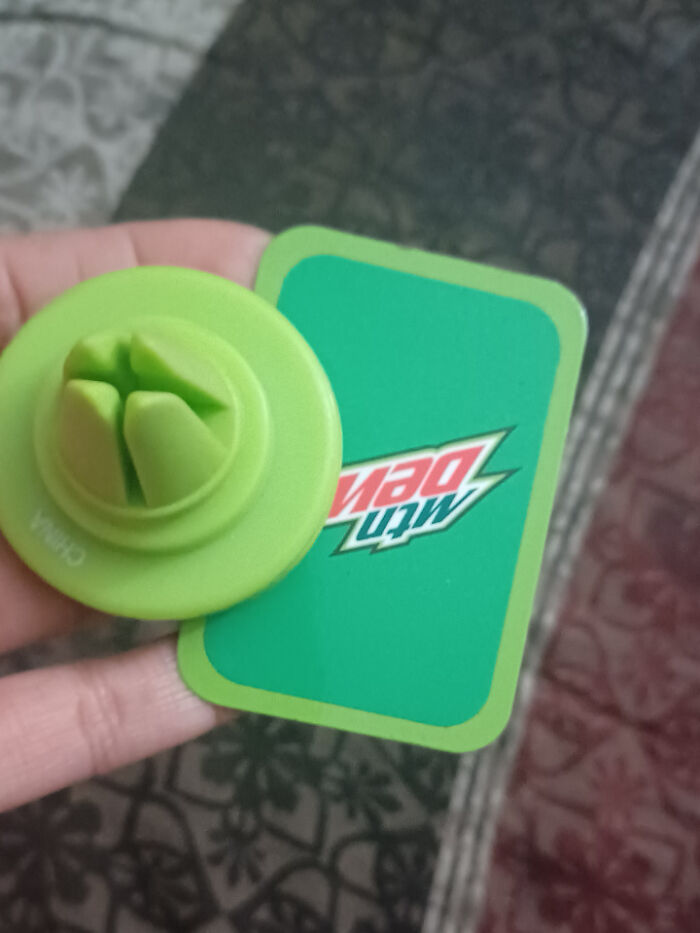
#51 This Thing Came With The Perfume Gift Set But I Have No Idea What’s Supposed To Be, It Feels Like It’s Made Of Clay Or Something But There’s No Description In The Box Or Anything. Is It Just A Random Trinket?
Answer: It's a perfume diffuser. You can spray your perfume on it, and it will absorb it and release the smell into the air.
#52 What Is This Cabinet On Wheels I Got At An Antiques Market? The Drawers Can Be Accessed From The Front As Well As From The Back, There Are Also Two Compartments With Small Key (???) Hooks On Each Side
Answer: This is just a scientific specimen cabinet, which could be used for anything from geology to lepidopterology.
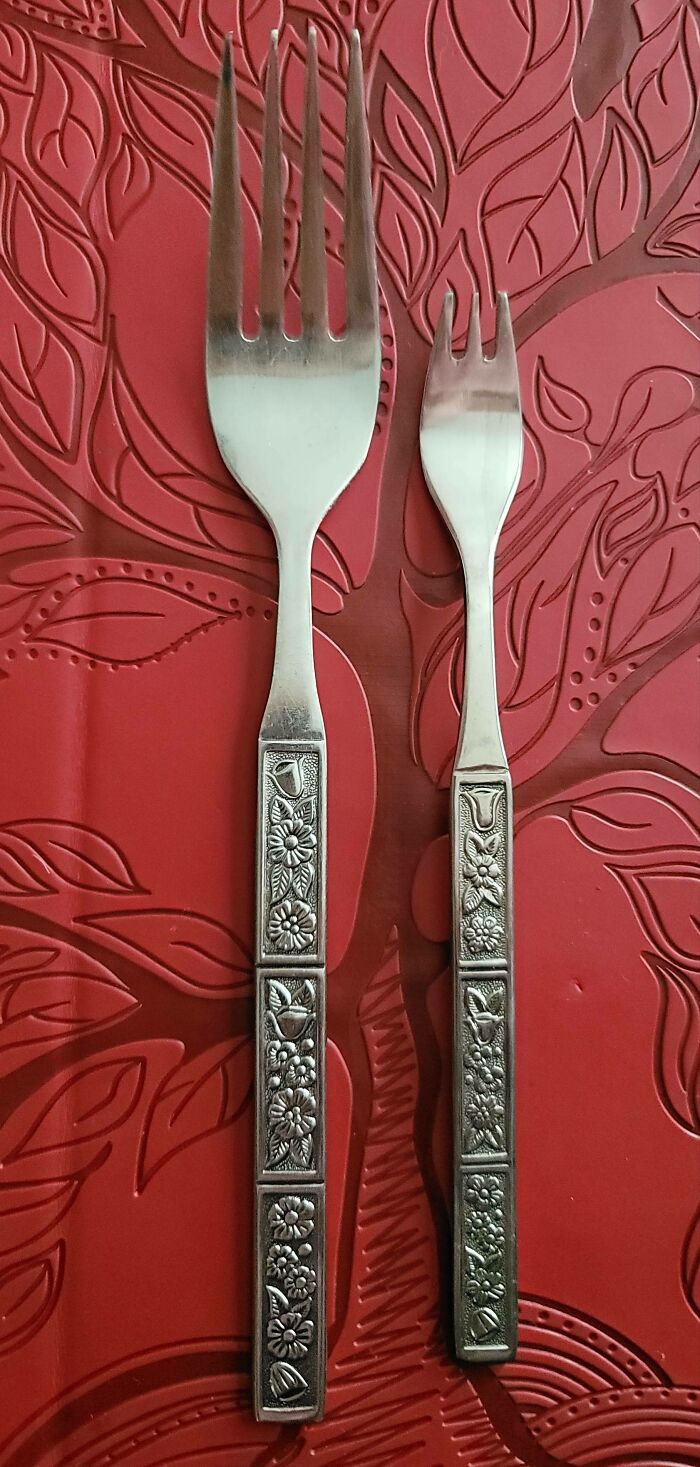
#55 Big Wooden Thing That Kinda Looks Like A Clothes Pin. It's About 4lbs, And 85cm Tall. It's A Dark Wood That's A Bit Worn Down And I'm Guessing It's Over 40 Years Old?
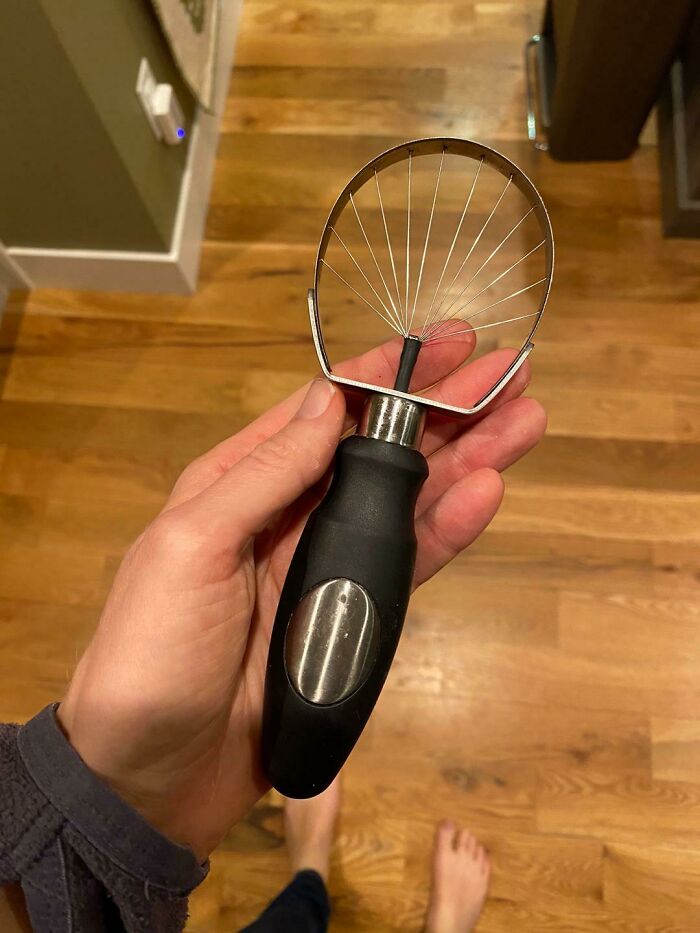
#59 Tennisracket With A Hook On The Back, On A Long Chain With Ball At The End. Looks Like Merchandise, But What Is The Hook And The Chain With The Ball For?
Answer: This is used to measure the height of the net in tennis.
#61 My Husband Found This While Hunting. It's Made Of Metal And Is A Little Bit Bigger Than A Plow, At Least 10' Wide And 25' Long
Answer: It’s a baler! The metal bands have small metal prongs protitruding, they pick up the hay. The corkscrew in the back moves it into the baling chamber, where a ram compresses it into a bale, after that it’s tied together and pushed out of the machine.
#64 What Is This Stuff In The (Seawater) Canal Next To My House?
Answer: This happens a lot in seawater. You see it in the beach all the time as a thick brownish foam. Basically, as marine creatures and so on (especially algae) decompose after death their bodies break down into various components. One of the processes is called saponification and basically converts fats into soap (fun fact, the same thing can happen to un-preserved humans). This coats the sand, gravel, rocks etc and then it is stirred up into foam by the water and (usually) high winds. On the beach it’s usually a mix of these animal byproducts, sand and other contaminants, it’s likely similar here but with less sand. In a canal it is likely stirred up by the wake of watercraft.
#68 I’ve Been Walking By This On The North Side Of 10th St (Between 6th And 5th Ave In The West Village) In NYC For Years. It’s The Only One Like It That I Know Of. Made Of Brass, Embedded In The Sidewalk. What Is It?
Answer: It’s a sensor to turn the heated sidewalk on and off.
#69 It’s Like A Hammer But One Side Is Like Spiked. The Head Is Iron With A Wooden Handle. Weighs 500-800g Estimated. There Are No Noticeable Markings On It
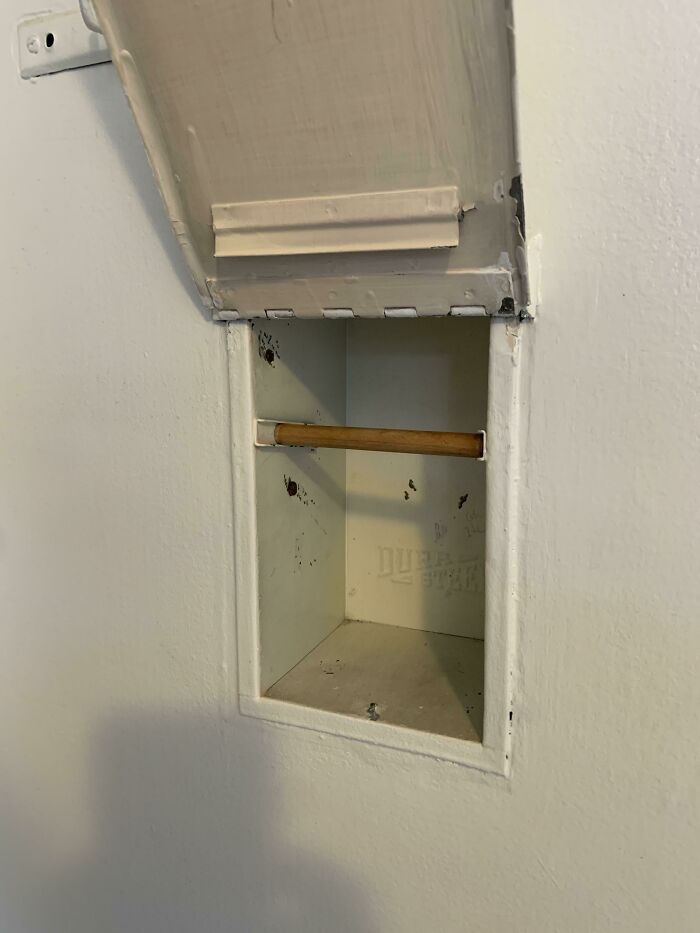
#70 Recessed Kitchen Enclosure: What Is The Purpose Of This Recessed Enclosure In The Wall Of A 1935 House In Southern California? I Don't Have The Measurements, But I Think That It's About A Foot Or So Tall And Is About Five Feet Up On The Wall. There's A Hinged Door That Opens Upward, As Shown
Answer: I think the dowel was put into a shelf slot after the fact to possibly make this into a paper towel holder. I say breadbox.
#72 Metal Spring Thing With 2 Red Glass Balls. Can Be Separated, The Balls Do Come Out. Little Over 3 Inches. Looks Like A Pair Of Tongs Holding The Red Balls
#73 Yellow/Orange Plastic, Semi-Circular Object Found In My Coworkers Dog's Stomach, Just Removed During Surgery. Approximately 1"X2" Long. Any Ideas? This Is The Only Photo I Have, No Other Angles Unfortunately
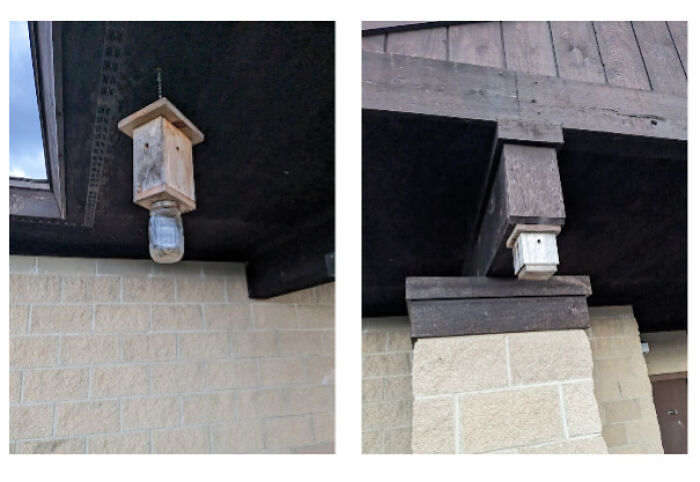
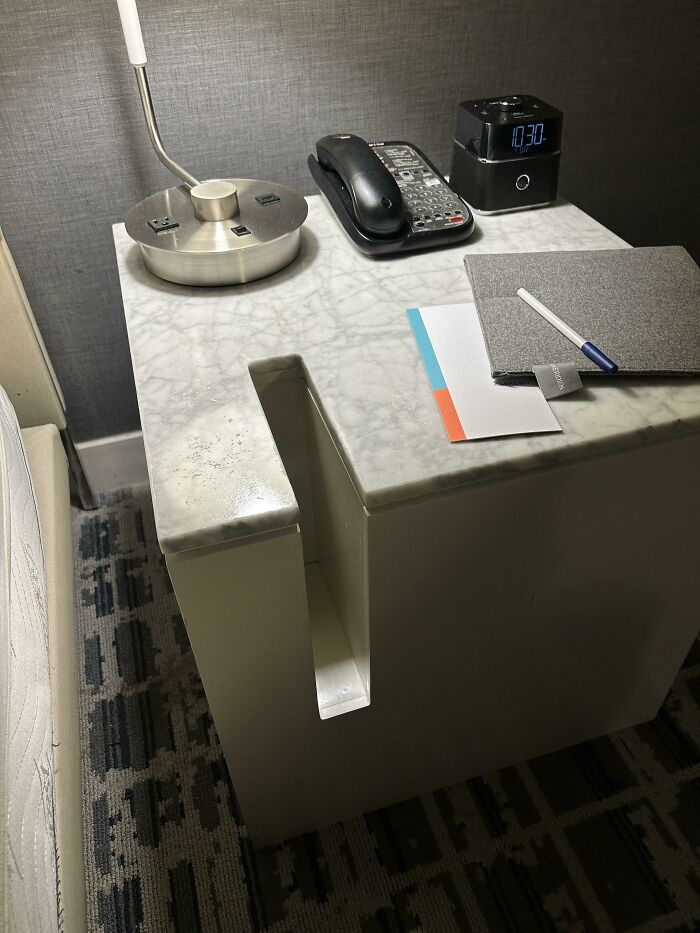
#78 Witt About 2 Foot Wide Indent In The Wall That Has Its Own Overhead Light And Light Switch
Answer: It's a phone “booth.” At one point it likely held a phone (likely a payphone). You could stand it in, have your call, and not be in the middle of the hallway.
#84 Laptop With Folding Sensors And Wires Going Into A Backpack. They Seem To Be Measuring Something. Saw Multiple People Walking Around With These Setups At A Major League Baseball Game
Answer: They're measuring wifi strength and saturation as part of MLB's deal with Extreme Networks.
#89 Contraption Found On A Hiking Trail In Utah Made Of Several Flat And Round Pieces Of Metal, Held Together By Screws With A Thicker Hollow Part Running Parallel To The Longest Metal Strip
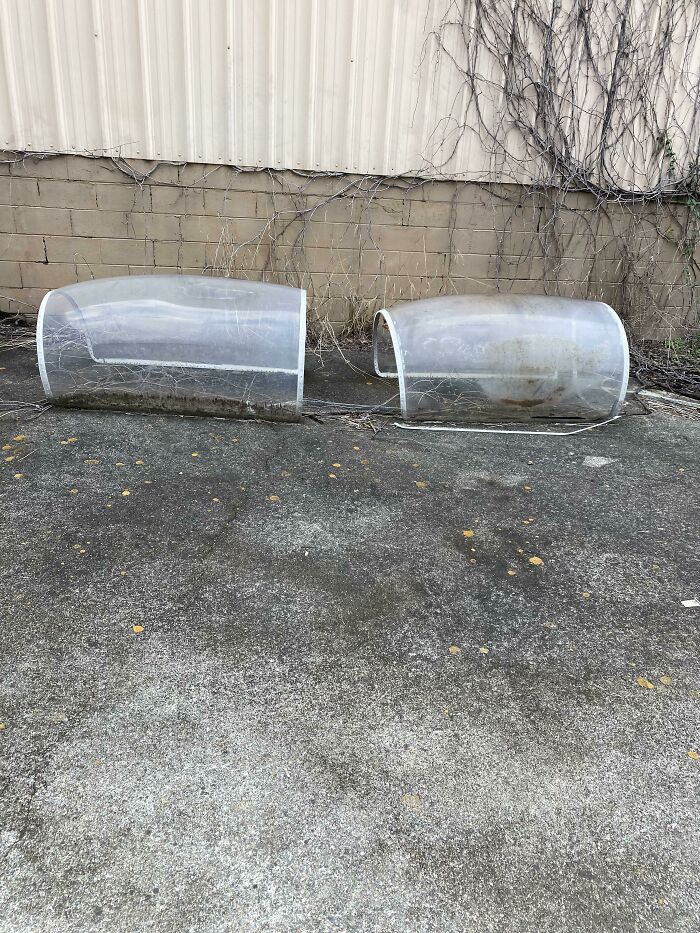
#97 What Is This Large White Pod Thing In My Neighbours Garden?
Answer: It’s a home observatory. The telescope inside doesn’t have to be particularly big, but chances are if they spent the money on the dome they have a pretty nice scope.
#98 What Is This Thing? It’s An Unmanned Ship Of Some Sort About The Same Size As A Big Kayak. Expensive Radar & Solar Panels On It. We Were On A Head Boat & This Was About 15 Miles Off The Coast In North Carolina. Captain Radioed The Nearby Navy Ship Who Claims. It Was Not Theirs
#99 Construction Device With A Yellow Base. Not Sure If It Goes Into The Ground. Makes Melodic Humming Noises At Regular Intervals And Increases In Pitch
Answer: Sonde device to measure pipe blockage / delineation using acoustic waves.
#100 What Is This Thing? It’s Magnetic, Very Dark Grey, Weighs 22 Grams, I Think It’s Metal. Cold To Touch, But Warms Up In My Hand
Answer: It's one of a pair of "rattlesnake eggs". You hold them separated slightly in your hand, and toss them up in the air, and they make a cool noise when they magnetize together. That's about it.
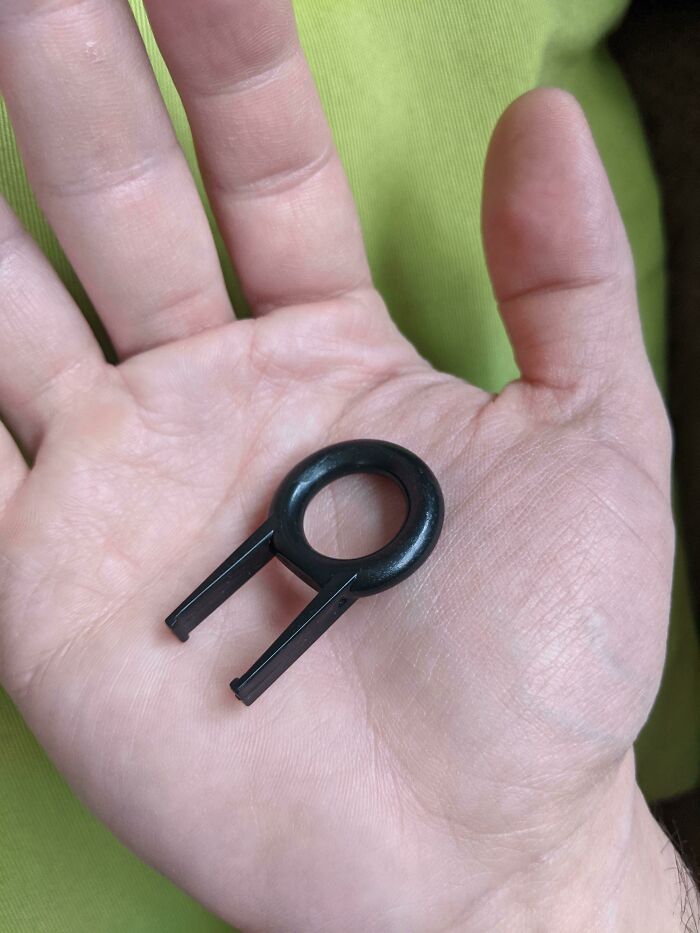
#102 Plastic Trinket Found In A Corporate Swag Bag. Has A Hole Just Big Enough For A Fingertip, And Two Nubs Looking Like It Clips To Something
Answer: It’s a keyboard key remover. It’s to help install custom keys but if it didn’t come with any custom keys, they probably gave it to you to help you remove all the keys to make cleaning easier.
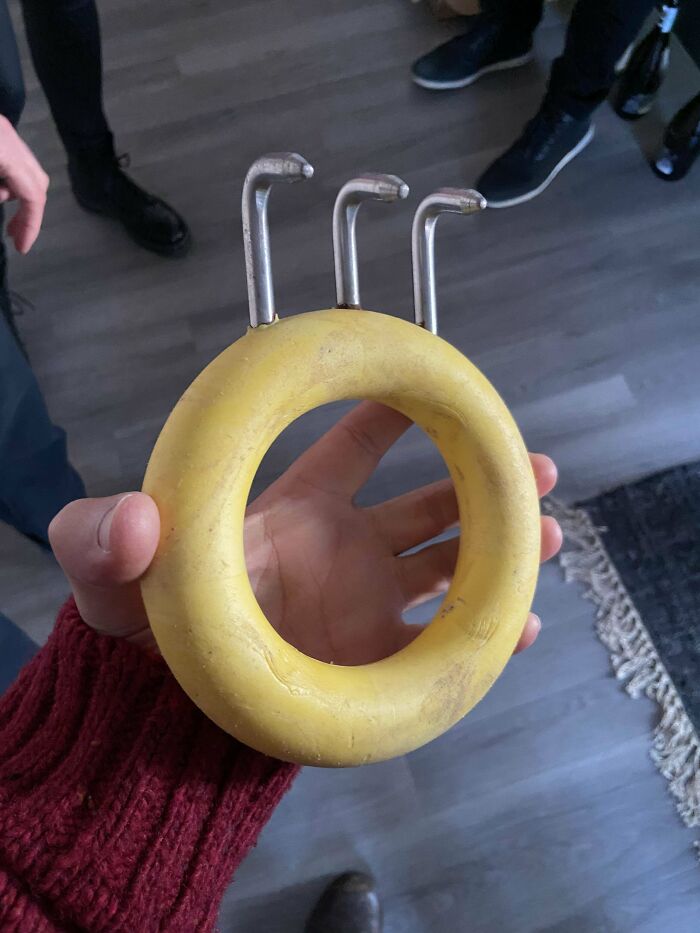
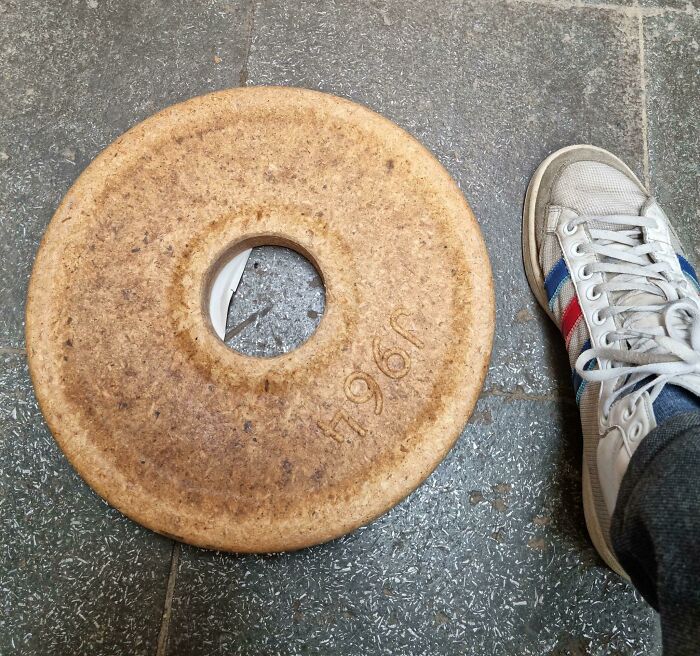
#104 What Is This Donut Shaped Thing Made Out Of Some Sort Of Recycled Cardboard?
Answer: It’s a core plug for a large roll of paper. You take them out when you load them onto a cutting machine to make smaller rolls like adding machine tapes or toilet paper rolls.
#108 This Washed Up On The Beach. Is Very Heavy But Seems To Barely Float. It Is About The 3-4 Feet Long And Looks Like Fiber Glass On The Outside But Not Completely Sure
Answer: It is an outrigger for trolling. you attach a long line to it and this carries it out away from the side of the boat so you can put out two long lines at once. Used for tuna and swordfish in the gulf stream.
#109 Aluminum Capsule Found On Beach Of Lake Superior. Has What Looks Like “Manitoba” In Small Letters On One Side. Completely Sealed, But Sounds Like Liquid Inside When Shaken
#112 Found On The Side Of The Road. It's Made Of Metal And Says Craftsman On The Front. It Has Some Sort Of Cup With A Nozzle Attached. There's Also A Small Rope. It Looked Heavy. About A Foot An A Half Wide And Not Quite A Foot Tall
Answer: A vintage craftsman wet wheel sharpening stone tool.
#115 What Is This Disc Thing I Was Just Handed With My Bagel? About 10 Inches In Diameter. Pouch Is Too Small To Hold A Can. Tag Says “Dist. By Primeline (Alphabroder) Cpsiatracking.com” I Went To The Url, And It Doesn’t Exist. Searched Those Companies’ Products And Found Nothing Relevant
#117 What Is This Table Of Numbers With Dots Found On A Plastic Suzuki Wheel Arch?
Answer: The month and year of manufacture. It’s a permanent dent made in the tool steel of the injection molding tooling, so the most recent dent is the birth date of the wheel arch.
#119 Large, Heavy Metal Hexagonal Object Found In Central Wyoming. It Has 3 Hollowed-Out Containers Each Attached To A Central Pipe. The 'Lids' On Top Are Bolted Shut
Answer: A ball mill. Similar in concept to a rock tumbler, but used by industry to powderize or smooth materials.
#123 Woven Bamboo Object Found In An Antique Shop In Kyoto, Japan. I Believe The Owner Said It Had Something To Do With Tea. Does Anyone Know What This Is?
Answer: These are tiny mock versions of what they used to use on riversides to stop erosion. Now they're mostly just decorations or hashi holders (chopstiick holders, but they have much smaller ones - i have some in my cuppard) so your food-covered hashi doesn't touch the table. They were called Takejakago.
#126 Anyone Know What This Is For? It Came With My House From 1948. Measures About 4.5” X 5”. Front Part Lifts Up. The Only Markings Is A Handwritten “50” On The Back. Looks Like It Would Have Originally Been Black
Answer: It's a hose holder that prevents tangling.
#127 What Is It? I Found This In One Of Our Flowerbeds. It Looks Like Two Chain Links With Four Rubber Bands Around Them. On The Side It Says “Narrow” And “Zsc-Z51”
#128 Purple/Blue Light In Hotel Only Comes On When Hitting Up Channel
Answer: It's an infrared based occupancy sensor. The TV controller is outputting an infrared signal activating the sensor.
Source: husband who is an electrical engineer.
#130 Found Behind A Metal Fabrication Factory. Feels Like Plexiglass. 6-8 Feet Long. Very Light. No Words Or Numbers On It. Studded Metal Around The Plexiglass
#131 Found In A Garage In The Pnw. Metal, Copper-Colored Disk About 2-3 Inches Across And Over 1 Inch Thick. One Side Has 2 Teardrop Grooves That Almost Looks Like A Pig Nose, The Other Side A Holographic Sticker Of A Rock And Roll Skeleton Skull
#133 This Inflatable Pillow-Like Object Was Found In Our Yard After A Windstorm. There Is An Opening To Inflate/Deflate It. There Is No Other Text On The Object
#134 Wooden Stick. Made Of Dark Wood With Wrapped String Detail, Roughly 2 Feet Long, With Big Heavy Lump At One End, And A Small Hole The Other End. Too Short To Be A Walking Stick
#136 Found This Weird Mountain Dew Thing. It's Magnetic And That's Pretty Much All I Know About It. I Google Image Searched It But Used Nothing But A Lemon Juicer So... What Is It?
#139 A Black Metal Puck With A Silver Tri-Point Pattern On One Side; Unscrews Into 3 Pieces. About 2in/5cm Wide, 1.5in/4cm Tall, Weighs About 13oz. Listed As "Mystery Item" At A Public Auction In Southern California
Answer: I think it's actually to evenly distribute the coffee rather than tamp it, the tamper would be used after this thing and has a flat bottom.
#140 Large Two Chambered Concrete Object Found In The Rural Woods Of Iowa
#141 Strange Tower Made Out Of Storage Containers On A Construction Site. Has Doors In The Middle And Also A Roof Hatch. The Inside Is Lighted With Lamps
#142 Found In The Middle Of The Woods Near Suburbs. Several Tubes Along The Edge. Obviously Some Kind Of Burn Pit
#143 Weird Plastic Red "Key" That I Found In My Apartment After The Firefighters Left After A Fire
#144 This Object Felt From The Sky Yesterday In The City Of Santos, Brazil, And Hit A Car Parked In The Street. The Car Owner Said It Was Pretty Hot When Found And Had A Rotten Egg Odor
#145 I’ve Ruled Out With Experts It Being Any Type Of Electrical Insulator Which Is The Main Answer I Get. Found In Western Ma River While Artifact Hunting, Village Settled Circa 1750s & In 1845 Boston Rail Line Went In. Def Old Dump Site. Glass & Porcelain. Ornate Swirls, No Makers Mark. Have Videos Too
#146 What Are These Rails Between The Main Rails Called And What Is Their Purpose?
#147 Some Kind Of A Plastic Handle In The Ceiling Of The Bathroom In An Old Apartment. It Has A Metal Rusty Long Rod Attached To It That Can Be Seen While Pulling It Down, And Probably A Spring, Cus It's Jumping Right Back When Letting It Go
#148 Found In The Middle Of The Woods Near Suburbs. Several Tubes Along The Edge. Obviously Some Kind Of Burn Pit
#149 Found This Spiked Metal Collar Hanging In One Of The Upstairs Rooms In The House I Just Bought In Spain
#150 What Is This Tiny Fork For? Dinner Fork For Scale
Nutritional Value: Zucchini is low in calories but high in essential nutrients such as vitamin C, vitamin A, potassium, manganese, and dietary fiber. These nutrients are important for maintaining good health and supporting various bodily functions.
Antioxidant Properties: Zucchini contains antioxidants like vitamin C and beta-carotene, which can help neutralize harmful free radicals in the body. Antioxidants play a crucial role in reducing oxidative stress and inflammation, which may contribute to chronic diseases.
Digestive Health: Zucchini is a good source of dietary fiber, which aids in digestion and promotes regular bowel movements. Adequate fiber intake can help prevent constipation, maintain a healthy gut, and support overall digestive health.
Weight Management: Zucchini is low in calories and high in water content, making it a suitable choice for those trying to manage their weight. Its high fiber content can also promote satiety, reducing the likelihood of overeating.
Heart Health: The potassium content in zucchini contributes to heart health by helping to regulate blood pressure levels. Adequate potassium intake is associated with a lower risk of hypertension and cardiovascular diseases.
Eye Health: Zucchini contains carotenoids like lutein and zeaxanthin, which are beneficial for eye health. These compounds have been linked to a reduced risk of age-related macular degeneration and cataracts.
Hydration: Zucchini has a high water content, which can contribute to hydration. Staying hydrated is essential for maintaining optimal bodily functions and overall health.
Recipes!
Zucchini bread!
Ingredients:
2 cups all-purpose flour
1 teaspoon baking soda
1 teaspoon baking powder
1/2 teaspoon salt
1 teaspoon ground cinnamon
1/2 teaspoon ground nutmeg
2 eggs
1/2 cup vegetable oil
1 cup granulated sugar
1/2 cup packed brown sugar
2 teaspoons vanilla extract
2 cups grated zucchini
1/2 cup chopped nuts (optional)
Instructions:
Preheat your oven to 350°F (175°C). Grease and flour a 9×5-inch loaf pan.
In a bowl, whisk together the flour, baking soda, baking powder, salt, cinnamon, and nutmeg. Set aside.
In a large bowl, beat the eggs, vegetable oil, granulated sugar, brown sugar, and vanilla extract until well combined.
Add the grated zucchini to the wet ingredients and mix well.
Gradually add the dry ingredients to the wet ingredients, mixing until just combined. Do not overmix. If using nuts, fold them into the batter.
Pour the batter into the prepared loaf pan and smooth the top.
Bake for approximately 50-60 minutes or until a toothpick inserted into the center comes out clean.
Remove from the oven and let the zucchini bread cool in the pan for about 10 minutes. Then transfer it to a wire rack to cool completely before slicing.
Zoodles!
Ingredients:
2-3 medium-sized zucchini
2 tablespoons olive oil
Salt and pepper to taste
Optional toppings: marinara sauce, pesto, grated cheese, fresh herbs, sautéed vegetables, or protein of your choice (e.g., grilled chicken, shrimp, tofu)
Instructions:
Start by preparing the zucchini. Wash them thoroughly and trim off the ends.
Use a spiralizer to create zucchini noodles. If you don’t have a spiralizer, you can use a julienne peeler or a sharp knife to slice the zucchini into thin, noodle-like strips.
Heat olive oil in a large skillet over medium heat. Add the zucchini noodles and season with salt and pepper.
Sauté the zucchini noodles for about 2-3 minutes or until they are slightly softened but still crisp. Be careful not to overcook them, as they can become mushy.
Remove the skillet from heat and serve the zucchini noodles with your choice of toppings. You can toss them with marinara sauce, pesto, or mix in sautéed vegetables or protein for a complete meal.
Stuffed Zucchini Boats!
Ingredients:
4 medium zucchini
1 tablespoon olive oil
1/2 onion, finely chopped
2 cloves garlic, minced
1 red bell pepper, finely chopped
1 cup diced tomatoes (canned or fresh)
1 cup cooked quinoa or rice
1/2 cup shredded cheese (such as mozzarella or cheddar)
1/4 cup grated Parmesan cheese
1 teaspoon dried oregano
Salt and pepper to taste
Fresh basil or parsley for garnish
Instructions:
Preheat your oven to 375°F (190°C). Prepare a baking dish by greasing it lightly with olive oil or cooking spray.
Wash the zucchini and cut them in half lengthwise. Scoop out the center flesh using a spoon, leaving about a 1/4-inch thick shell. Reserve the scooped-out flesh.
Heat olive oil in a large skillet over medium heat. Add the onion, garlic, and red bell pepper. Sauté for a few minutes until the vegetables are softened.
Chop the reserved zucchini flesh and add it to the skillet. Cook for an additional 3-4 minutes.
Stir in the diced tomatoes, cooked quinoa or rice, dried oregano, salt, and pepper. Cook for a few minutes to allow the flavors to blend.
Fill the hollowed zucchini shells with the mixture from the skillet, pressing it down gently. Sprinkle shredded cheese and grated Parmesan cheese over the top.
Place the stuffed zucchini boats in the prepared baking dish. Cover the dish with foil and bake for about 20 minutes.
Remove the foil and continue baking for another 10-15 minutes or until the zucchini is tender and the cheese is melted and lightly golden.
Once cooked, remove the zucchini boats from the oven and let them cool for a few minutes. Garnish with fresh basil or parsley before serving.
NOOTS!
The nutritional facts for zucchini may vary slightly depending on the size and variety, but here is a general overview of the nutritional composition of 1 cup (approximately 124 grams) of raw, sliced zucchini:
Calories: 19
Carbohydrates: 4 grams
Dietary Fiber: 1 gram
Sugars: 2 grams
Protein: 1 gram
Fat: 0 grams
Vitamin C: 21% of the Daily Value (DV)
Vitamin A: 11% of the DV
Potassium: 8% of the DV
Manganese: 8% of the DV
Vitamin K: 7% of the DV
Folate: 6% of the DV
Magnesium: 4% of the DV
Disclaimer: The following content was generated with the assistance of an AI language model. Organized, edited and tinkered around with by me, Corey C.
]]>
https://mallize.com/blogs/news/chicken-parmesan2023-06-24T21:13:52-04:002023-06-24T21:13:52-04:00Chicken ParmesanadminChicken Parmesan (also called Chicken Parmigiana) is such a treat! Classically crispy, coated in bread crumbs and parmesan cheese, then topped with marinara and fresh mozzarella. It’s simple and absolutely delicious paired with my awesome garlic bread!
Why You’ll Love this Chicken Parmesan
For my Chicken Parmesan recipe, I opt to coat the chicken in a light and airy panko bread crumbs and parmesan cheese combo that takes this chicken cutlet to a whole new level of CRISPY! That first bite of cRRRRunch will have you convinced to do the same.
Of course, using traditional bread crumbs is delicious too, but using Panko bread crumbs completely transports this chicken to heavenly status. It’s a great stick to your ribs dinner that gets on the table faster than you think it will, plus the kids (and adults!) just love it.
What are Panko Bread Crumbs?
Panko Bread Crumbs are Japanese bread crumbs made from specially baked, crustless bread that are processed into flakes and then dried. This makes for larger, flaky, oblong shaped bread crumbs that are crispier and lighter, therefore don’t pack together when coating the food, resulting in a breading that stays super crispy and for longer.
What Cut of Chicken is Best for Chicken Parmesan?
Chicken Breasts are the best part of the chicken to use for Chicken Parmesan. You want THIN pieces though for ultimate crispiness. For this recipe, I used chicken cutlets which you can buy in the store. You can also use chicken tenderloins, but those will look more like chicken fingers. Totally works, but might not be the look you’re going for.
Pro Tip: If all you can find are large chicken breasts, no biggy! Simply slice your chicken breasts lengthwise into 2 thin cutlets each. If your chicken breasts are still too thick, pound them out between plastic wrap until desired thickness is achieved.
How to Make Chicken Parmesan
Although this Chicken Parmesan recipe looks fancy, it’s so easy to put together even on a busy weeknight. For full recipe details, including ingredients needed and measurements, see the printable recipe card down below. Here is what you can expect when making this Chicken Parmesan recipe:
Preheat Oven + Prep
Preheat oven. Line a baking sheet with foil and top with a roasting rack (or cooling rack). Set aside.
Preheat Large Pan + Prep Dredging Station
Preheat a large, nonstick or cast iron skillet over medium high heat.
Set up your dredging station by placing flour and beaten eggs into 2 separate shallow dishes. Combine the parmesan cheese and Panko bread crumbs in a third shallow dish.
Season + Dredge Chicken
Season both sides of the chicken cutlets with salt, pepper, garlic powder and Italian seasoning. Dredge chicken in the flour mixture, then eggs, then into the cheese/bread crumbs – pressing into the cutlet to coat it evenly.
Fry Chicken on Both Sides
Melt butter and olive oil in the pan once it is nice and hot. Place chicken into hot pan and cook until each side is golden brown, about 3-4 minutes per side, checking to make sure it’s not burning. Transfer to a cooling rack on baking sheet, repeating until remaining chicken is all fried.
Pro Tip: Work in small batches so your chicken actually fries and doesn’t STEAM. You’ll be finishing the chicken off in the oven so it doesn’t matter if some cutlets sit on the rack for awhile while the rest is finishing off.
Bake
Top each piece of chicken with dollop of marinara sauce and a slice of fresh mozzarella.
Bake anywhere from 7-15 minutes until chicken reaches an internal temperature of 165°F with a meat thermometer, and cheese is melted. The timing here will depend on how thick your cutlets are, so check on them periodically with a meat thermometer. Do not overcook or you’ll have dry chicken and all of your hard work will be for naught.
Assemble and Serve
To assemble, toss cooked pasta with remaining marinara sauce and place a small amount onto each plate. Give it a twirl with a big fork if you’re feeling lavish. Top each pile of pasta with a piece of chicken and chopped fresh basil, if desired and serve hot.
Can I Substitute Low-Moisture Shredded or Bar Cheese for Fresh Mozzarella?
I love the taste and texture that Fresh Mozzarella Cheese gives to this recipe, but if you prefer Low-Moisture Shredded Mozzarella Cheese (or the bars that you shred yourself) then by all means do it! This is your house and you make the decisions. I guarantee you that your Chicken Parmesan will still be absolutely delish!
Pro Tip: If you do choose to use Low-Moisture Mozzarella Cheese, I would STRONGLY suggest buying the bars and shredding it yourself. Most bags of pre-shredded cheese are full of anti-caking agents that take away from the taste and texture of your cheese.
What to Serve with Chicken Parmesan
The traditional side dishes for Chicken Parmesan are a long noodle pasta like linguine, fettuccine, spaghetti, or my favorite – angel hair. Add some type of garlic bread and a caesar salad and you have a full meal. Here are some more side dishes for Chicken Parmesan:
Store leftovers in an airtight container and in the fridge for 4-5 days. If you want to store your leftovers longer, you can freeze it. To freeze, allow to chicken to cool completely to room temperature and then place in an airtight, freezer safe container or resealable bag. Chicken Parmesan will stay fresh in the freezer for up to 3 months. To thaw, allow to sit in the fridge overnight before reheating.
I hope you LOVE this dish and add it to your dinner menu rotation! I would love to hear what you think and to give this a star rating in the comments below. Have a fabulous week, friends!
Chicken Parmesan (also called Chicken Parmigiana) is such a treat! Classically crispy, coated in panko bread crumbs and parmesan cheese, then topped with marinara and fresh mozzarella.
Preheat oven to 425° F. Line a baking sheet with foil and top with roasting rack (or cooling rack). Set aside.
Set up your dredging station by placing flour and beaten eggs into 2 separate shallow dishes. Combine the parmesan cheese and panko bread crumbs in a third shallow dish.
Preheat a large, nonstick or cast iron skillet over medium high heat.
Season the chicken cutlets with salt, pepper, garlic powder and italian seasoning. Dredge chicken in the flour mixture, then eggs, then into the cheese/bread crumbs – pressing into the cutlet to coat it evenly.
Melt butter and olive oil in the pan once it is nice and hot. Working in small batches, place chicken into hot pan and cook until each side is golden brown, about 3-4 minutes per side, checking to make sure it's not burning. Transfer to a cooling rack on baking sheet, repeating until remaining chicken is all fried.
Top each piece of chicken with dollop of marinara sauce and a slice of fresh mozzarella. Bake for 12-15 minutes until chicken reaches an internal temperature of 165°F and cheese is melted. The timing here will depend on how thick your cutlets are, so check on them periodically with a meat thermometer.
To assemble, toss cooked pasta with remaining marinara sauce and place a small amount onto each plate. Top each with a piece of chicken and chopped fresh basil, if desired and serve hot.
When you’re looking for a simple side dish, it just doesn’t get any better than an herbal roasted asparagus recipe. Those tender spears of asparagus get so delightfully golden and tasty when they are roasted with a flavorful vinaigrette in the oven. This recipe for Lime Dill Roasted Asparagus takes less than 30 minutes and 6 ingredients–many in your pantry right now–to get on the table. With a bright touch of lime zest and juice and extra virgin olive oil, you can pop this asparagus recipe in the oven to roast until it’s tender and tasty. Also, try making this dish as an air fryer asparagus recipe.
Zest the lime peel (finely shred outer surface of lime with a zester or microplane) and set aside. Squeeze the lime juice and drizzle it evenly over the asparagus.
Sprinkle the lime zest, salt (optional), and black pepper over the asparagus.
Place the asparagus in the top rack of the oven and roast about 15-25 minutes, until golden brown along edges yet still bright green in color. Cooking time is dependent upon the size of the asparagus spears.
Remove from oven, sprinkle with dill, and serve immediately.
Makes 4 servings.
Notes
Make this as an Air Fryer Asparagus recipe by following steps 1-7, using the tray of your air fryer instead of a baking dish (may have to separate into 2 batches, if needed). Set the temperature to 375 and roast for 7-9 minutes, until lightly golden yet still green in color.
Prep Time:6 minutes
Cook Time:20 minutes
Category:Side Dish
Cuisine:American
Nutrition
Serving Size:1 serving
Calories:42
Sugar:1 g
Sodium:2 mg
Fat:3 g
Saturated Fat:1 g
Carbohydrates:3 g
Fiber:2 g
Protein:2 g
Keywords: roasted asparagus, asparagus spears, air fryer asparagus
For other plant-based vegetable dishes, try the following:
Ultra crispy-and so delicious, cornflake chicken is just the easy you dinner you need this week! Each chicken breast is coated in cornflakes and savory seasonings for both the best texture and flavor! Even your pickiest of eaters will be singing its praises.
Cornflake chicken is a crispy, delicious dish that the whole family will love. It’s made by coating boneless, skinless chicken breasts in a mixture of crushed cornflakes, paprika, garlic powder, onion powder, oregano, salt, and pepper. The cornflake crumbs stick to the chicken, creating a golden, crunchy coating when baked in the oven. The result? Juicy, tender chicken wrapped in a satisfyingly crispy shell.
Why is cornflake chicken so irresistible? Well, it’s all in the flavor! The spices and herbs give the chicken a mouthwatering taste that will make your taste buds do a happy dance. Paprika adds smoky goodness, garlic and onion powders bring savory flavor, oregano adds a fresh kick, and salt and pepper tie everything together. Each bite is the perfect contrast of a crispy exterior and juicy chicken goodness inside.
Ingredients Needed
Get ready for a taste sensation that will make your mouth water! The ingredients in cornflake chicken are a power-packed team, working together to create an irresistibly crispy and flavorful dish.
Boneless Skinless Chicken Breasts: Tender and lean cuts of chicken that form the base of this dish. Boneless chicken thighs can also be used.
Eggs and Whole Milk: Whisked together to create an egg wash, providing a binding agent to help the cornflake coating stick to the chicken.
Cornflakes: These crunchy and lightly sweetened cereal flakes that serve as the breading for the chicken.
Paprika: Adds a smoky and slightly spicy flavor to the chicken.
Garlic Powder: Brings a savory and aromatic kick to the coating. For a stronger garlic flavor, you can also substitute it with minced fresh garlic.
Onion Powder: Enhances the savory taste and adds depth to the overall seasoning.
Oregano: Adds a touch of freshness and extra flavor to the chicken.
Salt and Pepper: Essential seasonings that balance the flavors and bring out the best in the chicken. Feel free to adjust the amounts to suit your taste preferences.
How to Make Crispy Cornflake Chicken
With a simple preparation process that takes just over 30 minutes from start to finish, you can enjoy a crispy, flavorful delight without breaking a sweat in the kitchen. You get the perfect breaded chicken without the mess of deep frying!
Preheat Oven, Prepare Pan: Preheat your oven to 400 degrees Fahrenheit and prepare a baking sheet by lining it with parchment paper and placing an oven-safe wire rack over it.
Cut Chicken: Prepare your chicken by cutting each breast in half so you have 6 equal pieces, set aside.
Egg Mixture: Whisk the eggs and milk in a medium shallow bowl, and set aside.
Cornflake Mixture: In a large plastic bag, add your cornflakes, paprika, garlic, onion, oregano, salt, and pepper.
Crush: Use a rolling pin to crush the cornflakes and shake until everything has come together into a coarse crumb mixture. Then pour the cornflake crumbs out into a large plate.
Coat: Dip your chicken into the egg mixture to coat, then remove and coat generously in the cornflake crumbs, completely covering the chicken.
Add to Pan: Place the breaded chicken onto the prepared wire rack and pan, repeat with all your chicken cuts.
Bake: Once all the chicken is breaded, spray them each with cooking oil and place in the oven, and bake for 20-25 minutes, flipping halfway through baking.
Serve: Remove from the oven and allow the chicken to cool for a few minutes before enjoying.
Cooking Tips
Want to take your cornflake chicken to the next level? Here are some tips to help you achieve crispy, golden perfection every time.
Breading Consistency: Give your cornflakes a pass with a rolling pin or blitz them quickly in a food processor, but don’t go overboard! You want a coarse crumb texture that’ll give you that satisfying crunch without turning into a powdery mess.
Coat Thoroughly: When dunking your chicken in the egg and cornflake mix, be generous! Get those pieces fully coated, making sure every nook and cranny gets some love. Don’t be shy to press those crumbs onto the chicken so they stick.
Add Some Oil: Give your breaded beauties a quick spritz of cooking oil or spray before they hit the oven. This extra touch helps them turn perfectly golden brown.
Use a Wire Rack: Place your breaded chicken on a wire rack set over a baking sheet. This nifty setup allows hot air to circulate all around, making sure your chicken cooks evenly.
Storing Leftovers
If you have leftovers of your cornflake chicken, keep them! They heat up well for a quick and easy lunch.
In the Refrigerator: To store leftover cornflake chicken, let it cool down and then place it in an airtight container or resealable bag. Keep it in the refrigerator, where it will stay good for about 3-4 days. When you’re ready to eat the leftovers, simply reheat the chicken in the oven or toaster oven to maintain its crispy goodness.
Looking for More Delicious Chicken Recipes?
I’ve got you covered! Here are a few more of my favorites. They’re simple to prepare and even the pickiest eaters in your family will love them!
Ultra crispy-and so delicious, cornflake chicken is just the easy you dinner you need this week! Each chicken breast is coated in cornflakes and savory seasonings for both the best texture and flavor! Even your pickiest of eaters will be singing its praises.
3boneless skinless chicken breastscut into 6 pieces
2large eggs
¼cupwhole milk
4cupscornflakes
2teaspoonspaprika
1teaspoongarlic powder
½teaspoononion powder
½teaspoonoregano
1teaspoonsalt
½teaspoonblack pepper
Cooking spray
Instructions
Preheat your oven to 400 degrees Fahrenheit and prepare a baking sheet by lining it with parchment paper and placing an oven-safe wire rack over it.
Prepare your chicken by cutting each breast in half so you have 6 equal pieces, set aside.
Whisk the eggs and milk in a medium shallow bowl, and set aside.
In a large plastic bag, add your cornflakes, paprika, garlic, onion, oregano, salt, and pepper.
Use a rolling pin to crush the cornflakes and shake until everything has come together into a coarse crumb mixture. Pour the cornflake crumbs out into a large plate.
Dip your chicken into the egg mixture to coat, remove and coat generously in the cornflake crumbs, completely covering the chicken.
Place the breaded chicken onto the prepared wire rack and pan, repeat with all your chicken cuts.
Once all the chicken is breaded, spray them each with cooking oil and place in the oven, and bake for 20-25 minutes, flipping halfway through baking.
Remove from the oven and allow the chicken to cool for a few minutes before enjoying.
]]>
https://mallize.com/blogs/news/9-stores-you-might-forget-to-check-out-to-find-awesome-decor-and-you-shouldn-t2023-06-23T09:13:53-04:002023-06-23T09:13:53-04:009 Stores You Might Forget To Check Out To Find Awesome Decor (And You Shouldn’t!)admin
Look, there are A LOT of places to buy home decor, especially on the internet. We even made a HUGE list a couple of years ago. Yet still there are countless times I’m reminded of a really great brand or site that maybe I sourced from a while back but then lost track of because there are new options coming at me every day. Can anyone relate?? So as Caitlin and I were talking, we thought it would be really helpful (we hope) to have a nice quick list of our solid go-to’s that we think should get more attention and others that are just under the radar. Decorating is both fun and yet can feel like an endless journey in search of what we hope will be our holy grail vase, or lamp, or sculptural object. Maybe these stores will be your answer! Or simply might be a great place to poke around and see some great options for the future. Let’s dig in with a strong first option:
I’m sure you’ve seen countless photos of rooms with chic Scandinavian decor (and furniture) all over social media! Well, chances are the Finnish Design Shop carries those pieces. EHD favorite brands like ferm Living (see that little blue jar on the right?) and Skagerak (see that pretty blonde wood tray on the left?) are carried here…so you can only imagine what else they must stock. It’s truly a one-stop shop for all things cool and Scandi. Plus unbeknownst to me, they are currently having a sale in case you are interested! But first, let’s take a look at some of the decor pieces I pulled.
Man, this whole site makes me happy so choosing only six pieces wasn’t easy. I love that graphic yet slightly colorful print. I think it could work in so many homes. That round cushion pattern is SO GOOD! Then all of the candle options are truly so unique. You could easily spend hours on this site with its extensive inventory. Enjoy and sorry if you also fall in love:)
Ok, so I know people know about H&M (understatement??) but I am constantly shocked by their incredible home section. If you want pretty and super-affordable decor, you aren’t going to get much better than this. We are, of course, lifelong Target fans but H&M is seriously giving them a run for their money. Those candlestick holders are vintage H&M home but look how cute they are!?
They are giving a West Elm/CB2 vibe that I am very into. I’ve ordered a couple of vessels from them and Christmas ornaments but I’ll probably be getting more since I’m getting super close to revealing my living room (so I sound like a broken record? I promise I’m still waiting on a custom piece!). But seriously look at this selection below:
Chic, right?!? I would happily have every one of these items in my home. Their prices are unbeatable and the style is cool without feeling like you’re trying to design “too young”. 10000/10.
Ah, the unexpected wildcard! Much like H&M you don’t automatically think “good decor” when you hear the name Nordstrom. But let me tell you there are great pieces at great prices if you are down to search a little. Hey, even Nordstrom Rack has some goodies. But let’s take a look at some of their offerings, shall we?
These are pretty cool, right? They, of course, have plenty of more traditional items but I wanted to show you some “fun” options. How cool is that candelabra or that two-toned vase? Oh, and I am super into that awesome tic-tac-toe set. Go check out what’s on the site!
Ballard has a very special place in my heart. I’ll never forget seeing a Ballard Designs catalog on our counter when I was little and completely falling in love with these white and black fabric-trimmed lampshades. I thought, “I’m going to own those one day!” Unfortunately, I waited too long and honestly don’t think they are my style anymore. It’s crazy how 25 years can do that:) But honestly, they have so many truly great pieces that are traditional in the best way. I mean look at Em’s dining set from her back patio reveal!
Caitlin is also a big fan and got their outdoor curtain for her balcony reveal! But they have way more than just outdoor items (which they are currently having a sale on) so let’s look at the interior products I spotted.
See?! Traditional and modern all at the same time. I mean that leather back cushion is beautiful (and on sale), that gallery wall system is so pretty and takes away the frustration of trying to DIY something similar, I love that oversized firewood holder, and well everything else. Basically, DON’T SLEEP ON BALLARD DESIGNS!
Ok so we haven’t forgotten about one of our absolute favorite retailers, Jayson Home, but we definitely want to make sure everyone knows about them and thinks about them every time they are decorating their house or needs a gift. They are another one-stop shop! Emily and the team have used them for years (remember Em’s vintage chaise lounge?? Yes, they have vintage too!). Also, see that very cool vase ontop of the dresser in the photo above? Ya, they carry that too:)
I actually reached out to them for my friend’s bedroom because their products are so so good and there were so many things both my friend and I wanted for the room. We didn’t want to be greedy so we asked for that sweet glass matchstickcloche (I have the tall one and it’s stunning), that paper mache shell tray, and two of their alphabet vintage brass coasters with each of their initials. They really were the perfect unique touches this room was asking for. But let’s check out some of their other pieces (which doesn’t even scratch the surface!)
See?! Everything is hand curated and you can tell. I love everything. How cute would love rattan shelves be in a vintage-style home?? Or those beautifully wrapped rocks as an extremely cool gift? I would happily have one of those in my home. What I also love about Jayson Home is that they have a wide selection but not so wide that you are too overwhelmed. This is a must-bookmark.
Ah, another incredible shop that’s definitely a luxury brand, helping to preserve Africa’s artisanal heritage. 54Kibo offers stunning pieces that will bring so much depth and beauty to your home. Look at the examples above! Julie used one of their wall mirrors in an MCM eclectic living room she designed and it’s so cool! Then in Emily’s old LA living room, that black drink table is a show stopper. The angles and cutouts make it such a unique piece that brought more dimension into the room. Let’s see some other pieces, ya?
See how textured and joyful everything is?? And that turquoise mirror is all BEADED! This is truly a special shop that we suggest you check out frequently:)
When you hear the online shop Lumens you think of lighting, right? Well, you aren’t wrong but you are also missing out on so much more! Now, Lumens does sell incredible lighting with a lot of intention behind them. Remember my Paris post and that incredible department store I went into with all the lights I loved? Well, they sell ALL of them! BUT, they also sell furniture and decor! Say it with me – a real one-stop shop. Most everything leans pretty modern but don’t run if “modern” isn’t your style! They have so much and a little style contrast makes for interesting homes if we do say so ourselves. Enjoy!
If you’ve been with us for a while then you’ve likely heard of Bloomist. They are a beautiful online shop that sells pretty plants and decor pieces. Like really pretty decor pieces. They did go out of business for a hot second but are back and boy are we happy about it! It’s a very organic natural style with a little bit of edge at times which I love. Come see:
Right? I could look at their site all day because it’s so calming and hopefully you can see that from these photos. That black candle is actually a 2-for-1! When the scented candle burns out, you can then flip it over and place a taper candle in it. What a genius way to get a life-long use out of something. Then that shell pot with a wood base is so unbelievably beautiful it almost hurts. You just have to go to the site and see it all!
We hope Burke Decor is on your radar and if it isn’t, it should be. They really have EVERYTHING. Since this post is all about decor (and not things like furniture) we’ll focus on that. But if you do want interesting, beautiful furniture you should take a look. They give you options! However, look how cute this decor is…
A little modern, a little contemporary, a little natural. See? Everything! If you’ve never checked them out it’s a definite must:)
Ok! That’s it for today. Hope it was helpful and you were either reminded of or introduced to a new brand (or both!). Have a great Friday and we’ll see you all tomorrow.
]]>
https://mallize.com/blogs/news/cinnamon-swirl-cake-for-two2023-06-22T21:13:51-04:002023-06-22T21:13:52-04:00Cinnamon Swirl Cake for TwoadminThis cinnamon swirl cake for two has all the flavor of a cinnamon roll but it is in cake form. There is no waiting for dough to rise!
Why You’ll Love This Recipe!
It’s versatile. You can enjoy it for breakfast because there is cinnamon roll in the name or have it for dessert since there is cake in the name. Or just enjoy it anytime.
It’s the perfect size. Just the right amount for two people.
Has all the flavor of a cinnamon roll. It’s ooey, gooey and has a delicious vanilla glaze on top. And it tastes good and may become your favorite coffee cake recipe.
Ingredients Needed
Flour. I use unbleached all purpose flour
Salt
Sugars. Granulated sugar, powdered sugar and brown sugar
Baking powder. Make sure your baking powder is fresh!
Milk. I use whatever I have in my fridge which is usually 2 percent.
Egg.
Vanilla Extract
Butter. I use salted butter
GroundCinnamon
How to Make Cinnamon Swirl Cake for Two
Preheat oven to 350 degrees F.
In a medium size bowl, combine 3/4 flour, pinch of salt, 1/4 granulated sugar and 1 tsp baking powder. Whisk to combine.
Add in 2 Tbsp of milk, 2 Tbsp of beaten egg and 1/2 tsp vanilla into flour mixture and mix together.
Pour in 2 Tbsp melted butter and stir until all is incorporated.
Spray a 3 cup baking dish with non stick spray.
Pour batter into prepared pan.
In a small bowl, combine 3 Tbsp brown sugar, 3 Tbsp softened butter, 1/2 Tbsp flour and 1/4 Tbsp cinnamon. Stir until combined.
Drop cinnamon-sugar mixture by teaspoons over the top of the cake batter.
With a knife, swirl the cinnamon mixture into the cake batter. Do not over mix it in.
Bake in preheated oven for 24-25 minutes. Place on a wire rack to cool before adding glaze
In a small bowl, combine powdered sugar, milk and vanilla and stir until it is a nice smooth drizzling consistency. Add more milk if too stiff or more powdered sugar if too runny.
Drizzle over the cooled cake.
.
Tips for Making cinnamon Roll Cake Recipe
Use any pan that holds 3 cups of liquid. My baking dish measures about 5 1/2 x 4 1/2. If all you have is an 8 x 8 inch pan double the ingredients. If doubling you could also use a 9 x 5 loaf pan.
To test if your cake is done, you can insert a toothpick into it and it should come out clean. It will also lightly brown around the edges and begin to pull away from the pan.
Frequently Asked Questions
Can I add nuts to the cinnamon swirl coffee cake for two?
You could definitely add in nuts. I would recommend 1/4 – 1/3 of cup of chopped pecans or walnuts added into the brown sugar mixture.
How do I store leftover cake?
Since this is a small batch recipe my guess is you won’t have any leftovers. This cake is definitely best eat warm, fresh out of the oven, just like a cinnamon roll. If you do have leftovers put them in an airtight container at room temperature for up to 3 days.
Do you have a full size version of this coffee cake?
In a medium size bowl, combine all the cake ingredients in the order listed. Do not use the whole egg, use only 2 Tbsp of beaten egg.
Pour batter into greased baking dish.
Cinnamon Filling
In a small bowl, combine topping ingredients and mix together until well combined and smooth.
Drop topping by small spoonful (about 1 tsp.) onto the top of the cake batter.
Take a knife and cut through the mixture, allowing cinnamon to incorporate into the batter. Cut through the batter lengthwise and widthwise.
Bake for 24-25 minutes or until a toothpick comes out clean.
Glaze
In a small bowl combine glaze ingredients and stir until smooth and a nice glazing/drizzling consistency.
Remove the cake from the oven allow to cool partially before adding the glaze otherwise the glaze will melt into the cake.
Drizzle glaze over the top and enjoy!
Notes
Use any pan that holds 3 cups of liquid. My baking dish measures about 5 1/2 x 4 1/2. If all you have is an 8 x 8 inch pan double the ingredients. If doubling you could also use a 9 x 5 loaf pan.
To test if your cake is done, you can insert a toothpick into it and it should come out clean. It will also lightly brown around the edges and begin to pull away from the pan.
]]>
https://mallize.com/blogs/news/roasted-radishes-with-creamy-kefir-green-goddess-dressing2023-06-21T21:13:53-04:002023-06-21T21:13:53-04:00Roasted Radishes with Creamy Kefir Green Goddess Dressingadmin
by Aimee
Happy summer!
This beautiful vegetarian dish is perfectly simple and seasonal. Roasted radishes are paired with a vibrant green goddess dressing featuring creamy kefir – and the result is a cravable, colourful salad or appetizer.
I know it’s tempting to move on from radishes, but my garden patch is still producing the pretty pink root veggies. I’m currently obsessed with this recipe, so I decided to share it here.
Kefir Green Goddess
My teen helped me film this recipe for a Reel, and afterward we devoured it together. He declared the green goddess sauce to be amazing – and a new favourite. Since then we’ve been making it for roast potatoes, grilled chicken and more.
The kefir brings a wonderful tang to the dressing, which pairs perfectly with the earthy radishes. I like to use Liberté Plain kefir, which is easy to find where I live and keeps a long time in the fridge.
Even when radishes are no longe in season, you can keep making this sauce all summer long to serve with grilled vegetables.
Zero Waste Tip: Eat the Radish Tops!
In the Simple Bites kitchen, we’re always looking for ways to waste less. The goal is progress, not perfection as we move towards a zero-waste kitchen.
Seek out locally grown radishes, with fresh, bright green tops. Wash and dry them well, then toss the with olive oil and a light sprinkling of salt.
Roast the radishes with their tops on and they will crisp up like kale chips!
Herbs for Green Goddess Dressing
In this recipe I use a combination of chives, basil and parsley. In the spirit of zero waste, don’t get hung up on the exact amounts of herbs, instead use what you have.
Any other mild garden herbs such as tarragon, oregano or mint are also wonderful additions to the dressing. I believe basil is traditional!
TIP: For a non-vegetarian version, punch up the dressing with the addition of 4 anchovy filets.
Roasted Radishes with Creamy Kefir Green Goddess Dressing
Delicious as a warm salad or appetizer, this beautiful vegetarian dish is perfectly simple and seasonal.
Course Appetizer
Cuisine American
Keyword Vegetarian
Essential Ingredient Radish
Prep Time 20 minutesminutes
Cook Time 10 minutesminutes
Total Time 30 minutesminutes
Servings 4people
Equipment
Blender
Ingredients
1/2cupcup plain whole-milk kefirwell shaken
1/2avocadopitted and peeled
1bunchfresh chives
1cupItalian parsley leaves
1smallclove garlicpeeled
1Tablespoonlemon juice
1/2teaspoonfine sea salt
1/4teaspoonfreshly ground black pepper
3Tablespoonsextra-virgin olive oil divided
2bunchesyoung radishestops intact
1/2teaspoonflaky sea saltto garnish
Instructions
Make the Green Goddess
In a blender, combine the kefir, avocado, mixed herbs, garlic, lemon juice, salt and pepper. Blend until smooth. You will need to stop the blender and scrape down the sides a few times.
With the blender running, drizzle in the olive oil. Taste the green goddess sauce and adjust the seasoning, if desired. You may wish to increase the salt or add a splash more lemon juice.
Transfer the dressing to a small bowl or jar. This green goddess can be prepared up to one day in advance.
Prepare the Radishes
Run a few inches of cool water in a sink. Add the radishes and allow to soak for a few minutes. Move them around gently to dislodge any grit in the leaves. Transfer the radishes to a colander and drain briefly.
On a clean tea towel, spread the radishes to dry. This will help ensure the leaves will crisp up nicely during the roasting time.
Roast the Radishes
Preheat the oven to 425°F. With a sharp paring knife, slice the radishes in half, keeping the leaves attached.
Line a rimmed baking sheet with parchment paper. Tumble the radishes onto the sheet. Toss the radishes and leaves lightly with olive oil and season with salt. Arrange the radishes cut side down to facilitate caramelization.
Place on the center rack of the oven and roast, shaking the pan once or twice, until tender when pierced with a fork, about 10 minutes.
Plate the Dish
Heap a few spoonfuls of dressing onto a serving platter or shallow bowl. Arrange the warm roasted radishes on top of the green goddess.
Garnish the dish with sprinkling of flaky sea salt and additional chives, if desired. Serve warm or room temperature.
]]>
https://mallize.com/blogs/news/air-fryer-chicken-nuggets2023-06-21T09:13:54-04:002023-06-21T09:13:54-04:00Air Fryer Chicken NuggetsadminPerfectly cooked and extra crispy on the outside while tender and juicy on the inside. These air fryer chicken nuggets are so much better than the freezer bag and the variations are endless!
You seem to never forget your childhood favorites and for me growing up, I loved chicken nuggets. Even now, when I go to a restaurant, if I see chicken tenders on the menu with a side of french fries, you best believe I will be ordering it. There is just something about the crispy, bite-sized chicken that is so addicting!
Air fryer chicken nuggets are cubed chicken breasts that are perfectly seasoned and coated in a crunchy, golden crust, then cooked to perfection in the air fryer. It’s like the best of both worlds—crispy like deep-fried nuggets, but without the excess oil. And the best part? They’re ready in a snap! Honestly, we can ditch the takeout and whip out the air fryer instead. These chicken nuggets will be on your table in no time!
Why You’ll Love This
Satisfyingly crunchy. Cubed chicken breast are coated in a crunchy crust of panko breadcrumbs and flour that crisp up beautifully in an air fryer to give it the most crispy texture. The “crunch” of the chicken nuggets is so satisfying. It’s like popping popcorn in your mouth, one after another!
Healthier option. By using the air fryer, you can enjoy the same crunchy texture and delicious flavor without the excess grease. It’s a guilt-free way to indulge in a classic comfort food.
Versatile and fully customizable. These chicken nuggets offer endless possibilities for customization. Feel free to experiment with different seasonings, spices, or even breadcrumb coatings to suit your taste preferences. Whether you prefer a classic herb-infused flavor or want to spice things up with some zesty seasoning, these nuggets are incredibly versatile and can be tailored to your liking. Not to mention, the dipping sauce options are endless as well!
Ingredients You’ll Need
Got your air fryer ready? Here is a list of ingredients you will need to make air fryer chicken nuggets. Make sure to scroll down to view the full recipe for exact measurements.
Boneless skinless chicken breasts
Egg
Panko breadcrumbs
All-purpose flour
Grated parmesan cheese
Smoked paprika
Garlic powder
Onion powder
Italian seasoning
Dried parsley
Salt and pepper
How To Make Air Fryer Chicken Nuggets
Here is a general overview of the steps involved to make homemade chicken nuggets in the air fryer. Be sure to scroll to the bottom of this post for the full recipe.
Coat the chicken in the egg. Whisk the egg in a bowl then add the diced chicken to the egg mixture and toss together until all the chicken is coated.
Bread the chicken in the breadcrumb mixture. Whisk together the ingredients for the coating then add the chicken to the mixture. The best way to do this is in a plastic container with a lid. Close the lid and shake until all the chicken has been coated evenly.
Air fry the chicken. Add the chicken to the air fryer basket and make sure to arrange in a single layer. Lightly spray the tops of the chicken with cooking spray then air fry at 400 degrees for 8-10 minutes, shaking halfway through.
Recipe Tips, Substitutions, and Variations
Use chicken thighs for even more flavor. If you prefer dark meat then using boneless skinless chicken thighs will give this even more flavor because it’s dark meat and fattier.
Preheat the air fryer (if possible). To achieve maximum crispiness, I like preheating my air fryer before adding the nuggets. Some air fryers have this preheat option, if yours does not, that’s okay too. I think that the preheat helps because it makes the air fryer already hot so right from the start the chicken nuggets are being put into a hot environment to start their crisping process.
Arrange chicken in a single layer. Avoid overcrowding the air fryer basket and cook in batches if you need to. Arranging the chicken nuggets in a single layer allows for proper air circulation in the air fryer. This ensures even cooking and helps maintain the desired crispy texture.
Cool chicken nuggets on a wire baking rack. If you’re cooking the chicken nuggets in batches, you’ll want to cool the cooked chicken nuggets on a wire baking rack. Doing so allows air to continue to circulate instead of putting the hot chicken nuggets into a bowl where it’ll create steam and make your crispy coating (that you worked so hard for!) all soggy.
Shake the chicken halfway through cooking. To ensure even cooking and crisping, make sure to shake the air fryer basket of the chicken halfway through cooking.
Don’t have panko breadcrumbs? No problem! Regular breadcrumbs (plain or Italian seasoned) work great in this as well. I like the texture that panko breadcrumbs give. You can also use crushed up corn flakes to bread these to give even more texture and crunch!
Meatless? You know I’ve got you. Tofu nuggets are totally a thing and you can easily make them in the air fryer as well!
Flavor variations:
Spicy kick. If you’re a fan of heat, add some cayenne pepper or chipotle powder to the breadcrumb mixture for a spicy twist. It will give your chicken nuggets a fiery kick that will leave your taste buds tingling.
Cheesy goodness. For a cheesy flavor explosion, mix extra grated parmesan or cheddar cheese into the breadcrumb coating. The melted cheese adds a deliciously gooey element to your chicken nuggets, elevating them to a whole new level of yumminess.
Herb infused. Experiment with different herbs and spices to infuse your nuggets with unique flavors. Try adding dried herbs like oregano, thyme, or rosemary to the breadcrumb mixture. The aromatic herbs will add a delightful freshness to your chicken nuggets.
Ranch lovers. Mix in a packet of ranch seasoning in the breadcrumb mixture to give your chicken nuggets the classic creamy flavor we all love.
Dill pickle tanginess. Dill pickle seasoning is all the rage right now and they sell dill pickle seasoning at Trader Joe’s in the spice aisle. I’ve been putting it in the most unexpected things and it gives the dish that tangy hit.
Smokey BBQ. Grab your favorite BBQ dry rub and mix it into the breadcrumb mixture for a smokey BBQ infused flavor for your chicken nuggets!
Greek freak. Use my favorite Greek seasoning (Greek Freak) and make these a Greek-inspired flavored chicken nugget!
Storage and Reheating Instructions
After your chicken nuggets have cooled, you may store in an airtight container in the refrigerator for up to four days. To reheat, pop back into the air fryer and reheat for 5 minutes at 350 degrees just until it’s warmed through. You can also do this in the toaster oven. Do not microwave!
What to Serve with Air Fryer Chicken Nuggets
Chicken nuggets and french fries are a classic pairing and so are dipping sauces. Here are some ideas to pair with your chicken nuggets:
Perfectly cooked and extra crispy on the outside while tender and juicy on the inside! These quick and easy air fryer chicken nuggets are going to satisfy all ages!
Course Main Course
Cuisine American
Keyword air fryer chicken, easy chicken recipe, homemade chicken nuggets
Preheat air fryer (if possible) for 5 minutes at 400 degrees.
Whisk together egg in a medium bowl then add the cubed chicken. Stir to coat all the chicken in the egg mixture.
In a large plastic container (with a lid), add panko, parmesan cheese, flour, and all the seasonings. Whisk together.
Add the egg covered chicken to the plastic container then close the lid and shake until breading has coated the chicken evenly.
Arrange the chicken in an even layer in the air fryer basket then air fry at 400 °F for 8-10 minutes, shaking halfway through. You will likely have to do this in two batches.
Repeat until all chicken nuggets have been cooked.
Serve with your favorite dipping sauces like ketchup, BBQ sauce, or hot sauce.
]]>
https://mallize.com/blogs/news/the-best-travel-mugs-for-entrepreneurs-on-the-go2023-06-20T21:13:51-04:002023-06-20T21:13:51-04:00The Best Travel Mugs for Entrepreneurs on the Goadmin
There’s something comforting about holding a travel mug full of your favorite hot coffee or iced coffee as you rush to your next business meeting. The right travel mug is more than just a container for your beverage; it’s a trusty companion accompanying you through your busy entrepreneurial journey. But how do you choose the best travel coffee mugs to keep your coffee hot or your iced coffee perfectly chilled? The market is brimming with countless travel mugs, making the decision overwhelming. Let’s dive into the world of travel mugs together.
Why a Quality Travel Mug is Essential for Business Professionals
As an entrepreneur, you’re likely always on the move, needing that caffeine kick to keep your brain fired up. This is where the best travel coffee mugs come into play, bringing convenience, efficiency, and a dose of style to your on-the-go lifestyle.
Maintaining Temperature for Optimal Enjoyment
Travel mugs are not your ordinary coffee mugs. Thanks to advanced vacuum-insulated technologies, these mugs can keep your hot coffee hot and your cold beverages refreshingly cold for several hours. Imagine sipping hot coffee from your stainless steel travel mug in the morning, and hours later, still finding your coffee warm, without a single drop of heat lost to the atmosphere. This heat retention feature is a game-changer for busy entrepreneurs who love their drinks at an exact temperature.
Durability for a Busy Lifestyle
Durability is crucial when choosing travel mugs. The best travel mug for you would be a rugged, long-lasting stainless steel mug, which can withstand the hustle and bustle of your entrepreneurial journey. Many travel mugs, such as the Hydro Flask with its Flex Sip Lid, are made of stainless steel with a vacuum-insulated tumbler design, ensuring they can endure daily use while keeping your hot beverages hot and your cold drinks ice cold.
Factors to Consider When Buying a Travel Mug
As you search through our Amazon picks for the perfect travel coffee mug, consider these key factors:
Size and Portability
Do you enjoy long sips of hot coffee or do you prefer a quick iced coffee to jumpstart your day? Your beverage preference will determine the size of the mug you need. Some stainless steel travel mugs fit perfectly into cup holders, while others are designed with a simple shape to easily slide into your bag.
Design and User Experience
Design plays a massive role in your user experience. Some travel coffee mugs come with a wide mouth for easy filling and cleaning, and a twist-off lid for a smooth drinking experience. Some mugs feature a built-in straw or a straw lid for those who prefer sipping their iced coffee with a straw. Others have a flex sip lid or a screw-on cap with a rubber seal for a spill-proof, leak-proof experience.
Cleaning and Maintenance
Maintaining your travel coffee mug should be as easy as enjoying your hot coffee. Look for dishwasher-safe options to ensure convenient cleaning. Be wary of mugs with complex lids as they may be challenging to clean. A stainless steel interior is a plus as it doesn’t harbor any metallic flavors, keeping your coffee tasting as it should.
Price vs Quality
While you might be tempted to go for the cheapest option, remember that a good quality travel mug is an investment. Mugs like the Fellow Carter and offer remarkable temperature control and retention, keeping hot drinks hot and cold drinks cold for long periods. They might cost a bit more, but their performance and durability justify the price.
The Impact of Using a Travel Mug on the Environment
Being an entrepreneur isn’t just about managing a successful business; it’s also about being a responsible global citizen. Using a reusable mug for your daily coffee intake can significantly reduce waste from disposable cups.
Reducing Waste from Disposable Cups
Every time you fill your reusable cup with hot coffee or iced coffee, you are taking a step towards preserving the environment. Just imagine the pile of disposable cups you’d save from ending up in the landfill if you used a reusable cup daily.
Making a Difference as a Business Owner
Your conscious choices as a business owner can inspire others in your network to follow suit. Encourage your colleagues to join the movement by choosing reusable over disposable.
YETI MagSlider Lid, No-sweat design, Dracut color coating, Fits standard cup holders
Ergonomic flat sides, Non-slip silicone bottom, Shatterproof sip-through lid with built-in slider, Detachable silicone gasket
Slim design, Leak-proof seal and quick twist-locking lid, True Taste ceramic interior coating, 12 oz capacity with a wide mouth and thin lip
Safety and Cleanliness
BPA-free, Dishwasher safe
BPA-free, Dishwasher safe
Not specified
Available Colors
Multiple colors available
Multiple Colors Available
Not specified
YETI Rambler 20 oz Stainless Steel Vacuum Insulated Tumbler
Top Pick: YETI travel mugs are everywhere and for good reason. A YETI travel mug is an investment – pricier than most travel mugs but worth the splurge if you can afford it. The Rambler YETI travel tumbler comes standard with the YETI MagSlider Lid that employs the strength of magnets to securely lock your drink in place, preventing spills. The Rambler features a robust Dracut color coating, which resists fading, peeling, and cracking, while also providing an extra grip.
Built for convenience, it boasts a no-sweat design, ensuring your hands remain dry while holding. It’s also dishwasher safe, simplifying cleanup, and BPA-free for your peace of mind. The Rambler’s size is compatible with standard cup holders, making it a handy choice for travel.
Features:
YETI MagSlider Lid for secure closure
Vacuum-insulated 18/8 stainless steel body for temperature maintenance
No-sweat design to keep hands dry
Dracut color coating for enhanced grip and durability
Corkcicle 22 oz. Triple Insulated Coffee Mug with Lid
Runner Up: The Corkcicle Triple Insulated Coffee Mug is a perfect companion for those who appreciate warm beverages during their work hours. The triple-insulated stainless steel structure of this mug maintains your drink’s temperature, ensuring hot beverages remain warm for 3+ hours.
The ergonomic design of this mug features flat sides and a non-slip, silicone bottom. These characteristics make for a secure grip and prevent unwanted spills. Additionally, the mug comes with a shatterproof, sip-through lid with a built-in slider for an even better drinking experience and spill protection.
Features:
Triple-insulated stainless steel keeps beverages hot for 3+ hours
Ergonomic flat sides and non-slip silicone bottom ensure secure handling
Shatterproof sip-through lid with built-in slider for spill prevention
Detachable silicone gasket for easy cleaning and leak resistance
Best Value: The Fellow 12 oz Carter Move Travel Mug is the perfect partner for coffee lovers, blending beautiful design with flawless functionality. Constructed with double-wall vacuum-insulated 304 18/8 stainless steel, it provides exceptional thermal retention, keeping your drinks hot for up to 12 hours or cold for up to 24 hours.
Features:
Double-wall vacuum-insulated stainless steel for superior heat and cold retention
Slim design compatible with most cup holders for easy travel
Leak-proof seal and quick twist-locking lid for secure portability
True Taste ceramic interior coating for unaltered flavor
The S’well Stainless Steel Water Bottle offers triple-layered, vacuum-insulated construction that keeps your beverages cold for up to 36 hours or hot for up to 18 hours. With its 17 oz capacity, this container is sized to fit most standard cup holders. It features an opening wide enough for most ice cubes, making it easy to refill and reuse. Furthermore, the copper wall layer provides insulation that eliminates condensation, ensuring your hands and bag stay dry.
Features:
Triple-layered vacuum-insulated construction for extended temperature retention
Wide opening for easy refilling
Copper wall layer to prevent condensation
BPA-free and composed of 18/8 premium food-grade stainless steel
Contigo Superior 2.0 Stainless Steel Travel Mug with Handle
The Contigo Superior 2.0 Stainless Steel Travel Mug is the perfect companion for on-the-go drinking. Boasting a leak-proof lid for hassle-free travel and a THERMALOCK double-wall stainless steel insulation, this 20oz mug ensures your drinks stay hot for up to 7 hours or cold for up to 18 hours.
Featuring a one-handed drinking design, there are no lids or caps to misplace, providing convenience for those busy mornings or hectic days. The handy carrying handle allows for comfortable transport, and despite this, the mug still fits in most car cup holders.
Features:
Leak-proof lid for secure travel
THERMALOCK double-wall stainless steel insulation
One-handed drinking design
Carrying handle for comfort
Fits in most car cup holders
Easy to clean with a dishwasher-safe lid and hand wash only body
This is the updated version of IRON °FLASK’s Grip Coffee Mug 2.0 – a 24 oz, leak-proof and vacuum-insulated stainless steel beverage holder, engineered for both practicality and style. This travel-friendly canteen is designed to keep your drink cold for up to 18 hours or warm for up to 4 hours.
Features:
18/8 premium stainless steel construction, ensuring durability and no metallic aftertaste.
Leak-proof, double-walled design for optimal temperature retention.
Insulated, ambidextrous flip lid for easy access and secure closure.
Non-toxic, BPA-free material for safe usage.
A noise-proof, non-slip rubber base for stability and protection.
Classic powder-coat exterior finish
Various colors and unique patterns available
Suggested for coffee but versatile for any beverage.
bubba Hero Dual-Wall Vacuum-Insulated Stainless Steel Travel Mug, 18 oz.
The BUBBA Hero 18oz travel mug will your new companion for hot or cold beverages on the go. With its dual-wall vacuum-insulated stainless steel construction, this mug is designed to keep your drinks hot for up to 6 hours and cold for up to 24 hours.
Product Features:
Made from premium stainless steel, providing durability and insulation.
Locking lid designed for a smooth-flow, leak-free drinking experience
Silicone base ensures the mug remains stable on various surfaces and prevents metal clanking sounds.
Convenient cleaning with top-rack dishwasher compatibility.
Hydraflow 50oz Triple Wall Vacuum Insulated Travel Mug with Straw Lid
The Hydraflow Capri is a versatile triple-wall vacuum-insulated water bottle equipped with a handle. Designed for the busy adult, its features include triple-wall vacuum insulation and premium copper lining, ensuring maximum temperature retention for both cold and hot beverages.
Features:
Capable of preserving icy cold drinks for up to 12 hours and keeping hot beverages steaming for up to 6 hours.
High-quality, BPA-free construction using 18/8 stainless steel, providing superior durability and minimizing any metallic taste.
Convenient dishwasher-safe design, allowing easy cleaning and maintenance without damaging its quality.
Dual-lid system for flexibility – directly sip from the bottle or use the included metal straw.
Versatility to function as a water tumbler, coffee mug, or smoothie cup
Simple Modern 40 oz Tumbler with Handle and Straw Lid
From daily commuting to weekend adventures, the Simple Modern Tumbler adds convenience to your routine while ensuring your hydration needs are met in style. Its tapered shape, comfortable grip, and straw lid are just some of the great features of this reliable tumbler.
Key Features:
Tapered shape with a handle, ensuring a comfortable grip
Compatibility with most cup holders for effortless transportation.
Straw lid that provides resistance against leaks
Double-wall insulation maintains drinks at optimal temperatures for extended periods.
Durability that stems from its construction of high-quality 18/8 stainless steel
H2 HYDROLOGY Classic Tumbler With Lid and Four Straws
The H2 HYDROLOGY Classic Tumbler, designed for both cold and hot beverages, boasts an impressive thermal efficiency that keeps your drinks icy for up to 24 hours and warm for up to 6 hours. The Hydrology classic tumbler is crafted from premium 18/8 stainless steel featuring an anti-slip powder-coated finish and a laser-engraved logo. The tumbler is accompanied by four reusable straws and a straw cleaner.
Features:
Maintains cold beverages for up to 24 hours and hot beverages for up to 6 hours
Includes four reusable straws (two stainless steel, two plastic) and a straw cleaner
Built with premium 18/8 stainless steel with an anti-slip powder-coated finish
Available in multiple colors and capacities (16 oz, 24 oz, and 32 oz)
Offers the 100% Hydrology promise: full satisfaction or receive a refund or exchange.
One often overlooked advantage of travel mugs is their potential for branding. A custom travel mug with your logo or brand message can be a walking billboard, promoting your business wherever you go. Consider getting your mug personalized, or add a sticker with your business’s name and info.
Custom Travel Mugs for Brand Visibility
Whether you’re meeting a client or working from a coffee shop, your custom-branded travel mug subtly markets your brand.
A Unique Opportunity for Entrepreneurs
Branded travel mugs aren’t just promotional items; they’re also conversation starters. They can spark interest and open doors to potential business opportunities.
FAQs about Travel Mugs
Can I put my stainless steel travel mug in the dishwasher?
While some stainless steel travel mugs are dishwasher safe, not all are. Always check the product details or the manufacturer’s instructions. If you’re unsure, it’s best to hand wash your travel mug. This helps maintain the vacuum seal, the outer finish, and the overall quality of the mug.
How long can a vacuum insulated tumbler keep my coffee hot?
A high-quality vacuum insulated tumbler can keep your coffee hot for several hours. Many travel mugs promise heat retention for up to 6-12 hours, and some can even stretch beyond that. However, it’s essential to remember that the actual duration depends on various factors, such as how hot the beverage was when you poured it in, how many times you open the lid, and the ambient temperature.
Are all travel mugs leak-proof?
Not all travel mugs are leak-proof. However, many high-quality travel mugs come with leak-proof features, such as a flex sip lid or a screw-on cap with a rubber seal. If you carry your mug in your bag or you often travel with it, investing in a leak-proof travel mug would be worth it.
How do I clean the lid of my travel coffee mug?
While some travel mug lids are dishwasher safe, it’s often recommended to hand wash them for a thorough clean. Using warm water, mild dish soap, and a soft brush, you can easily clean the nooks and crannies of the lid. For stubborn stains or residues, soaking the lid in warm soapy water before cleaning can be helpful. There are also special cleaning tablets designed specifically for travel mugs, as well as tools to help get your lids and mugs super clean.
How much liquid can a travel mug hold?
The capacity of a travel mug can vary widely, ranging from small 8-ounce mugs to larger 32-ounce ones. The standard size for most travel mugs is around 16 ounces, which is about the size of a grande coffee at Starbucks. Your choice depends on your coffee-drinking habits and how often you’re willing or able to refill your mug.
Your Travel Mug as Your Business Companion
Your journey as an entrepreneur is filled with endless meetings, brainstorming sessions, and the occasional road trip. Through all this, a reliable travel mug becomes more than just a container—it becomes a trusted business companion. It keeps your hot beverages hot, your cold beverages cold, and your taste buds delighted. Choose wisely, and you’ll find that your travel mug not only elevates your coffee-drinking experience but also contributes positively to the environment and your brand visibility.
Let’s not forget that a well-chosen travel mug can even save you from that dreadful moment of discovering your coffee has gone cold during your meeting. It’s about time to choose the best travel mug that works for you and your unique entrepreneurial journey. Your next cup of perfectly hot coffee or refreshingly cold iced coffee awaits.
]]>
https://mallize.com/blogs/news/smoked-corn-dogs2023-06-19T21:13:51-04:002023-06-19T21:13:51-04:00Smoked Corn Dogsadmin
Smoked Corn Dogs are smoked or grilled hot dogs dipped into a sweet cornmeal batter and deep fried. Get ready for the best corn dog of your life!
Being from the south, we definitely have a love for all things deep fried, such as Fried Okra, Fried Chicken Strips and Onion Rings. If you are craving a county fair corn dog, this recipe is for you.
When your mom calls with a great idea, you have to do it. My mom had the idea to grill the hot dogs and then make corn dogs. We immediately headed to the store to gather up ingredients and make this recipe happen. It's so good, y'all!
Ingredients Needed
Hot Dogs : We picked bun length all beef hot dogs. Use your favorite.
Corn Starch: This is the secret ingredient to get the batter to stick to the hot dogs!
Cornmeal: Yellow cornmeal, not cornmeal mix.
All Purpose Flour
Sugar
Baking Powder
Kosher Salt
Eggs
Milk
Buttermilk: If you don't have buttermilk, substitute a scant ½ cup of milk + ½ tablespoon vinegar or lemon juice)
Vegetable Oil
Step By Step Directions
Grill the hot dogs or place on your smoker for about 15 minutes until desired doneness.
Remove from the grill and place a corn dog stick or skewer through the center of each hot dog. We trimmed bamboo skewers and used two per hot dog, just so they would be a little easier to handle.
For the cornmeal batter, add cornmeal, flour, sugar, baking powder and salt to a bowl. Whisk to combine.
Add eggs, milk, buttermilk and vegetable oil. Whisk until smooth.
Pour the cornmeal batter into a tall glass or a tall measuring cup.
Heat vegetable oil in a heavy dutch oven or deep skillet over high heat until it reaches 350°.
When the oil is hot, batter corn dogs one at a time.
Place cornstarch into a bowl and roll hot dogs until coated.
Dip corn dogs into batter in a swirling motion until well coated. Let the excess drip off and place into the hot oil.
Cook 3- 4 minutes, rolling the corn dogs to brown on all sides. If you would like to test the corndogs to make sure the batter is cooked through, insert a tooth pick and if it comes out clean, it's done.
Use tongs to remove from hot oil, allowing excess oil to drip off before placing on baking sheet, lined with paper towels and a wire rack.
Repeat with remaining ingredients.
Serve corn dogs immediately with ketchup and mustard or your favorite condiments.
Recipe Notes
Store leftover corn dogs wrapped in aluminum foil or a zip top bag in the refrigerator up to 2 days.
Reheat corndogs on a sheet pan in the oven at 350° for 10 - 12 minutes.
Most of the time, deep fried foods are not that great leftover. However, these corn dogs were just as delicious reheated in the oven.
The sweet and fluffy cornmeal batter on these corn dogs make them something special. It is just down right delicious with the smoky hot dogs. We can't wait to make these again.
Best Sides for Corn Dogs
Jalapeño Deviled Eggs are a must have side dish and since you have the fryer going, French Fries are a great side dish for corn dogs.
When our kids were little we kept a stockpile of frozen corn dogs for snacks or an easy lunch. These homemade smoked corn dogs are about a million times tastier than the frozen variety.
If you are craving a state fair style corn dog, try these Smoked Corn Dogs. They are so easy to make that you will be frying them up again and again.
If you love this recipe as much as we do, please leave a comment and a five star review. Be sure to help us share Pinterest, Facebook and Instagram.
Yield: 12 Corn Dogs
Smoked Corn Dogs
Smoked Corn Dogs are smoked or grilled hot dogs dipped into a sweet cornmeal batter and deep fried. Get ready for the best corn dog of your life!
Prep Time10 minutes
Cook Time35 minutes
Total Time45 minutes
Ingredients
12 hot dogs
2 tablespoons corn starch
1 cup yellow cornmeal (not cornmeal mix)
1 cup all purpose flour
½ cup sugar
1 tablespoon baking powder
½ teaspoon kosher salt
2 large eggs
½ cup milk
½ cup buttermilk (see notes for substitute)
1 tablespoon vegetable oil
3 cups vegetable oil for frying
Instructions
Prepare a grill fire or smoker to 375° using hickory for smoke flavor. Cook hot dogs 10- 15 minutes or until desired doneness.
Remove hot dogs from grill and insert bamboo skewers or hot dog sticks into the center of each hot dog. Set aside.
Place cornstarch in a shallow dish and set aside.
Mix the cornmeal batter in a bowl by adding cornmeal, flour, sugar, baking powder and salt. Whisk until combined.
Add eggs, milk, buttermilk and 1 tablespoon of vegetables oil. Whisk until completely combined.
Pour batter into a tall glass or measuring cup.
Pour 3 cups of vegetable oil into a dutch oven or deep skillet and place over high heat, heating to 350°.
When oil is hot, roll each hot dog into corn starch and dip into batter in a swirling pattern until evenly coated. Let excess batter drip off. It is best to batter hot dogs one at a time, as you are dropping them into the oil.
Carefully place corn dogs into hot oil, cooking 2 - 3 at a time. Roll corn dogs to brown evenly on all sides, about 3- 4 minutes. If a tooth pick inserted into the batter comes out clean, you know it's done.
Remove to a rimmed baking sheet lined with paper towels and a wire rack.
Repeat with remaining ingredients.
Serve immediately.
Notes
Buttermilk Substitute: Mix a scant ½ cup of whole milk with ½ tablespoon of vinegar or lemon juice.
Store leftover corn dogs wrapped in aluminum foil or a zip top bag in the refrigerator up to 2 days.
Reheat corndogs on a sheet pan in the oven at 350° for 10 - 12 minutes.
]]>
https://mallize.com/blogs/news/don-t-mess-with-a-classic-blackberry-pie2023-06-19T09:13:52-04:002023-06-19T09:13:52-04:00Don’t Mess with a Classic: Blackberry PieadminBlackberry Pie
A thick slice of old-fashioned Blackberry Pie is the quintessential summer dessert. Between the sweet seasonal berries and the scoop of ice cream on top (never forget the ice cream!), it’s the perfect treat to cap off a backyard get-together.
Why You’ll Love This Blackberry Pie Recipe
Blackberry Pie Is a Great Way to Use Blackberries. If you’re lucky enough to be able to pick your own blackberries, you probably also have a whole lot of blackberries to put to use. There’s no better way to do that than baking up a homemade blackberry pie (followed by Blackberry Crisp).
Frozen Berries Work Too. You don’t even need to thaw them first!
It’s Simple. In this world of over-the-top desserts with a gazillion ingredients and flavors, isn’t it refreshing to get back to the basics with an old-fashioned blackberry pie recipe?
No Runny Filling or Soggy Bottoms Here. I add both all-purpose flour and tapioca or cornstarch to thicken the blackberry filling, so it won’t be runny or make your crust soggy.
It Can Go Tart or Sweet. If you’re picking your own berries, you can adjust the sweetness of the recipe by including some pinkish under-ripe blackberries in the filling to make it more tart. Or, use less sugar. It’s up to you! (Psst, love sweet-tart pies? Try my Rhubarb Pie next!)
The Crust Is a Tried-and-True Favorite. It’s buttery, it’s flaky, and it’s also made with whole wheat flour. (Look at you, working some nutrition into your dessert!) Readers love this crust in my Strawberry Pie, Crock Pot Chicken Pot Pie, Sweet Potato Pie, and other fruit pies, from apple pie to blueberry pie!
You can easily make a gluten-free blackberry pie by substituting your favorite gluten-free pie crust and using a measure-for-measure gluten-free flour substitute to thicken the filling.
Fresh or Frozen Blackberries. Store-bought blackberries tend to be a little bit sweeter and juicier than wild blackberries. If you’re using frozen blackberries, don’t thaw them first.
Granulated Sugar. If your berries taste super sweet, you can use a bit less.
Cassis Liqueur or Chambord Raspberry Liqueur. An optional add-in to enhance the flavor of the filling.
Lemon Juice, Orange Juice, or Lime Juice. This brings balance and brightness.
All-Purpose Flour. Our first thickener.
Quick-Cooking Tapioca or Cornstarch. Our second thickener. Use an additional teaspoon if your berries are extra plump and juicy.
Kosher Salt. Another ingredient added to balance the flavor of the blackberry pie.
Spice. Use ground cinnamon, freshly grated nutmeg, or cardamom.
Unsalted Butter. Don’t use salted! You’re already adding salt to the filling, so salt in the butter too would be a little much.
Egg Wash. Beat an egg with a teaspoon of water. This will give you that shiny bakery-style crust.
Turbinado Sugar. Coarse sugar gives us sparkle and crunch.
Vanilla Ice Cream. This is optional for serving, but you’re missing out of you skip it. A scoop of vanilla ice cream (preferably the kind flecked with vanilla beans) melting over slice of warm blackberry pie is absolute bliss.
Substitution Tip
Instead of ice cream, you can also serve blackberry pie with a dollop of whipped cream. A sprinkle of lemon zest over the whipped cream is a nice touch if you’re making this for a party!
The Directions
Make the Pie Crust. TIP: make one disk of dough slightly larger than the other.
Roll Out the Dough. Line the pie dish and pop it into the freezer. Roll the top crust or cut it into 1-inch strips for a lattice top and freeze.
Mix the Blackberries. Add sugar and the flavor boosters.
Whisk the Dry Ingredients. This makes sure the thickeners are evenly distributed.
Coat. Pour the dry ingredients into the bowl with the berries and stir until they’re evenly combined.
Add the Filling to the Bottom Crust. Don’t forget to dot with butter.
Add the Top Crust. Brush the egg wash onto the crust and sprinkle sugar on top.
Bake. Place the pie plate on a parchment-lined baking sheet and bake blackberry pie at 425 degrees F for 20 minutes, then 350 degrees F for 40 to 50 minutes.
Cool. Let the pie cool for at least 4 hours, then slice, serve, and ENJOY!
Storage Tips
To Store. Wrap cooled blackberry pie in the pie plate with foil or plastic wrap, or transfer any leftovers to an airtight container. Store in the refrigerator for up to 5 days, or at room temperature for up to 2 days.
To Freeze. Freeze for up to 2 months in an airtight container or wrapped tightly in the pan. Let the pie thaw in the refrigerator before serving.
What to Serve with Blackberry Pie
Other Summery Desserts. If you’re making dessert for a party, you might want a few options for your guests to choose from. Serve this blackberry pie alongside other summer favorites like Strawberry Cake or Peach Crisp.
A Light Cocktail. Enjoy your slice of pie with a glass of White Sangria.
Recommended Tools to Make this Recipe
Pie Plate. A glass pie dish gives you an inside view (literally) of how the pie is baking so you can achieve that perfect golden brown crust.
Rolling Pin. You’ll need one to roll out the top and bottom crusts.
Pie Crust Shield. A pie shield is much easier to use than strips of foil if you need to protect the edges of the crust from over-baking.
Recipe Tips and Tricks
Watch the Crust. If you notice the edges are browning too quickly, place strips of foil over them or use a pie crust shield, which allows the pie to continue baking while protecting the crust from getting too much heat.
Use an Egg Wash or Alternative. If you don’t want to use egg wash, you can swap in half-and-half, cream, or milk. You’ll need one of these to keep the coarse sugar from falling off the crust.
Cut Vents if You’re Not Doing a Lattice Crust. You need someplace for the steam to escape as your pie bakes. Otherwise, all the moisture will stay in the pie, making the crust soggy.
Be Patient. Blackberry pie really does need at least 4 hours at room temperature to set up. If you cut it too soon, your slices will fall apart!
Choose Instant Tapioca for a Glossier Finish. Cornstarch is a fabulous thickener too, but it will make the filling cloudy. If that matters to you, go with tapioca. It’s widely available at grocery stores, and online here.
1/8teaspoonground cinnamonfreshly grated nutmeg, or cardamom for something different
1tablespoonunsalted buttercut into small pieces
1large eggbeaten with 1 teaspoon water for an egg wash
1tablespoonturbinado sugar or similar coarse sugar
Vanilla ice creamoptional for serving
Instructions
Prepare the pie crust, divide into two (make one half slightly larger than the other), and chill for 1 hour as directed (or up to 2 days). When ready to bake, place a rack in the center of your oven preheat to 425°F.
On a moderately floured work surface (I like to use a sheet of parchment paper or wax paper in case I need to pop the dough back into the fridge), roll out the larger portion of dough into a 13-inch circle (if it’s too stiff from being in the fridge, let it rest at room temperature for 2 or so minutes, until you can roll it; it warms up fast). Always roll from the center of the dough outward, rotating the dough on the counter every now and then as you go (this will give you a better, more even circle and also help you gauge when to add more flour to the board if the dough is sticking). Flour the board and your rolling pin as little as is manageable and work fast so the dough stays cold.
Fold the circle over the rolling pin, then use the rolling pin to help you unfurl it gently into a deep 9-inch pie plate. Ease the dough down into the plate without stretching it. If it any point the dough tears, don’t stress. Just pinch it back together and patch as needed. If the dough becomes too warm and hard to work with, stick it in the fridge for a few minutes (this is why the wax/parchment is handy). Place the dough-lined pie plate into the freezer while you carry on.
Roll out the second portion of dough on a sheet of wax or parchment paper as you did the first. if you’d like to make a lattice, cut it into 1-inch strips. Use the sheet to lift it and place it in the fridge while you prepare the filling.
In a large bowl, place the blackberries, sugar, cassis (if using), and lemon juice.
In a small bowl, whisk together the flour, tapioca or cornstarch, salt, and cinnamon. Add it to the blackberry mixture, then with a big spoon, stir until the berries are evenly coated.
Remove the bottom crust from the freezer. Gently add the filling, as well as any juices or dry bits of flour and sugar that have collected in the bowl.
Scatter the butter over the top of the blackberry filling.
Remove the top crust from the refrigerator. Drape the top crust over the filling (or cut into 1-inch strips and arrange as a lattice). Trim the pie crust to ½-inch overhang all the way around. Tuck the top crust under the bottom crust and flute the edges with your fingers (or keep it easy and just press down around the edges of the crust with the tines of a fork). If not using a lattice, with a sharp knife, cut several vents in the top.
Use a pastry brush to dust off any excess flour from the crust, then brush the crust all over with the egg wash.
Place the pie on a parchment-lined baking sheet and sprinkle with the turbinado sugar. Bake on the center rack at 425°F for 20 minutes, then reduce the temperature to 350°F and continue baking until the crust is deep golden and you see bits of filling bubbling out of the vents, about 40 to 50 minutes more (if your berries were frozen, you may need to extend the baking time by 10 minutes or more). If at any point the crust edges start to get too dark, tent them with foil or a pie crust shield. Rotate the pie as needed so the crust browns evenly.
Let the pie cool completely at room temperature (4 hours or more; if you slice it too early, the pie won’t set up properly). Slice and enjoy with ice cream as desired.
Notes
*Instant tapioca is available at most grocery stores and yields a glossier finish than cornstach, which can make the filling a little cloudy. That said, both make a great-tasting pie!
If you prefer not to use an egg, you can brush the crust with half-and-half, cream, or milk.
TO STORE: Wrap cooled blackberry pie in the pie plate with foil or plastic wrap, or transfer any leftovers to an airtight container. Store in the refrigerator for up to 5 days, or at room temperature for up to 2 days.
TO FREEZE: Freeze for up to 2 months in an airtight container or wrapped tightly in the pan. Let the pie thaw in the refrigerator before serving.
How Do You Keep a Blackberry Pie from Being Runny?
The addition of flour and cornstarch or tapioca in this recipe will keep your blackberry pie from being runny. Letting the pie cool for at least 4 hours helps too!
How Do You Thicken a Runny Pie?
Unfortunately, once your pie is runny, there’s no way to correct it. Luckily, this blackberry pie recipe yields a thick, jammy filling. If your pie is runny, just adjust your expectations, top with ice cream, and enjoy!
Can I Freeze Blackberry Pie Filling?
Yes, if you’ve got an abundance of blackberries on your hands, you can make extra pie filling and freeze it for later! Freeze it in an airtight bag or container for up to 3 months and thaw it in the refrigerator before using.
Related Recipes
There’s always room for a sweet treat after dinner—at least when it’s one of these fruit dessert recipes!
]]>
https://mallize.com/blogs/news/bbq-ribs2023-06-17T21:13:51-04:002023-06-17T21:13:52-04:00BBQ Ribsadmin
For me, nothing says “Summer is here!” like a succulent rack of BBQ Ribs with All. Of. The. Sides. But maybe, like me, you don’t have a grill or a backyard, or any desire to stand out in the hot sun next to fire. First, I see you. Second, you don’t need a big fancy grill to get juicy, tender, fall-off-the-bone BBQ Ribs. All you need is a baking pan, some foil, and some patience to get oven-baked barbecue ribs on the table that’ll have your whole family asking for more! PS This is a great recipe for Father’s Day, the 4th Of July, or a summer barbecue. So make sure to save it!
What you need to make BBQ Ribs
Are you ready to skip the grill and fire up your oven? Here’s what you need to make delicious oven-baked barbecue ribs that leave you wishing you’d made a double batch!
Ribs– your choice: baby back, spare, short, St. Louis style, you name it. Though cook times will vary, you can make any 3-pound rack using this simple recipe.
Barbecue Sauce– we have a great recipe for Homemade BBQ Sauce if you want to make your own, but any BBQ sauce will do. Not only does the sauce add deep flavors, but it also helps caramelize the outer layer of ribs for mouth-wateringly sticky perfection.
Spices– a rub is a must if you want to add deep flavor to ribs. For this recipe, we will make our own rub with salt, pepper, garlic powder, onion powder, smoked paprika, brown sugar, cayenne, and mustard powder, but if you have a favorite brand, use 5 tablespoons.
Butter – mixing the dry rub with melted butter makes it easy for the seasoning to stick to your ribs as they bake. The butter also adds flavor and keeps your ribs from getting dry.
Liquid– placing liquid in the pan will help keep your ribs from drying out. You can use any liquid: water, chicken broth, and if you’re making pork ribs, apple juice works beautifully.
How To Pick Ribs
Here are a few helpful tips to keep in mind when picking ribs:
Look for meaty ribs that are the same thickness from end to end. Press your finger down into the rib to get a feel for how much meat there is on the bone.
Look for ribs marbled throughout with fat, which keeps them juicy and adds flavor. Pass on ribs with big clumps of fat, which adds to the weight and cost of the rack but has to be trimmed before baking.
The ribs should be about the same size and thickness from end to end, which ensures even cooking. Of course, you’ll have some natural tapering at one end, but avoid racks with a considerable size difference from end to end.
Plan on at least 3 to 4 ribs per serving and buy accordingly.
What To Serve With BBQ Ribs
Kick up your BBQ Ribs 100 notches by serving them with delicious, easy-to-make Budget Bytes classics like:
Wrap ribs tightly in plastic or foil and place them in an airtight container. Store leftovers in the fridge for up to three days or in the freezer for up to three months. To reheat from frozen, thaw the ribs in your fridge overnight. When ready to cook, bring the ribs to room temperature while you preheat your oven to 250°F. Line a sheet pan with a rack and fill the pan with a few cups of water. Wrap the ribs in foil, place them on a sheet pan, and warm for about 20 to 30 minutes or until steaming.
Place an oven rack in the center of the oven and preheat it to 300°F. Trim the ribs, removing excess fat. Trim the thicker end to even out the thickness. (Cook the trimmed meat with the ribs as a cook's bonus.) Turn the ribs over and remove the silvery membrane from the back of the ribs.
Line a sheet pan that's at least 2 inches deep with heavy-duty aluminum foil and place a wire cooling rack in it. If you do not have a cooling rack, crumple a long sheet of aluminum and roll it into a rack-sized donut that is at least 2 inches thick. Place the trimmed ribs on the rack. Pat off any excess moisture with a paper towel.
Make a rub by mixing salt, pepper, garlic powder, onion powder, smoked paprika, brown sugar, cayenne, ground mustard, and melted butter.
Rub the seasoning generously all over the meaty top of the ribs in a thick layer.
Pour chicken broth into the sheet pan, being careful not to pour it on the ribs. Place the sheet pan in the oven. Lower the temperature to 250°F. Bake uncovered for 30 minutes.
Cover the ribs in aluminum foil and bake for 60 minutes, rotating the sheet pan midway through.
Remove the aluminum foil and brush the ribs with 1 cup of bbq sauce. Bake for an additional 30 minutes or until tender. Every rack is different. The ribs are ready when a fork can easily pull the meat off the bone.
Turn the heat in the oven on broil. Brush the ribs with an additional 1/2 cup of bbq sauce and place under the broiler for a few minutes, just until a little char develops. Remove the ribs from the oven and rest for 15 minutes. Cut the ribs to your desired size, serve, and try not to lick your fingers!
Place a rack in the center of the oven and preheat it to 300°F. Trim the ribs, removing any big clumps of excess fat. Trim the thicker end to even out the thickness and cook the trimmed meat along with the ribs. Cook’s bonus! Turn the ribs over and remove the silvery membrane from the back of the ribs. It gets rubbery when cooked. Use a pairing knife or other sharp small knife to cut away at the skin while you pull it.
Line a sheet pan that’s at least 2 inches deep with heavy-duty aluminum foil and place a rack in it. Place the trimmed ribs on the rack. If you do not have a cooling rack, crumple a long sheet of aluminum and roll it into a rack-sized donut that is at least 2 inches thick. Place the trimmed ribs on the rack or aluminum donut. Pat off any excess moisture with a paper towel.
Make a rub by mixing 2 teaspoons of salt, 1 teaspoon of pepper, 2 teaspoons of garlic powder, 2 teaspoons of onion powder, 2 teaspoons of smoked paprika, 1 tablespoon of brown sugar, 2 teaspoons of cayenne, 2 teaspoons of mustard powder, and 4 tablespoons of melted butter.
Rub the seasoning generously all over the meaty top of the ribs.
Pour the chicken broth into the sheet pan, being careful not to pour it on the ribs. Place the sheet pan in the oven. Lower the temperature to 250°F. Bake uncovered for 30 minutes. Cover the ribs in aluminum foil and rotate the sheet pan front to back. Bake for another 30 minutes, then rotate the sheet pan again and bake for an additional 30 minutes.
Remove the aluminum foil and brush the ribs with 1 cup of bbq sauce. Bake for an additional 30 minutes or until tender. Every rack is different. The ribs are ready when a fork can easily pull the meat off the bone.
Turn the heat in the oven on broil. Brush the ribs with an additional 1/2 cup of bbq sauce and place under the broiler for a few minutes, just until a little char develops. Remove the ribs from the oven and rest for 15 minutes. Cut the ribs to your desired size, serve, and try not to lick your fingers!
]]>
https://mallize.com/blogs/news/4-easy-ways-to-organize-your-home-s-entryway2023-06-17T09:13:53-04:002023-06-17T09:13:53-04:004 Easy Ways to Organize Your Home’s Entrywayadmin
Experts share their go-to tricks for decluttering the mess-prone area
By Anna Kocharian
There’s an unspoken rule that an entryway should serve as a drop-off point for all sorts of gear—shoes, coats, mail, and keys are just the start.
And while some homes have a mudroom, hall closet, or garage with dedicated storage, others lack the necessary framework for concealing clutter.
With that in mind, we turned to professional organizers for their tried-and-true tips for bringing a little more method to the madness that can be a home’s entry.
Start With a Plan
In a mudroom or entryway, function should always come first, says professional organizer Lucy Milligan Wahl, founder of LMW Edits. “You can make any system look good, but you have to create it first,” she says.
Photo: Linda Raymond/Getty Images
Everything from a home’s layout to your lifestyle and even the climate can affect the way the area is arranged.
If you live in a region where it’s always raining, having a dedicated and easy-to-reach spot for umbrellas and rain gear is important. If your family is involved in a heavy rotation of sports and music lessons, you might want to carve out a nook for the gear they’ll be toting back and forth.
Finally, think about how often you’ll be able to organize the space—and be realistic about it.
“Are you willing to put in a few minutes every day to tidy up or does it all need to be grab-and-go?” Wahl says. Once you’ve figured that out, analyze your space and make a thoughtful plan from there.
If your home is lacking a mudroom or an entryway altogether, you may have to fashion one.
“First, find a space that is a good one-stop-spot for jackets, shoes, bags, and more—a catchall on the way in and out where your family can store things and have easy access to coming and going,” says home improvement and lifestyle expert Kathryn Emery of Be the Best Home. It doesn’t need to be a huge area; all you really need is a little bit of wall space.
Make Room for the Kids
Carving out a kids’ zone can be a helpful way to encourage them to stay tidy—or something close to it. Emery suggests dedicating a cubby or shelf for each child, to help them form a habit of stowing their belongings the moment they walk in.
Photo: Tria Giovan/GAP Interiors
“A bench with storage drawers is great for kids, as they are low to the ground and simple to get in and out of,” she says.
Though if you’re looking for a more simple approach, wall-mounted hooks are the way to go. Be sure to install them at a height the little ones can easily reach for convenience when hanging coats and bags.
Swivel hooks, which can often feature three to five movable hooks, are a great option for maximizing a space and keeping one person’s items confined to a dedicated spot, Emery says. And if you have enough wall space, install a few of them in a row.
• Safavieh Damien 3-Drawer Wood Storage Unit, $250 at Walmart, $281 at Home Depot
Corral Smaller Items
Keys, wallets, and similarly sized items can easily get lost in the shuffle, so it’s always worth having a dedicated spot for them. “Use containers that are just large enough for the items you need,” Wahl says.
Photo: Tria Giovan/GAP Interiors
Keys can go in a small dish or tray, phones can live on a charging station, and mail can be stacked in trays, Wahl says.
Take things a step further and give each member of the family their own tray to make the process a bit more streamlined. The entry is an area that’s already filled with lots of stuff, so avoid adding anything extraneous because it will instantly become clutter.
“The area should be for the things your family uses on a daily or near-daily basis,” the organization expert says.
If you have more belongings than storage space in your entryway or mudroom, a freestanding cabinet can be a good solution. One that incorporates an array of useful features—think a coat rack, shoe holder, and bench—can be a great way to consolidate the basics into one neat zone.
Photo: Kilito Chan/Getty Images
The sort of cabinetry you choose to bring in can include features like a clothing rod, drawers, hooks, or shoe shelves, says certified professional organizer Schae Lewis of Mission 2 Organize. It all depends on your needs.
Play to the weaknesses of the area. If you’re lacking a designated zone for a specific category, be it shoes, coats, or bags, find a storage unit that can cater to that.
“If you are creating the space from scratch without any cabinetry, plenty of hooks and a shoe solution are crucial for this space,” Lewis says.
The Shopping List • Vasagle 3-in-1 Coat Rack, $68 at Wayfair, from $70 at Amazon • Godishus Wardrobe, $150 at Ikea • 6-Tier Shoe Storage Cabinet, $45 at Amazon
]]>
https://mallize.com/blogs/news/applebee-s-menu-prices-half-price-appetizers-20232023-06-16T21:13:52-04:002023-06-16T21:13:52-04:00Applebee’s Menu Prices & Half Price Appetizers (2023)admin
Are you ready to eat good in the neighborhood? Here are the Applebee’s menu prices for 2023 on everything from burgers to steaks and salad. I also share my favorite ways to save money when dining at Applebee’s including the half-priced appetizers.
At Applebee’s, you can enjoy its appetizers and pay only half its price. What’s more, is that you can do it twice a day, one from 3:00 PM to 6:00 PM and from 9:00 PM until closing time.
As you can see, at 50% off the appetizer prices are significantly cheaper.
Chicken Wonton Tacos — reg. $9.99, 50% off = $4.99
Keep in mind that not every appetizer on the menu is 50%. Each Applebee’s location determines the menu items that are available for happy hour or late night.
Applebee’s boneless chicken wings.
What are the best ways to save money at Applebee’s?
Here are some of the most effective ways to save money on your next Applebee’s visit.
Discounted Gift Cards: Applebee’s regularly sells gift cards at a discount around the holidays. For example in honor of Father’s Day the restaurant is offering a free $10 gift card when you spend $50 on gift cards for dad (or yourself). This is a great opportunity to save money considering it’s like getting 20% more value for every $50 in spend you make. If you’re planning to dine at Applebee’s in the future this is a smart purchase.
Join the E-Club: Applebee’s offers an Email Club where you can receive exclusive deals and specials. They often send coupons to subscribers, and you also receive a free appetizer like Mozzarella Sticks, Classic Wings, or Quesadillas just for signing up.
On your birthday, you will also be eligible for a free dessert like New York Cheesecake, Carrot Cake, or Apple Pie à la Mode. Be prepared to show your Applebee’s server your Club Applebee’s email confirmation or driver’s license with your birthday.
Veterans and Military Discount: Applebee’s offers a 10% discount to active duty military, veterans, and reservists at participating restaurants. Every Veterans Day on November 11, vets and active-duty military are given a free meal with proof of service as a special Veterans Day military offer.
Happy Hour Specials: Applebee’s offers happy hour specials twice a day, from 3pm to 6pm and from 9pm to close. During these times, you can enjoy discounts on appetizers, drinks, and desserts. The appetizers specifically are half-priced.
Appetizers: Half-price on select appetizers, such as mozzarella sticks, chicken wings, and quesadillas.
Drinks: $3 beers, $5 wine, and $2 cocktails.
Desserts: $2 off on select desserts, such as cheesecake and carrot cake.
Daily Specials: Some locations have daily specials that are available for a short period of time. For example, all summer long Applebee’s is offering a $6 Sips on the Beach promotion where diners ages of 21 years of age and older can get a Mucho Mai Tai made with Captain Morgan and Passion on the Beach made with Tito’s Vodka.
Kids Eat Free on Wednesdays: Applebee’s offers a Kids Eat Free promotion on Wednesdays from 4pm to 10pm. During this time, children 12 and under can get a free kids meal with the purchase of an adult entrée. Make sure to call ahead on this one as not every location offers this deal.
2 for $25 Deals
Applebee’s often runs promotional deals such as “2 for $25” deals where you get two entrées and an appetizer for a set price. The current 2 for $25 deal allows you to choose two entrées and one full-sized appetizer for just $25.
Pick Two Entrées: Choose from the following entrées: 6 oz. Top Sirloin, Riblets Plate, Classic Burger, Classic Cheeseburger, Fiesta Lime Chicken, Grilled Oriental Chicken Salad, Oriental Chicken Salad.
Pick 1 Appetizer: Buffalo Boneless Wings, Crunchy Onion Rings, Spinach Artichoke Dip, Mozzarella Sticks, or Two Side Salads.
The deal is available in-restaurant or with carside pickup, delivery. The deal is not available with other discounts or promotions.
For a little bit more, you can order premium items with the 2 for $25 deal. For example you could upgrade to an 8 oz. Top Sirloin ($2.50 more), Riblets Platter ($3.00 more), Bourbon Street Chicken & Shrimp ($2.50 more), Classic Bacon Cheeseburger ($1.00 more), and the Whiskey Bacon Burger ($2.50 more). For each premium item you increase the price tag of the deal by 4% – 12% depending on the upgrade you select.
How is Applebee’s food made? Are Applebee’s meals frozen?
Applebee’s, like many chain restaurants, uses a combination of fresh and pre-prepared foods in their kitchens. For operational efficiency and consistency across all locations, certain elements of their dishes may be prepared in a central kitchen, frozen, and then shipped to individual locations. These items might then be cooked from frozen or refrigerated states.
However, Applebee’s also uses fresh ingredients in their kitchens. For instance, vegetables may be delivered fresh and then chopped and prepared in the kitchen. Steaks, for example, are typically delivered to the restaurant fresh and then seasoned and cooked to order. The balance between fresh and pre-prepared ingredients can depend on the specific dish and individual restaurant location.
There is a benefit to this approach. The process ensures consistency across all locations – when you order a particular dish at an Applebee’s, the goal is that it should taste the same whether you’re in California or New York.
Does Applebee’s use beef or pork ribs?
Applebee’s is well known for its Riblets, which are made from pork, not beef. A Riblet is a smaller cut of rib with meat on both sides of the bone. These Riblets are marinated and slow-cooked to become tender. The meat is cooked finished on the grill with a variety of different sauces, such as honey barbecue or spicy Texas barbecue for enhanced flavor.
A true classic: Applebee’s Classic Bacon Cheeseburger.
Are Applebee’s riblets real ribs?
Yes, Applebee’s Riblets are made from real ribs. They come from a section of the pork rib known as the button rib. The button rib is a flat, circular section of the rib bone surrounded by meat, typically found towards the backbone and including part of the back ribs. It’s a smaller, more compact cut than what you might picture as a traditional rib.
This part of the rib is often left behind when the back and spare ribs are cut from the pig. Riblets are smaller than full-size ribs, but they’re still real ribs with meat on the bone.
Is Chilis or Applebee’s cheaper?
Applebee’s and Chili’s generally have similar price points as they both operate in the casual dining sector. The cost can vary slightly depending on the specific menu items, the location of the restaurant, and any current promotions or specials.
Both chains offer a variety of entrées, appetizers, and desserts with prices typically ranging from about $10 to $20 USD for main dishes. They also both often run deals, such as combination meals or discounts on certain days of the week, which can provide additional value.
A crowd favorite: Chicken Fajita Rollup.
Does Applebee’s serve ribeye steaks?
Applebee’s does offer a Ribeye steak on their menu. Their Ribeye is a 12-ounce cut that is seasoned and grilled to the customer’s preferred level of doneness.
Applebee’s is better known for it’s lower priced steak options like the top sirloin available on the 2 for $25 menu.
Why is Applebee’s so expensive?
The perception of Applebee’s as “expensive” may be subjective and depends on what you’re comparing it to. Applebee’s is categorized as a casual dining restaurant, which is a step above fast food in terms of both price and service.
Applebee’s is generally comparable in price to similar casual dining chains. Restaurants like Chili’s, TGI Friday’s, and Outback Steakhouse offer a similar range of prices for similar meals.
For instance, main courses at these establishments typically fall within the $10 to $20 range, depending on the specific dish. Of course, premium dishes like steaks or seafood can cost more. Appetizers, desserts, and beverages also add to the total cost.
All of these chains often run deals that provide an appetizer and two entrées for a set price. These kinds of promotions can provide significant value and can make the pricing more competitive compared to fast-casual or fast-food restaurants.
A feast waiting for you: Shrimp Parmesan Sirloin.
Here are a few factors that might contribute to their pricing:
Quality and Variety of Food: Applebee’s offers a wide range of dishes, from salads and sandwiches to seafood, pasta, and steaks. The ingredients needed for these meals, and the processes to prepare them, can cost more than the simpler fare offered by fast food restaurants.
Labor Costs: Casual dining restaurants like Applebee’s typically provide a higher level of service than fast food or fast-casual establishments. This includes hosts, waitstaff, and bartenders, all of whom need to be paid.
Overhead Costs: The cost of running a full-service restaurant — which includes utilities, rent, licensing, insurance, and maintaining the dining space — can be quite high. These costs are often factored into the price of the meals.
Profit Margins: Like any business, Applebee’s aims to make a profit. While they strive to keep prices as competitive as possible, they also need to ensure they’re earning enough to cover all their costs and make a reasonable profit.
Location: Restaurants in areas with higher costs of living, like big cities or popular tourist areas, might have higher prices to offset the increased cost of doing business in those areas.
If you find Applebee’s too expensive, there are several ways to save money, such as taking advantage of their “2 for $20” or “2 for $25” deals, eating during Happy Hour, or joining their e-club to receive coupons and learn about special promotions. You can also consider sharing an entrée or appetizer, as the portion sizes are typically quite large.
Does Applebee’s have MSG in their food?
Applebee’s, like many other restaurant chains, does not make a blanket statement about the use of monosodium glutamate (MSG) in their food. Some of their dishes or ingredients may contain MSG, while others may not.
If you’re concerned about MSG in your food due to sensitivity or for other health reasons, it’s always a good idea to ask the restaurant directly about the ingredients in the specific dishes you’re interested in. You can also often find allergen information on the restaurant’s website, although this may not always include specific information about MSG.
A serving of Applebee’s Chicken Tenders.
Does Applebee’s serve sweet potatoes?
Applebee’s does not typically list sweet potatoes as a standard side option on their menu. They offer a variety of sides such as fries, garlic mashed potatoes, steamed broccoli, coleslaw, and others, but sweet potatoes have not one of those options.
Does Applebee’s serve potato soup?
No, Applebee’s does not serve potato soup.
Does Applebee’s have baked potatoes?
Applebee’s used to serve baked potatoes but has since discontinued it. On a Facebook post in 2018, a user commented about missing Applebee’s baked potatoes which the chain replied to saying “We’re sorry to hear you’re missing our baked potatoes, Coleen. We like to keep a variety of potato options on our menu. We will let our Food & Beverage Team know you’d like to see the baked potato back on the menu!”.
Who owns Applebee’s?
Applebee’s is owned by Dine Brands Global, which also owns IHOP (International House of Pancakes). Dine Brands Global is one of the world’s largest full-service dining companies and operates more than 3,500 restaurants under these brands.
Originally, Applebee’s was started by Bill and T.J. Palmer. They opened their first location in Atlanta, Georgia, in 1980. The Palmers sold the business concept to W.R. Grace and Company in 1983, and Bill Palmer was named president of the Applebee’s Division, an indirect subsidiary of W.R. Grace and Company. He became an Applebee’s franchisee in 1985 and today owns more than three dozen Applebee’s restaurants.
In 2007, IHOP Corp. purchased Applebee’s International Inc., originally planning to turn the company around by selling company-owned restaurants to franchise owners. IHOP Corp. then changed its name to DineEquity Inc., which was later rebranded to Dine Brands Global.
Why is Applebee’s so expensive? Have prices gone up?
Applebee’s president John Cywinski said that restaurant raised prices by 7% since the second quarter of 2021. In 2022, CEO John Peyton said that they are making an emphasis on the value of their products.
Applebee’s has positioned itself as a value-oriented casual dining restaurant where customers can enjoy “delicious food and generous proportions in a wonderful environment at an affordable and approachable price at times like these when economics are tough for our guests.” You can see these value oriented offerings in action with the happy hour, late night specials and 2 for $25 meals.
Although Applebee’s has increased its prices, the chain mentioned that they have seen an increase in sales and that despite seeing a drop in sales for people making under $50,000 a year, it did not significantly impact the company’s quarterly results.
Applebee’s is a popular American company that operates a chain of casual dining restaurants. It was founded by Bill and T.J. Palmer in Decatur, Georgia on November 19, 1980. The Palmers designed a restaurant that focused on casual dining, with a menu that included a variety of appetizers, entrées, and desserts. They aimed to create a neighborhood grill and bar-type atmosphere, which is why the full name of the restaurant is “Applebee’s Neighborhood Grill + Bar”.
After opening their first location and finding success, the Palmers sold their restaurant concept to W.R. Grace and Company in 1983. From there, the chain began to grow rapidly, with the first franchise restaurant opening in Kansas City, Missouri in 1985.
Applebee’s has grown into a globally recognized brand. There are more than 1,700 Applebee locations worldwide, including restaurants in Canada, Mexico, and various countries in the Middle East, Asia, and Europe, in addition to its many locations throughout the United States.
]]>
https://mallize.com/blogs/news/sweet-potato-home-fries-with-zucchini2023-06-16T09:13:53-04:002023-06-16T09:13:53-04:00Sweet Potato Home Fries with Zucchiniadmin
The comforting bliss of home fries is a welcome addition to any weekend breakfast, brunch, or even dinner, for that matter. What are home fries? Home fries are a traditional, classic potato scramble which pan-fried in the skillet with onions, maybe bell pepper, and some seasonings and spices to create a savory side-dish at the breakfast table. In this healthy recipe for homemade home fries, I swap out white potatoes for sweet potatoes and add earthy zucchini and yellow squash for a nutrient-rich, flavorful combo. This gluten-free, vegan recipe for Sweet Potato Home Fries with Zucchini is also baked in the oven for a healthier, easier preparation style. You could also make these sweet potato home fries in the air fryer using the same recipe.
Try a variety of sweet potatoes in this recipe to add new colors and textures to your cooking, including Japanese sweet potatoes or even purple sweet potatoes. You can also mix up your zucchini and yellow squash to try a variety of squashes available in farmers markets and home gardens. It’s a great way to use up that zucchini growing in your garden in the summertime, too!
Try serving these sweet potato home fries with this recipe for Easy Chunky Salsa.
Learn how to make home fries the healthy way with this delicious recipe for homemade sweet potato home fries with zucchini, which is vegan and gluten-free.
Ingredients
2 small sweet potatoes, peeled, chopped into small cubes
Prepare to enjoy the mouthwatering delight with this irresistible Calamari Fritti recipe.
With its golden and light coating and tender squid, this Italian classic is sure to satisfy your cravings and transport you to sunny Italy. Let me show you the secrets to achieving the perfect fried calamari—your taste buds won't want to miss this!
Delectable and so tempting!
Calamari Fritti means fried calamari in Italian which sounds so simple and it is! The traditional Italian recipe for fried calamari doesn’t require a thick coating. Instead, the still damp calamari are tossed in the flour mixture creating the lightest, barely noticeable batter.
The first time I enjoy this dish was in Venice many years ago. The calamari arrived spilling out of a paper cone, with an ethereal golden coating and it was melt-in-the-mouth tender. Follow my recipe for Calamari Fritti to have that same Venetian experience right in your own home.
For complete ingredient quantities and full instructions, please scroll to the printable recipe card bottom of the page.
Why you’ll love this recipe
Taste: Calamari fritti is known for its light and tasty coating, which enhances the natural taste of the tender calamari. The combination of savory flavors and delicate crunch is incredibly appealing.
Versatility: Calamari fritti can be served as an appetizer, a main course with a side or salad, or even as a snack. Fried calamari make a popular addition to an Italian antipasto platter along with a bowl of marinated olives and some bruschetta with mozzarella.
Seafood delicacy: Calamari, or squid, is a popular seafood delicacy that is enjoyed by seafood lovers worldwide. This Italian fried calamari recipe, just like my Calamarata Pasta, showcases the delicate texture and unique flavor of this seafood.
Easy to prepare: Making calamari fritti is relatively simple, making it accessible to home cooks. With just a few basic ingredients and a straightforward cooking process, you can recreate this tasty dish in your own kitchen.
Crowd-pleaser: Calamari fritti is a crowd-pleaser, loved by both adults and children. A platter of golden-brown rings and tentacles always draws oohs and aahs.
Nostalgic memories: For those of you, who like me, have fond memories of enjoying Calamari Fritti at Italian restaurants, making and savoring this dish brings back those cherished moments.
Squid v Calamari
So you’re probably wondering, what is the difference between the two - squid versus calamari? Nothing, actually. They’re the same thing. The creature in the sea is squid but it’s more often referred to in culinary terms as calamari though also sometimes squid as in “squid rings”.
For complete ingredient quantities and full instructions, please scroll to the printable recipe card bottom of the page.
Ingredients
Calamari - fresh squid or frozen is fine. You can clean the calamari or ask your fishmonger to do it for you.
Semolina flour - semolina flour is very fine ground semolina but it’s grainier than all purpose flour. It is available in most supermarkets.
00 flour - I like to use 00 flour which is a very fine Italian flour used for pasta and pizzas.
Sunflower oil - easily available at supermarket, sunflower oil is a good choice because it can be heated to high temperatures.
Salt - don't skip salting the fried calamari; this is essential for the tastiest calamari.
See recipe card for quantities.
Instructions
Pour the oil into a deep frying pan and heat to 340ºF-356ºF (170-180ºC). Check with a thermometer. Mix together the semolina flour and 00 flour.
Slice the mantles into ½ inch rings (about 1 ½ cm). Cut the fins into strips. Leave the tentacles as they are or if large cut them in half lengthwise.
When the oil is ready, add a handful of prepared calamari to the flour mixture. Toss well to coat all over.
Put the coated calamari into a fine sieve to shake off the excess.
Carefully transfer the coated calamari into the hot oil. Stir to separate and cook for 1-1 ½ minutes or until golden brown.
Use a slotted spoon to remove the fried calamari from the hot oil and drain the prepared wire rack. Sprinkle with salt while hot.
Drain on a wad of absorbent paper towel. Then repeat with the remaining calamari.
Serve immediately with lemon wedges.
Hint: Line a wire rack with paper towels and set it over a baking sheet ready to drain the fried calamari.
Substitutions
Semolina Flour - instead of semolina flour use just 00 flour.
00 Flour - if you don’t want to buy 00 flour use all purpose flour. Another good alternative if bread flour.
Sunflower Oil - peanut oil is a good substitute is you don’t have sunflower oil. You could also use regular or light-flavored olive oil but don’t use extra virgin olive oil.
Variations
Peppery - add a teaspoon or two of finely ground black pepper to the flour before coating the calamari.
Herby - mix some dried herbs like oregano into the flour before coating the calamari.
Spices - include a little paprika, garlic powder or red pepper flakes to the flour mixture for a tasty variation.
Equipment
While you won’t need a deep frying for this recipe, you will need a high sided frying pan to cook the calamari fritti in plenty of oil.
Storage
This recipe for calamari fritti doesn’t keep well and isn’t suitable for freezing. Calamari fritti is best enjoyed immediately after frying while it's still hot and crispy. This isn’t a recipe that can be made in advance.
Top tip
Begin with fresh calamari for the best flavor and texture. Look for firm, odorless squid at your local seafood market or grocery store. If possible, ask the fishmonger to clean and prepare it for you. Frozen calamari are also good if purchase from a reputable fishmonger. Avoid buying frozen squid rings - this recipe won’t be as good.
Cut the calamari mantle, which is the body or hood part, into thick rings. Thin rings may look more elegant but there’s also more chance of over cooking and making the calamari tough.
As mentioned earlier, the key to authentic calamari fritti is a light coating. Toss the damp calamari rings and tentacles in a mixture of flours and salt. Shake off any excess flour before frying to achieve a thin, barely noticeable batter.
To prevent overcrowding and ensure even cooking, fry the calamari in small batches. Overcrowding the pan can lead to soggy results, so give the squid enough space to crisp up nicely.
Once fried, place the calamari on a paper towel-lined wire rack set over a baking sheet to remove excess oil and keep them crispy. This step helps maintain the desired texture and prevents the dish from becoming greasy.
FAQ
Is calamari always fried?
No, calamari can be cooked in a variety of ways. One of my favorite recipes is my Calamarata pasta where the calamari are cooked gently in a tomato based sauce over a long period of time.
What’s the best oil to fry calamari in?
The best oil to use should have a high smoke point. I like to use sunflower oil. However peanut oil is also excellent or a light flavored olive oil could also be used.
How long should I cook calamari
Calamari cooks quickly, typically within 1-2 minutes. Fry the calamari until it turns a golden brown color, but be careful not to overcook it, as it can become rubbery and tough.
It’s important to maintain the right frying temperature for tender calamari. Calamari are notorious for being chewy. To cook calamari so that it’s not tough either cook long and slow or fast and quick as in this recipe.
Heat your oil to around 340ºF-356ºF (170-180ºC). If the oil isn't hot enough, the calamari can become greasy, while if it's too hot, the coating may burn before the squid is fully cooked.
What kind of squid is calamari?
Squid and calamari are the same thing. Calamari is the word used when in culinary terms.
Serving Suggestions
Calamari fritti pairs well with various accompaniments and dipping sauces. Whether you prefer a tangy tomato sauce, a garliky butter sauce, or a squeeze of lemon, you have the freedom to customize your dining experience according to your taste. Its versatility allows you to enjoy it in various settings, whether it's a casual gathering, a seafood-themed meal, or a special occasion.
Made this recipe? Let me know if you liked it by leaving a ★★★★★ star rating and a review below. Please share a photo of your creation by tagging me on Instagram @marcellina.in.cucina!
Slice the mantles into ½ inch rings (about 1 ½ cm). Cut the fins into strips. Leave the tentacles as they are or if large cut them in half lengthwise.
Mix together the semolina flour and 00 flour.
Have ready a paper towel lined wire rack and set it over a baking sheet on which to drain the fried calamari.
Pour the oil into a deep frying pan and heat to 340ºF-356ºF (170-180ºC). Check with a thermometer.
When the oil is ready, add a handful of prepared calamari to the flour mixture. Toss well to coat all over.
Put the coated calamari into a fine sieve to shake off the excess.
Carefully transfer the coated calamari into the hot oil. Stir to separate and cook for 1-1 ½ minutes or until golden brown.
Use a slotted spoon to remove from the hot oil and drain the prepared wire rack. Sprinkle with salt while hot.
Repeat with the remaining calamari.
Serve immediately with lemon wedges.
Notes
Ask your fishmonger to clean the calamari for you. It is easy to clean but much more convenient to bring it home cleaned.
If you can't find semolina flour, simply use all 00 flour or even bread flour is really good.
You can substitute peanut oil or light flavored olive oil for the sunflower oil.
Tips for Success
Choose the freshest calamari.
Cut the calamari mantle, which is the body or hood part, into thick rings.
Use the correct temperature. Heat your oil to around 350°F (175°C).
Shake off any excess flour before frying to achieve a thin, barely noticeable batter.
Don't overcrowd the pan when frying and cook quickly.
Drain well on paper towels.
For more tips and information, please scroll up to read more.Please note that the nutritional information doesn't include oil because this is very dependant on the conditions of the frying. If you have dietary concerns about fat in this recipe perhaps try my Italian Almond Cake instead.
]]>
https://mallize.com/blogs/news/fried-pickles-recipe2023-06-15T09:13:51-04:002023-06-15T09:13:51-04:00Fried Pickles Recipeadmin
Our favorite Fried Pickles with perfectly crispy, and well-seasoned breading are quick and simple to make. Serve them with a bowl of ranch for dipping, and watch them disappear!
Deep Fried Pickles Are Easy to Make and Fun to Eat!
Fried pickles are a southern favorite, and everyone in this household is a big fan. This is a special appetizer that’s fun to eat, and always gets “oohs” and “aahs” whenever I serve them.
If you are thinking that deep frying pickles sounds too complicated, stay with me! I promise, making these fried pickles is super easy. Even if you have never fried anything before, you can do this! And the crispy, crunchy, salty reward is so worth it.
These Fried Pickles Are…
Really Crispy: No soggy pickles here! This recipe makes a really crispy, crunchy treat. You won’t be able to stop eating them.
Seasoned to Perfection: When you are deep frying food, it’s important to get the seasoned breading just right. You want it to be zesty and flavorful, and this recipe delivers.
Simple to Make: Say goodbye to your fear of deep frying! This simple tutorial takes all the mystery out of deep frying your very own crunchy pickles.
Perfect for Game Day (or Anytime!): Whether you’re creating the perfect table of snacks for the Super Bowl, or treating yourself to the extra special snacks, these pickles are sure to be devoured. You might want to make two batches!
So, what’s in this recipe for fried pickles? Glad you asked! Here is the list of mouthwatering ingredients. (Remember, you can scroll down to the bottom of this post to find a printable recipe card with full ingredient amounts and nutrition facts.)
Pickles: Drain a jar of your favorite sliced pickles – any kind you like.
Oil: Vegetable oil, or another neutral high-heat oil for frying.
Flour: All-purpose flour.
Seasonings: Salt, pepper, garlic powder, onion powder, and paprika.
Baking Powder: To make the pickles extra-crispy.
Milk: Whole milk is my go-to, but low fat milk would also be fine.
Eggs: A couple of large, whole eggs.
How to Make Fried Pickles
Making fried pickles is an easy way to get started with deep frying, if you’ve never done it before. You don’t have to worry about handling raw chicken or anything like that. You just bread the pickles and fry them until golden brown!
Dry the Pickles. Lay the drained, sliced pickles out on a baking sheet lined with paper towels, and pat the tops dry with another paper towel. Set the baking sheet aside.
Heat the Oil: Next, pour about 2 inches of oil into a deep skillet, and turn the heat to medium-high. Allow the oil to heat until it reaches 350°F on a thermometer.
Make the Seasoned Flour. In a mixing bowl, whisk together the flour, salt, pepper, garlic powder, onion powder, paprika and baking powder.
Make the Egg Mixture. In a separate mixing bowl, beat the milk and eggs together.
Bread a Few Pickles: Working in batches of five or six pickles at a time, dips Pickles into the flour mixture, the egg mixture, and then the flour again.
Fry the Pickles in the Hot Oil. Gently lower the pickles into the hot oil, and let them cook for 1 – 2 minutes, or until they are golden brown. Flip them over halfway through the cooking time so they brown evenly.
Drain. Use a slotted spoon to lift the fried pickles out of the oil, and place them on a clean, paper towel-lined plate to drain any excess oil.
Repeat. Continue breading, frying, and draining the remaining pickles until they are all done.
Enjoy! Serve your homemade fried pickles with freshly chopped parsley and ranch, if desired.
Helpful Tips for the Crispiest Fried Pickles
If you are anything like me when I was frying pickles for the first time, you’ve got questions. Here are some helpful tips to get you on your way:
Pickle Options: You don’t have to use any particular kind of pickles – as long as you dry them, almost any pickles will work. Dill chips are the most common, but you could use sandwich slices for really big fried pickles, or even pickle spears! Sweet pickles also work, although they’re much less common.
Drying the Pickles: I can’t stress this enough – drying the pickles is essential to getting a really crispy crunch. If your pickles are still damp when you bread them, the breading will be a bit soggy and won’t stick very well.
Heating the Oil: The other big thing to remember is to heat your oil to the right temperature, and keep it there. I highly recommend using a thermometer that clips onto your frying pan (I use this candy thermometer when frying. If your oil gets too hot, it can burn the pickles. If the oil is not hot enough, the pickles will take too long to fry and will become oily!
Baked Pickles: Yes, you can make these in the oven, too! They will not turn out quite as crispy, but they’ll still be tasty. Just prepare them as instructed, but then lay them on a wire rack in a rimmed baking sheet, and bake at 450°F for about 15 – 20 minutes, or until they’re golden-brown and crisped up.
What to Serve with Fried Pickles
Dipping sauce! Seriously, dipping crunchy fried pickles into your favorite sauce is half the fun. We love classic ranch, but you could do all kinds of sauces, including…
Cilantro Lime Dressing: This Cilantro Lime Dressing recipe is a bit like ranch, but with a twist thanks to plenty of fresh green cilantro and mouth-puckering lime. It’s ultra-refreshing and perfect for dipping.
Tzatziki: Another creamy contender, homemade Tzatziki Sauce is a Greek classic that is very light and simple, adding just the right richness to a platter of homemade fried pickles.
Sweet Chili Sauce: This addictively delicious Sweet Chili Sauce is so good, you’ll want to eat it on everything. Try it with fried pickles to give them even more crazy-good flavor.
Bang Bang Sauce: If you have ever had bang bang shrimp, you know how good Bang Bang Sauce is! It happens to also pair wonderfully with fried pickles!
Storing and Reheating the Leftovers
While this dish is best served fresh, storing the leftovers couldn’t be easier – the real challenge will be having any leftovers to begin with! If you do save some for later, make sure to follow these guidelines for storing and reheating.
Storing: Keep the fried pickles in your refrigerator, preferably sealed in an airtight container or storage bag. I like to add a clean, dry paper towel in there to absorb any moisture and keep them from getting too soggy.
Reheating: Reheating fried pickles is easiest in the air fryer. Just add them to the basket, and air-fry at 450°F until heated through. You can also do this in the oven.
How to Freeze Fried Pickles
If you want to make these and freeze some for another time, that is super-simple. Here’s how to do it.
Make and Cool the Fried Pickles. First, make the recipe as directed, but instead of serving the pickles set them out to cool completely on a wire rack. Make sure to arrange them in a single layer.
Flash-Freeze. Once they’re cool, arrange the pickles on a clean plate or baking sheet, again keeping them in a single layer. Put them in your freezer until they’re frozen solid.
Package and Store. Transfer the frozen fried pickles to freezer bags, and keep in your freezer for up to three months.
Reheat from Frozen. Reheat in an air fryer or conventional oven at 450°F until heated through. If you’re using an oven, I recommend reheating them on a wire rack over a baking sheet.
Yield: 6 Servings
Fried Pickles
Our favorite Fried Pickles with perfectly crispy, and well-seasoned breading. Serve them with a bowl of ranch for dipping, and watch them disappear!
Prep Time15 minutes
Cook Time20 minutes
Total Time35 minutes
Ingredients
1 (16-oz) jar sliced pickles, drained
Vegetable oil, for frying
1 cup all-purpose flour
1 teaspoon salt
1/2 teaspoon ground black pepper
1/2 teaspoon garlic powder
1/2 teaspoon onion powder
1/2 teaspoon paprika powder
1/4 teaspoon baking powder
1 cup milk
2 large eggs
Instructions
Lay the pickles on a baking sheet with a paper towel, pat the tops dry with another paper towel and set aside.
In a deep skillet, preheat about 2 inches of vegetable oil over medium-high heat until it reaches 350°F on a thermometer. (I like to use a clip on pot thermometer to monitor the oil tempruatre while frying.)
In a mixing bowl, whisk together the flour, salt, pepper, garlic powder, onion powder, paprika and baking powder.
In another mixing bowl, beat the milk and eggs until combined.
Dip 5-6 pickle slices in the dry ingredients then into the wet ingredients, then coat them a final time in the dry ingredients.
Fry the pickles in the hot oil for about 1-2 minutes, or until they are golden brown, flipping them over halfway.
Use a slotted spoon to remove the pickles from the oil and place them on a paper towel-lined plate to drain any excess oil.
Repeat this process with the remaining pickles.
Serve with freshly chopped parsley and ranch, if desired.
Notes
Storing: Keep the fried pickles in your refrigerator, preferably sealed in an airtight container or storage bag. I like to add a clean, dry paper towel in there to absorb any moisture and keep them from getting too soggy.
Reheating: Reheating fried pickles is easiest in the air fryer. Just add them to the basket, and air-fry at 450°F until heated through. You can also do this in the oven.
Pickle Options: You don’t have to use any particular kind of pickles - as long as you dry them, almost any pickles will work. Dill chips are the most common, but you could use sandwich slices for really big fried pickles, or even pickle spears! Sweet pickles also work, although they’re much less common.
Drying the Pickles: I can’t stress this enough - drying the pickles is essential to getting a really crispy crunch. If your pickles are still damp when you bread them, the breading will be a bit soggy and won’t stick very well.
Heating the Oil: The other big thing to remember is to heat your oil to the right temperature, and keep it there. I highly recommend using a thermometer that clips onto your frying pan (I use this candy thermometer [LINK]) when frying. If your oil gets too hot, it can burn the pickles. If the oil is not hot enough, the pickles will take too long to fry and will become oily!
Baked Pickles: Yes, you can make these in the oven, too! They may not turn out quite as crispy, but they’ll still be great. Just prepare them as instructed, but then lay them on a wire rack in a rimmed baking sheet, and bake at 450°F for about 15 - 20 minutes, or until they’re golden-brown and crisped up.
]]>
https://mallize.com/blogs/news/homestyle-raspberry-jam2023-06-14T21:13:51-04:002023-06-14T21:13:51-04:00Homestyle Raspberry Jamadmin
A simple Homestyle Raspberry Jam recipe celebrating the peak of raspberry season. Use this easy-to-follow small batch recipe to transform your raspberry crop into jars of stunning ruby red jam filled with vibrant summer berry flavour.
If you’re looking to preserve the flavours of summer to enjoy year-round simply type ‘jam’ into the search bar. You’ll find many easy small batch recipes from Amaretto Sour Cherry Jam to Vanilla White Peach Jam and everything in between.
Homemade Raspberry Jam
There are few kitchen projects more satisfying than making jams and jellies. If you have an excess of summer produce, you can preserve it to enjoy throughout the entire year. Nothing is more delicious than spreading this ruby red jam all over a buttery toast or a bowl of ice cream in the middle of winter!
Friends, this is a very basic recipe meant for both beginners and seasoned jam makers. If you are new to hot water bath canning, I hope you eventually enjoy it as much as I do. It might seem overwhelming at first but after using my kitchen tips and trips, you’ll soon become comfortable with small batch preserving.
This easy Raspberry Jam recipe is one I grew up making by my grandma’s side. We always began the canning season in Spring with several batches of strawberry rhubarb jam. Once they were made and put away in the canning room, it was time to pick and preserve raspberries!
I am old enough to remember her using rubber rings, glass lids, and pints in addition to sealing the jam with a layer of melted wax. Fortunately, jam making is much simpler these days. Half pint jars with metal rings and lids with integrated rubber seals simplify the process greatly.
This whole batch should take less than an hour, including prep time and cooking time (not including water bath time).
Raspberry Jam vs. Raspberry Jelly
For those of you who prefer a ‘seedless’ breakfast preserve, I recommend making Raspberry Jelly. The recipes for raspberry jam and jelly are very similar, with the latter requiring raspberry juice in place of whole fruit. The extra step involved is worth doing if you like a clear, seedless jelly.
Sometimes, when I don’t have the time to make jam (or it’s too hot), I cook the fruit down then strain it through a jelly bag to remove the seeds. The juice can be refrigerated or frozen until it’s time to make the jelly. By the way, you’ll need 4 cups of juice and less sugar than is required to make raspberry jam.
Ingredients for Raspberry Jam
The ingredients list for this jam is short…and sweet. There are only three ingredients, including sugar.
Raspberries
Pectin
Sugar
I highly recommend that you source the very best produce available. Many people buy soft or over ripened fruit for jam making but this is not ideal. Sun ripened red raspberries are so tart and sweet when in season, why mess with a good thing?
Some people add a tablespoon or two of lemon juice to increase acidity in jams and jellies but raspberries are highly acidic and require no further acidity.
If you’ve never made jam, you may be concerned at how much sugar jam and jelly recipes contain. Remember that this simple three ingredient recipe contains no preservatives (which can be found in store bought preserves). In these recipes, sugar is the preservative.
Why is Pectin Important in Jam?
Fruit Pectin is an important component in jams and jellies, because it helps the jam set. This naturally occurring soluble fiber is found in fruits and vegetables, especially apples and citrus peels. It turns out that raspberries also have a high amount of pectin.
All jams contain pectin in some form, whether it is an added product or a natural component of the fruit. Those that claim otherwise are misrepresenting the truth.
So, how exactly does pectin make jam gel? Pectin’s chemical structure changes and reacts when it’s added to a liquid then heated to a high temperature, causing it to thicken.
Pectin plays a huge role in this recipe. Without it, the jam would take much longer to reach the setting point, but it can be done.
How to Make Raspberry Jam
Preparing the Equipment
To begin, preheat the oven to 225 F.
Preparing equipment for making jam begins with inspecting and washing the jars in hot soapy water. After a thorough rinse, set the jars upside down in a tray of water in the oven, set at 225°F. Place washed lids and rings in a pot of water along with the tongs, measuring cup, and funnel (if using).
Sterilize the jars in the oven for ten minutes and heat the saucepan until it almost reaches the boiling point. Keep lids warm at this temperature while you prepare the fruit.
Preparing the Raspberries
Next, it is time to prepare the fruit. Wash the raspberries in cold water and inspect for any mold or bugs. Drain the raspberries well and place 1/3 raspberries in a large pot. Use a potato masher to smash them into a jam-like consistency. Repeat this step two more times with the remaining 2/3 raspberries.
Cooking Raspberry Jam
Once all raspberries are smashed, add the pectin all at once and stir well. Turn stove to medium-high, stirring frequently with a wooden spoon as mixture heats up. Measure out the sugar.
Once the jam mixture reaches a rolling boil, add sugar all at once then allow to return to a rolling boil. Boil for one more minute. Remove jam from heat and continue stirring constantly another 5 minutes. Skim any foam that accumulates on the surface.
Carefully but quickly ladle hot jam into hot jars (or use a funnel). Wipe the jar rims with a clean cloth then cover with lids. Screw the rings on but not too tightly.
At this stage, I allow the jam jars to cool overnight and check the seals in the morning. I refrigerate any jars that have not sealed. However, many people prefer to process their jam using the hot water bath method.
The hot water bath method: Fill a water bath canner (with a jar rack) with water at the beginning of your jam session and allow it to come to a full boil over high heat.
After step 8, lower the jars into the boiling water (ensure the jars are covered in one inch of boiling water) and process for 10 minutes, or according to altitude.
Hi! I’m Bernice Hill and I’ve been the sole recipe developer, photographer, and writer at Dish ‘n’ the Kitchen for the past eleven years. It is my pleasure to share easy to follow recipes that are delicious, nutritious, and approachable for the whole family.
If you make this Homestyle Raspberry Jam recipe, I’d love to hear about it in the comments section or in a recipe rating. Be sure to follow me on Facebook and Pinterest for my latest recipes. Also, if you do make this recipe, please share your photos and tag me on Instagram. I hope you like this recipe!
Yield: 8 - 250ml (half pint) jars
Homestyle Raspberry Jam
A simple Homestyle Raspberry Jam recipe celebrating the peak of summer raspberry season. Use this easy to follow small batch recipe to transform your raspberry crop into jars of stunning ruby red jam filled with vibrant berry flavour.
Prep Time20 minutes
Cook Time20 minutes
Additional Time10 minutes
Total Time10 minutes
Ingredients
10 cups fresh raspberries; (5 cups prepared)
1 box Certo pectin powder
7 cups granulated sugar
Instructions
Inspect and wash 8 half pint (250 ml) jars and lids in hot soapy water; rinse well (I like to do a few extras as described here).
Wash raspberries.
Smash raspberries in layers in a big pot. Approximately 10 cups raspberries equals 5 cups smashed.
Add pectin and stir well.
Turn stove to medium-high and stir with a wooden spoon as mixture heats up.
Once it comes to a rolling boil (see photo), add sugar all at once then allow to return to a rolling boil. Boil for one more minute.
Remove jam from heat and continue stirring another 5 minutes. Skim any foam that accumulates on the surface.
Carefully ladle into hot jars, wipe the rims with a clean cloth, and cover with lids. Make sure rings are snug but not too tight.
Allow jam jars to cool overnight. Check seals and refrigerate any lids that have not sealed.
Notes
*If you prefer to use a hot water bath to seal the jars, fill a water bath canner (with a jar rack) with water at the beginning of your jam session to allow it to come to a full boil.
After step 8, lower the jars into the boiling water (ensure the jars are covered in one inch of boiling water) and process for 10 minutes, or according to altitude.
Nutritional calculation was provided by Nutritionix and is an estimation only. For special diets or medical issues please use your preferred calculator.
Did you make this recipe?
Share your dish pic on Instagram or Facebook and tag @dishnthekitchen (or #dishnthekitchen) in your post or story! Rate this recipe and leave a review to share your experience with others!
]]>
https://mallize.com/blogs/news/creamy-cauliflower-mac-and-cheese2023-06-14T09:13:51-04:002023-06-14T09:13:52-04:00Creamy Cauliflower Mac and CheeseadminCauliflower Mac and Cheese
Comfort food that’s healthy too? This time, you CAN have it all with Cauliflower Mac and Cheese! The recipe replaces the macaroni with tender cauliflower florets for a lightened up remake of everyone’s favorite cheesy pasta.
Why You’ll Love This Baked Cauliflower Mac and Cheese Recipe
Bold Statement: Cauliflower Beats Noodles. Let’s be honest, the elbow noodles in traditional mac and cheese mainly serve as a vehicle for delivering cheesy goodness. Cauliflower brings some of its own flavor to the table, and all those nooks and crooks make it even better for holding cheese sauce. (Case in point? My Instant Pot Cauliflower Mac!)
It’s Extra Creamy. The addition of Greek yogurt to the cheese sauce gives it a richer, creamier texture, along with a little bit of tang that complements the flavor of sharp cheddar. Having tested a number of different options, I prefer yogurt to cream cheese or heavy cream.
Cauliflower Makes It Healthier. Pasta isn’t exactly a nutritional powerhouse, but cauliflower is a great source of fiber and lower in carbs than elbow noodles. Win! For those who need a low-carb or keto diet, this cauliflower mac and cheese is a great option. Be sure to check out this Cauliflower Casserole too.
The Flavor Will Wow You. Many mac and cheese recipes are kind of one note, but this cauliflower mac and cheese has some depth to it thanks to the Greek yogurt, sharp cheddar, umami Parmesan, and a toasty whole wheat panko breadcrumb topping.
How to Make Cauliflower Mac and Cheese
The Ingredients
For the Cauliflower Mac and Cheese
Cauliflower Florets. You can cut them from two small heads of cauliflower, or save yourself some prep time and buy the ones that come in a bag.
Unsalted Butter. Even though this isn’t a traditional cheese sauce, it starts the traditional way: with a roux. That means beginning with butter!
All-Purpose Flour. The next component of our roux. Flour thickens the sauce.
Whole Milk. Whole milk is best, but you can use 2% if that’s what you have on hand, or substitute half-and-half for a richer sauce.
Dijon Mustard. Mustard gives the cheese sauce a little bit of pep and its acidity balances the richness of the dish. Even if you’re not a mustard fan, it’s a must in this cauliflower mac and cheese recipe.
Kosher Salt. Kosher salt is always my choice for cooking.
Black Pepper. Just enough to enhance the flavor, without distracting from it.
Garlic Powder. There’s a time and a place for fresh garlic, and it’s not in mac and cheese! Garlic powder is garlicky without the pungency of fresh cloves.
Cayenne Pepper. Use less if you’re cooking for kids (and those who are heat averse) and more if you’re in the mood to spice things up.
Extra Sharp Cheddar Cheese. Buy a block and shred it yourself. This is critical!
Substitution Tip
I used sharp cheddar for that classic mac and cheese flavor, but you can swap in another cheese instead (as long as it’s shredded from the block!) or use a combination of two or three different varieties. Just avoid very mild cheeses like mozzarella—you want to use something fairly assertive to get some flavor in your cheese sauce.
Full-Fat Greek Yogurt. Our secret weapon for a luxuriously creamy cheese sauce.
For the Topping
Unsalted Butter. For some buttery flavor in the topping.
Whole-Wheat Panko Breadcrumbs. Use regular panko if you can’t find whole wheat, or leave it out for a low carb option—it adds a nice crispy-crunch, but it’s not absolutely necessary in this recipe.
Grated Parmesan Cheese. Parm isn’t a good melter, but it has a lot of great flavor—that’s why we use it as a topping!
Dietary Note
To make this cauliflower mac and cheese gluten-free, use your go-to gluten-free all-purpose flour substitute in the sauce and swap in gluten-free panko or crushed Rice Chex cereal for the topping.
The Directions
Pre-Cook the Cauliflower. Steam the cauliflower in the microwave until it’s al dente, then drain and pat it dry.
Make the Roux. Melt the butter in a Dutch oven or saucepan, then whisk in the flour. Once the flour is golden brown, slowly whisk in the milk and continue to cook until the sauce thickens.
Season. Lower the heat and whisk in all of the seasonings.
Add the Cheese. Stir in the cheese a small handful at a time.
Stir in the Yogurt. Remove the pot from the heat and add the Greek yogurt.
Fold in the Cauliflower. Gently stir in the cauliflower, then transfer the mixture to a greased baking dish.
Make the Topping. Melt the butter in a small saucepan or bowl, then stir in the panko and Parm. Sprinkle this mixture over the cauliflower mac and cheese.
Bake. Place the baking dish in the oven and bake until the cauliflower is fork tender and the sauce is bubbling up along the edges. Broil if desired, then rest 5 minutes before serving. ENJOY!
Recipe Variations
Tex-Mex Cauliflower Mac and Cheese. Use pepper jack cheese instead of cheddar and replace the panko topping with crumbled tortilla chips. Serve with pico de gallo and sliced green onions.
French Onion Cauliflower Mac and Cheese. Swap the cheddar for gruyere and fold caramelized onions into the cauliflower mixture before adding it to the baking dish. Sprinkle some fresh parsley or thyme on top when serving.
Smoky Cauliflower Mac and Cheese. Instead of making the cheese sauce with cheddar, use smoked gouda.
Loaded Cauliflower Mac and Cheese. Add cooked, crumbled Baked Bacon for some protein and bacon-y flavor and serve your cauli mac with an extra dollop of Greek yogurt and chives or green onions on top.
Cheesy Cauliflower Rice. Instead of using cauliflower florets, use riced cauliflower. (See my Cauliflower Fried Rice post for how to make cauliflower rice, or use store-bought.) Now that the mac and cheese will be more liquidy with cauli rice.
Storage Tips
To Store. Store leftovers in an airtight container in the refrigerator for up to 3 days. If you have a lot of leftovers, you can keep them in the casserole dish and tightly cover it with foil.
To Reheat. Reheat leftovers in a 350 degrees F oven or microwave until warmed through.
To Freeze. Place leftovers in an airtight, freezer-safe container and freeze for up to 3 months. Thaw overnight in the refrigerator before reheating according to the instructions above.
Meal Prep Tip
Prep and steam the cauliflower up to a day in advance to get a head start on the recipe. Simply store it in the refrigerator until you’re ready to make the cheese sauce.
Beef. If you don’t have room in your oven for another recipe, make Air Fryer Steak on the countertop instead!
Veggie Sides. Use cauliflower mac and cheese as your main dish and serve it with an easy side like Roasted Asparagus or Air Fryer Green Beans. (Pro-tip: Make extra panko topping and toss it with your vegetable side for some extra flavor and texture. It’s my go-to when I roast a big baking sheet of veggies!)
Bread. You’re saving all those carbohydrates by eliminating the noodles, so now you have room for Rosemary Olive Oil Bread or Beer Bread with your cauliflower mac and cheese!
Recommended Tools to Make this Recipe
Casserole Dish. A quality casserole dish will last for decades, which is why I like simple, classic white. It will never go out of style!
Cheese Grater. It’s so important to shred your own cheese for this cauliflower mac and cheese recipe.
Don’t Use Pre-Shredded Cheese. Yes, store-bought bagged cheese is super convenient, but the white powdery stuff that coats the cheese to keep it from sticking is bad news for your mac and cheese. It’s an anti-caking agent that will keep the cheese from melting smoothly, resulting in a gritty sauce. It’s why I shred my own cheese for Gourmet Mac and Cheese, Instant Pot Mac and Cheese, and Brussels Sprouts Mac and Cheese.
Steam the Cauliflower First. Roasted Cauliflower is delicious, but its flavor will make the cauliflower the star instead of the cheese sauce. You also can’t add it raw or it won’t cook through. Steaming it first is essential!
Dry the Cauliflower Too. It will release some liquid into the creamy cheese sauce—just enough to give it the perfect consistency. If there’s too much water clinging to the cauliflower when you add it to the sauce, it will end up thin and bland.
Use a Large Pot. You’ll need to accommodate not only the cheese sauce, but also 8 cups of cauliflower—and you’ll have to be able to stir it without it spilling over the edges and making a mess on your stovetop!
Pour the Milk in Slowly. If you dump it all in at once, you’ll end up with lumps of flour in your cheese sauce. Not good! (While we’re on the subject of the sauce, don’t let it come to a boil either. After adding the milk, you’ll need to cook the sauce over low heat.)
Let It Rest. The sauce will thicken after a quick rest once you pull your cauliflower mac n’ cheese out of the oven.
6ouncesFRESHLY SHREDDED extra sharp cheddar cheeseabout 1 1/2 cups – do not use pre-shredded! It won’t melt smoothly
1/2cupfull-fat Greek yogurt
For the Topping
3tablespoonsunsalted butter
3/4cupwhole-wheat panko breadcrumbs or regular panko
1/2cupgrated Parmesan cheese
Instructions
Set the Greek yogurt out to come to room temperature. Place a rack in the center of your oven and preheat to 375°F. Generously coat a 9×13-inch baking dish with nonstick spray.
Place the cauliflower in a large microwave-safe bowl and add 1 inch of water. Cover with a damp paper towel and microwave on high power for 4 minutes. Stir, then recover and microwave for 4 minutes more, until the cauliflower is slightly softened but still definitely fairly al dente. Drain into a colander, then spread into a single layer on paper or kitchen towels and pat dry. Let air dry while you make the sauce.
In a Dutch oven or large, deep stockpot, heat the butter over medium heat.
As soon as the butter melts, sprinkle the flour over the top and cook, whisking constantly, until flour turns light golden brown and smells lightly nutty, about 1 minute. Gradually pour in the milk, whisking constantly to prevent lumps from forming. Bring to a simmer and cook, stirring continuously to make sure the sauce doesn’t stick to the bottom, until the sauce thickens, 3-5 minutes.
Reduce the heat to low. Whisk in the mustard, salt, black pepper, garlic powder, and cayenne pepper.
Next, stir in the cheddar by small handfuls, adding it gradually and stirring all the while to ensure it melts smoothly. Make sure each addition of cheese melts before adding the next.
Remove from the heat. Stir in the Greek yogurt.
Add the cauliflower, stirring gently to combine. The sauce will seem very thick, but will thin out as water is released from the cauliflower when it cooks. Transfer the mixture to the prepared baking dish and spread into an even layer.
Make the topping: In a small bowl, melt the butter. Add the Panko and Parmesan. Stir to combine, then sprinkle evenly over the top of the cauliflower mac.
Bake for 25 to 35 minutes, or until hot and bubbly and the cauliflower is just fork tender. If you’d like to crisp the top, turn the oven to broil for a few minutes until golden in spots. Let rest 5 minutes, then serve.
Notes
TO STORE: Refrigerate cauliflower mac and cheese in an airtight container for up to 3 days.
TO REHEAT: Reheat leftovers in a 350°F oven or microwave until warmed through.
TO FREEZE: Place leftovers in an airtight, freezer-safe container and freeze for up to 3 months. Thaw overnight in the refrigerator before reheating according to the instructions above.
The most likely culprit is that your steamed cauliflower wasn’t dried thoroughly. It’s important to dry it well so it doesn’t water down the cheese sauce. Note that the sauce will also thicken as the mac and cheese cools.
What Does Cauliflower Mac and Cheese Taste Like?
Cauliflower mac and cheese tastes very similar to traditional mac and cheese, but it has a slightly nutty, sweet flavor thanks to the cauliflower.
Can I Use Broccoli as a Substitute for Macaroni Instead of Cauliflower?
While you can substitute lightly steamed broccoli for the cauliflower, broccoli has a MUCH more assertive flavor to it and the bright green color means it’s not a good swap visually either. If you want a cheesy broccoli dish, try this Broccoli Bake.
Related Recipes
Cauliflower does it all! If you can’t get enough of this healthy multitasking ingredient, here are some more cauliflower recipes to try.
]]>
https://mallize.com/blogs/news/need-dorm-room-essentials-print-our-free-college-dorm-checklist-for-students2023-06-13T21:13:54-04:002023-06-13T21:13:55-04:00Need Dorm Room Essentials? Print Our FREE College Dorm Checklist For Students.adminMake shopping for dorm room essentials easier! Use our FREE and printable college dorm checklist for students!
Do you have the dorm room essentials you need for college moving day?
Print out this free college dorm checklist of all the dorm room essentials you’ll want to take along! Although every campus offers different amenities and has different rules, it’s SO much easier to remember the college dorm essentials when you have a list like this! From shopping to packing, this list can make sure you don’t leave any important items behind!
Select only the college essentials that you want from the list below.
Click on the Print icon at the bottom of this post.
Print a list with just those items!
Use it as a shopping list or college packing list and check off your items.
Now if only paying for college were this easy! 😅
Where can I find the best college dorm essentials?
While we never say no to a great store (or sale), check your local Dollar Tree,Walmart, Target, Kohl’s, and of course, Amazon. Some stores will even ship your dorm essentials directly to your college!
Hip Tip: Check with your specific college or university about what is (and is not) allowed, what is (and is not) provided, and what to expect when you get there. Many schools even provide the dimensions for dorm rooms, beds, and windows to give you a good idea of the sizes you’ll need!
Bacon wrapped asparagus is a smoky and savory side dish that will be a staple for mealtime. Each bundle is glazed with maple syrup for caramelized flavor you won’t be able to get enough of!
Let’s be honest… everything is better with bacon. For more tasty side dishes try bacon wrapped carrots, dates, or chestnuts!
Asparagus Wrapped in Bacon
I’m so excited to share this popular bacon wrapped asparagus dish, made with just six ingredients. It’s one of my go-to favorites when it comes to roasted veggies. Asparagus is one of my favorite veggies by itself, but it’s even better wrapped with a piece of juicy bacon. This is a crowd-pleasing appetizer or side dish that often steals the show!
There are two challenges when making vegetables wrapped in bacon. First, the bacon strips are cooked on the outside, but the insides don’t have the same crisp texture. Second, the asparagus spears cook way too quickly in the high-temperature oven before the bacon is done, creating shriveled up bundles. I found just the right solution to improve both of these issues, and the results are delicious! Stay tuned for the perfect bacon-wrapped asparagus made even better with a tasty maple glaze! It’s a dish that everyone will love.
Ingredients Needed
You only need a few simple ingredients to make a knockout side dish. Bacon wrapped asparagus is so hearty and delicious, you’ll want to serve it alongside all of your favorite meals! Note: exact measurements for each ingredient can be found in the recipe card below.
Olive Oil: Olive oil adds a rich and smooth flavor to the dish, and also helps to prevent the bacon wrapped asparagus from sticking to the pan.
Pure Maple Syrup: Maple syrup brings a touch of sweetness to the glaze, complementing the savory flavors of the bacon and asparagus.
Garlic Salt: Adds a delicious savory and garlicky flavor to the dish.
Black Pepper: For an extra kick of flavor. Feel free to adjust the amount of black pepper based on your preference for spiciness.
Thick-Cut Bacon: Because let’s be honest here, the bacon is the star of the show. It adds a salty, smoky, and crispy element to the dish.
Fresh AsparagusSpears: Asparagus pairs wonderfully with bacon. Make sure to trim off the woody ends of the asparagus before use.
Kosher Salt: Kosher salt is used to season the asparagus and enhance its natural flavors. You can adjust the amount of salt based on your taste preferences.
Tips for Picking Asparagus
Asparagus can typically be found year round, however, be on the lookout for its peak season from March to June. When selecting asparagus, make sure they are bright green, firm, and the tips should be tight with a slight purple hue.
How to Make the Best Bacon Wrapped Asparagus
This is one of my favorite side dishes to make because it tastes like it’s from a fancy steakhouse. Plus, it comes together in just 30 minutes! You’ll want to serve this bacon wrapped goodness with every meal.
Precook the Bacon
Preheat Oven: Adjust the oven rack to the center position and preheat the oven to 400 degrees Fahrenheit.
Prepare Baking Sheet: Line a baking sheet with foil and place a wire rack on top.
Add Bacon: Spray the rack with nonstick cooking spray. Place 5 slices of bacon spaced evenly apart on the pan.
Roast: Roast until the bacon just begins to shrink and turns a slightly red color, but is still flexible, about 5 minutes, depending on thickness. The bacon should not be completely crispy, otherwise, it will break when wrapping around the asparagus.
Maple Glaze: In a small bowl, whisk together the olive oil, maple syrup, garlic salt, and black pepper.
Brush With Maple Mixture: Remove the bacon from the oven and brush with the maple syrup mixture on both sides. Roast the bacon for 3 more minutes.
Cool: Allow the bacon to cool until it’s easy to handle with your fingers. Divide the asparagus into five even-size bundles.
Prepare the Bacon Wrapped Asparagus
Wrap: On a cutting board, wrap one slice of the par-cooked bacon overlapping over the length of the asparagus spears.
Prepare Bacon Wrapped Asparagus: Secure the bacon with a toothpick. Carefully place the bundles on the baking rack. Generously brush the maple syrup mixture over the bacon-wrapped asparagus spears on both sides. Lightly season each bundle with salt and pepper.
Roast, Add More Glaze: Roast the bacon asparagus bundles for 10 minutes, remove from the oven and brush the maple mixture over just the bacon.
Roast Again: Roast for 5 minutes, or until the bacon is browned and crispy, and the asparagus is tender.
Serve: Remove the toothpicks and serve the bacon wrapped asparagus hot.
Cooking Tips
To make sure your bacon wrapped asparagus turns out perfectly, here are a few things to keep in mind.
Precook Bacon: The critical step is to par-cook the bacon before it gets wrapped. Thick cut bacon slices are used so that it’s easy to handle after precooking because it’s not too thin and fragile. It also doesn’t crisp too quickly and is pliable when wrapping the asparagus bundles.
Adjust the Cooking Time: The pieces of bacon are roasted for a few minutes until just cooked and flexible. The cooking time may vary depending on how thick the bacon is, so make sure to use your intuition with time being just a guideline.
Don’t Skip the Glaze: The maple glaze is one of the best things about this recipe. It adds a delicious caramelized flavor. If you don’t have maple syrup, honey or brown sugar also works! The trick to making the asparagus and bacon caramelized is adding more of the maple mixture over the bundles at the beginning of the cooking process, and once more at the end.
Storing Leftovers
Bacon wrapped asparagus is best served fresh and warm, but you can also store your bundles in the fridge if you have leftovers.
In the Refrigerator: Store in an airtight container for up to 3 days.
Reheating: Reheat in an oven to keep the bacon crispy. 10 minutes at 350 degrees Fahrenheit should do the trick!
More Delicious Ways to Use Asparagus
This versatile vegetable is the perfect addition to any hearty meal. If you have extra asparagus on hand, here are a few more tasty ways to prepare it. Find my full list of recipes that use asparagus here.
Bacon wrapped asparagus is a smoky and savory side dish that will be a staple for mealtime. Each bundle is glazed with maple syrup for caramelized flavor you won’t be able to get enough of!
Adjust the oven rack to the center position and preheat the oven to 400°F (204°C).
Line a baking sheet with foil and place a wire rack on top.
Spray the rack with nonstick cooking spray.
Place 5 slices of bacon spaced evenly apart on the pan.
Roast until the bacon just begins to shrink and turns a slightly red color, but is still flexible, about 5 minutes, depending on thickness. The bacon should not be completely crispy, otherwise, it will break when wrapping around the asparagus.
In a small bowl, whisk together the olive oil, maple syrup, garlic slat, and black pepper.
Remove the bacon from the oven and brush with the maple syrup mixture on both sides. Roast the bacon for 3 more minutes.
Allow the bacon to cool until it’s easy to handle with your fingers. Divide the asparagus into five even-size bundles.
On a cutting board, wrap one slice of the par-cooked bacon overlapping over the length of the asparagus spears.
Secure the bacon with a toothpick. Carefully place the bundles on the baking rack. Generously brush the maple syrup mixture over the bacon-wrapped asparagus spears on both sides.
Lightly season each bundle with salt and pepper.
Roast the asparagus bundles for 10 minutes, remove from the oven and brush the maple mixture over just the bacon.
Roast for 5 minutes, or until the bacon is browned and crispy, and the asparagus is tender.
Remove the toothpicks and serve the bacon wrapped asparagus hot.
Notes
Originally posted on May 24, 2018Updated on June 12, 2023
]]>
https://mallize.com/blogs/news/tokyo-itinerary-5-days-in-japan-s-dynamic-and-futuristic-capital2023-06-12T21:13:51-04:002023-06-12T21:13:51-04:00Tokyo Itinerary: 5 Days in Japan’s Dynamic and Futuristic Capitaladmin
Tokyo may be the most populated city in the world, but it is also a futuristic land of robot restaurants, multi-purpose vending machines, adorable characters, and highly-efficient transportation. You may half expect to see flying cars weaving between the skyscrapers, yet tucked away in every district, you see a peaceful mix of Buddhist temples and Shinto shrines that represent Japan’s ancient culture. This blend of new and old make Tokyo a fantastic city to visit and I’ll help you figure out how with this Tokyo itinerary.
If this is your first trip to Japan, you will be astounded by how clean and safe the city is, as well as how orderly, polite, and helpful the people can be, making Tokyo a true joy to visit. When we were planning our 2-week Japan itinerary, many people suggested we spend just two to three days in Tokyo, and I’m glad I didn’t listen to their advice.
With so much to do, you will have no problem filling your five days in Tokyo itinerary. And that is without visiting the Tokyo Disney or Disney Sea theme parks, or doing a deep dive into anime culture — both of which can be very popular with families visiting Tokyo.
In this Tokyo itinerary, I’ll share my suggestions on how to get to Tokyo and ways to get around, where to stay in Tokyo, and a day-by-day five-day Tokyo itinerary that is perfect for first-time visitors that want a mix of ancient and modern culture. I’ll share our favorite activities and tours, and tips we learned along the way.
If you are spending more time in Japan, you may also want to read my full two-week Japan itinerary and find out how much a trip to Japan costs as you start your planning.
How to Get to Tokyo
Note: This post may contain affiliate links. If you click a link and make a purchase, I may receive a small commission. All opinions are my own.
Tokyo has two main international airports: Narita International Airport and Haneda Airport. Narita International Airport is located approximately 60 kilometers east of central Tokyo and caters to a wide range of airlines including Japan Airlines (JAL), All Nippon Airways (ANA), United Airlines, American Airlines, British Airways, and Cathay Pacific.
Upon arrival at Narita International Airport, there are several convenient ways to reach downtown Tokyo. The fastest and most efficient option is to take the Narita Express (N’EX) train, which offers direct connections to major stations in Tokyo such as Tokyo Station, Shinagawa Station, and Shibuya Station. Alternatively, travelers can opt for the Keisei Skyliner, a high-speed train that connects Narita Airport to Ueno Station in about 40 minutes. Additionally, limousine buses are available, offering door-to-door service to major hotels and key areas within Tokyo.
Haneda Airport, located closer to central Tokyo, is another popular international gateway to the city. It primarily serves domestic flights but also operates numerous international routes including Japan Airlines (JAL), All Nippon Airways (ANA), Singapore Airlines, Korean Air, Cathay Pacific, and Delta Air Lines. Haneda Airport’s proximity to downtown Tokyo, at a distance of approximately 20 kilometers, makes it a convenient choice for many travelers.
To reach central Tokyo from Haneda Airport, there are various transportation options available. The Tokyo Monorail provides a direct connection to Hamamatsucho Station, from where travelers can transfer to other train lines to reach their desired destinations. Another popular choice is the Keikyu Line, which connects Haneda Airport to stations such as Shinagawa, Yokohama, and Asakusa. Additionally, limousine buses and taxis are readily available for those who prefer a more personalized and convenient transfer to their accommodations in Tokyo.
Getting Around Tokyo
The size of Tokyo can surprise even seasoned travelers and getting from one destination to another can easily take 45 minutes, even when traveling by train or metro. I would not recommend driving in Tokyo (also, FYI, in Japan, they drive on the left) and taxis can be quite expensive so I’d use them as a last resort.
The primary modes of transportation will be by using public transportation including the Tokyo Metro and Toei Subway systems, JR trains (Japan Railways), and local busses. To use the Metro, Subway, and bus system, you will need a refillable IC Card, such as Suica or Pasmo, which can be purchased at the airport or any train station using easy-to-follow machines. Just note that your IC card needs to be loaded using cash, not credit cards.
JR Trains require a ticket or the use of a JR Pass, which can be purchased by international visitors from their home country before they arrive in Japan. It can take a day or two to learn to navigate the train and metro system, but Google Maps is extremely helpful. It will tell you what line to take, the direction, the platform number, which car is best to use if you are transferring, and the best exit from the train station. Finding the best exit from the large train stations can be the most challenging part of the journey.
When using any of the trains, be sure to follow the local custom of standing on the left side of the escalator in the train stations so those in a hurry can walk on the right. There are also often arrows on the floor and stairs in the train station indicating which direction to walk. On the platform, line up in single file lines at the spots indicated behind the yellow line. Once the train stops, let everyone exit before filing onto the train. You may want to try to avoid the commuter rush hour because the crowds on some of those trains can be quite a crush and you may have to wait for the next train.
Also, note that it is impolite to be loud on the train. Most people read or browse on their phones quietly. This also makes it easier to hear the train announcements (in Japanese and English) to exit at the correct stop. No matter which mode of public transportation you use, you will still do a lot of walking in Tokyo, so be sure to bring comfortable walking shoes! During our time in Tokyo, we clocked an average of five to seven miles a day, despite taking a lot of metro rides!
Where to Stay in Tokyo
View from the Hilton Tokyo
Tokyo is huge and choosing where to stay can be overwhelming. I had a few criteria: 1) I wanted to be within a short walk to a major train station and close to multiple metro lines; 2) I wanted it to be walkable to restaurants, yet not in the middle of a major crazy tourist area; 3) I opted for an American brand hotel.
While I typically prefer boutique hotels, Japanese hotels are known for small rooms and I wanted to have a bit more space for a five-day stay and access to English-speaking staff and concierge. Plus, it seemed like a good opportunity to rack up (or use) some of my loyalty points. I actually opened up a Hilton Honors American Express card for this trip because I knew the hotel spend would hit the threshold to score major bonus points, plus it gave me 12 times bonus points on our stay. Here is my referral link if you are interested in taking advantage of a similar deal. (There is currently a 150,000 bonus point offer if you spend $4,000 in the first three months.)
For these reasons, we decided to stay at the Hilton Tokyo in Shinjuku. It was a 10-15 minute walk to Shinjuku station (one of the busiest in the world) but in a quiet, business area away from the bright lights and grittier areas close to the station. We could access two different metro lines through an underground passage directly from the hotel. And, I knew that we wanted to visit a number of sights in this area. The hotel also offers a free shuttle bus to Shinjuku station every 20 minutes during hours of operation, if you don’t want to walk.
With the exception of hard beds, we were very happy with our stay at the Tokyo Hilton. The rooms were large and our views from the 38th floor were stunning. We booked Executive Club level rooms, which included access to the Executive Lounge for a complimentary buffet breakfast and evening happy hour. We could have also had breakfast at the lobby restaurant, but we found the convenience and speed of the lounge worked perfectly for us.
Service, including housekeeping, was also excellent and the one night that we decided to stay in for dinner and avoid walking in the rain, we had a choice of multiple restaurants. There is also a sweets shop in the lobby (which closes oddly early) and the lobby restaurant even offers a Hello Kitty sweets buffet that is sure to delight some families.
If you are looking for an upscale area with designer shopping and high-end restaurants, I’d recommend staying in the Ginza area. If you are looking for something very authentic feeling, perhaps the Asakusa area. The area near the Tokyo Station is also very central and nice.
Find other places to stay in Tokyo:
See my quick overview of things to do in Tokyo:
Tokyo Itinerary Day 1
Since you will be arriving in Tokyo from an overseas flight, you will be jet-lagged and exhausted. By the time you take care of everything you need to do at the airport, you likely won’t arrive and be able to check into your hotel until mid to late afternoon. Take the time to unpack and settle in, but try to stay awake until at least early evening. It helps to get some fresh air, so I recommend taking a walk to explore the neighborhood.
If you are staying in Shinjuku, you can take in the sights around Shinjuku station or take in the views from the free observatory at the South Tower of the Tokyo Metropolitan Government Building (located very close to the Hilton Tokyo.) This was the tallest building in Tokyo until 2007, and it still offers stunning views.
To get there, use the Tocho-mae Station on the Oedo Subway Line, which is located in the basement of the Tokyo Metropolitan Government Building. Alternatively, it is only a ten-minute walk from the west exit of JR Shinjuku Station. The observation deck is open until 10 pm if you prefer to see the sparkling lights of Tokyo at night.
For dinner, I’d recommend lining up at about 4:45 pm (you’ll probably be hungry and want an early night anyway) at Fuunji. This no-frills ramen and dipping noodle shop is popular for a reason. There are only about a dozen seats and you order from a vending machine (cash required), then hand your ticket to the person behind the counter and line up behind customers at the counter and wait for an open spot.
This is not a place to linger and you are encouraged to eat quietly and quickly and then make way for the next group. But it is delicious, affordable, and worth the wait. A perfect introduction to Japanese food! I suggest at least one person getting the dipping noodles so you can try both (don’t make my mistake and order both! The people behind the counter laughed at me — “for one person?!!” Silly me but I’m glad I got to try both.)
Another nearby option is Udon Shin, but this is also very popular (you will soon learn that Japanese people love to line up to eat way more than tired tourists are willing to do!). You will want to run over there and get a ticket as soon as you arrive at your hotel and get a return time (often 5 hours later.)
Tokyo Itinerary Day 2
Hopefully, after a good night’s sleep, your body clock will reset and you will be ready to hit the ground running. Even still, I think it is a good idea to not schedule anything for your first day that can’t be pushed back or changed, such as tours, workshops, prepaid tickets, etc. Save those for later in the trip to give yourselves a chance to adjust first.
I also recommend tackling one to two neighborhoods a day, to minimize the time you spend in transit from one attraction to another. Since we were traveling with a teen, an afternoon exploring the teen culture in Harajuku was a must on her list. However, we decided to start with something that made it clear that we were in Japan, so we started our day at the Meiji Jingu Shrine.
Meiji Jingu Shrine
Located in the lush and quiet oasis of Meiji Jingu Gaien Park, the Meiji Jingu Shrine, was established in 1920 to honor Emperor Meiji and Empress Shoken, who played crucial roles in modernizing Japan during the Meiji Restoration. You can access the park using the Tokyo Metro to the Meiji-jingumae station, or the JR Yamanote Line.
After passing through a towering torii gate, you will wind your way through the park to the shrine. One thing you will often notice in Japan is the coexistence of Buddhism and Shinto religions, with Shinto shrines and Buddhist temples sitting side-by-side. While Buddhism and Shintoism are distinct religious practices, they have long coexisted harmoniously in Japanese society.
At the shrine, you can partake in traditional Shinto practices, like writing wishes on ema (wooden plaques) or purchasing omamori (amulets). If you wish to offer a prayer at a shrine, be sure to read the correct practices, which include the proper washing of your hands, bowing, clapping twice, and bowing again.
Harajuku
If you are traveling with tweens or teens, or just want to get a beat on youth culture in Japan, a visit to the Harajuku neighborhood is a must. This area has become synonymous with avant-garde fashion, street style, and unique subcultures. The main thoroughfare is Takeshita Street, which is lined with colorful shops, quirky boutiques, and trendy cafes, attracting both locals and tourists alike. It is also where you will find some of the Instagram-worthy snacks such as rainbow cotton candy at Totti Candy Factory and rainbow crepes at Santa Monica crepes.
Takeshita Street is a hub for snacking and shopping for an array of clothing, accessories, cosmetics, and novelty items, including some of Japan’s famous characters (like those from Sanrio.) Harajuku is also associated with Kawaii culture. Kawaii, meaning “cute” or “adorable” in Japanese, is an integral part of Japanese popular culture. It encompasses a wide range of elements, including fashion, music, art, and lifestyle.
In Harajuku, Kawaii culture is on full display, with its distinctive style featuring pastel colors, frilly dresses, oversized bows, and whimsical accessories, often drawing inspiration from anime and manga. Some of it can feel a bit fetish-geared, at least to the Western eye, but it is still quite popular with Japanese teens.
If your teens wants to pick up some fashion items that don’t look like everything you see in the U.S., be sure to stop into the shops at CuteCube and SoLaDo. You will find more upscale, familiar brands along Omotesando Street, which runs perpendicular to Takeshita. The LaForet Harajuku shopping mall on Omotesando also offers floor upon floor of affordable teen fashion and Kawaii clothing. Kiddyland is a great spot to pick up toys and character gifts, and Graniph has cute and fun t-shirts and bags for teens.
While it is easy to snack your way along Takeshita Street with spiral-fried potatoes, candy-lacquered strawberries, boba tea, crepes, and more (but please don’t waste your money on the rainbow grilled cheese from Le Shiner, it is awful), leave time to explore the backstreets of the Omotesando Hills. This quieter area offers vintage stores and cute boutiques.
I’d recommend lunch at A Happy Pancake. These meringue pancakes are light, fluffy, and delicious, topped with everything from fruit to ice cream.
Another popular thing to do in Harajuku is stop at one of the many animal-themed cafes. I always struggle a bit with the ethics of animal cafes featuring non-domesticated animals in particular, but my husband really wanted to stop into the Harry Harajuku Hedgehog Cafe. I was pleased to see how the animals were treated in this shop by being given rest time, requiring guests to wear gloves, close supervision of how the animals were treated, and the ability to adopt the animals. Since we have never had a pet hedgehog, it was fun to get to feed and hold them for a few minutes.
Memory Lane / Omoide Yokocho
Finish up your day in the area around Shinjuku Station. First, walk through the narrow alley of Omoide Yokocho, also known as Memory Lane. This area invokes feelings of old Japan, with tiny little restaurants and izakayas (little bars) lining the alley, cooking yakitori over small charcoal grills, with smoke pouring out into the alley. There are plenty of spots to stop and eat. Just join a line or grab an empty seat at a counter where something smells good. You will find plenty of yakitori skewers, ramen, and other single-dish specialty shops.
Photo by Cho for Flytographer
We popped into one spot that had a few more seats and ordered ramen and soba from a vending machine (again, this is an area where you will need cash to pay.) Afterward, the adults may want to head to some of the bars in the Golden Gai area, but it didn’t feel particularly family-friendly.
Godzilla fans have to take a walk over to the Hotel Gracery in Shinjuku to get a view of the giant Godzilla on top of the hotel. This area is lined with bars, restaurants, arcades, and “women’s clubs” (which seemed more like strip clubs with young girls standing outside in French maid outfits luring people in.) The area is a little gritty at night, but crime is still not a big issue in Japan as it is a very safe country.
Technically, only hotel guests or those eating at the Cafe at Hotel Gracery are allowed up on the terrace to get close to the Godzilla, but no one stopped us (and the cafe was closed), so my husband was in his version of Godzilla-fanboy heaven.
Tokyo Itinerary Day 3
On day three, it is time to venture a little further and explore the areas around Tsukiji, Shiba, Odaiba, and Ginza. It is a busy day so wear your favorite walking shoes!
Tsukiji Fish Market
One of the most famous tourist destinations in Tokyo is the Tsukiji Fish Market. This world-renowned market consists of two main sections: the inner market and the outer market. The inner market, once famous for its bustling tuna auctions and wholesale sales, has been relocated to Toyosu, while the outer market continues to thrive in the original Tsukiji area and is accessible to visitors.
The outer market is a lively and bustling area filled with numerous stalls, shops, and restaurants offering a wide array of fresh seafood, produce, kitchenware, and culinary delights. There is also an inside area where locals pick up fish for daily meals.
We took a brief tour with True Japan, but honestly, it seemed easy enough to explore on your own and just join the queue wherever you see a line if you are hungry.
However, if you really want to find the best places to eat and get to sample specialties instead of just walking around, I’d recommend taking either the Fish Market Tour from Magical Trip or the classic Tsukiji food tour with Arigato Travel.
Sushi Making Experience
One of my favorite experiences on our Japan trip was the sushi-making workshop we took with True Japan (and I don’t even like sushi!) Located in the basement of a building across from the Tokyo Tower, I really wasn’t sure what to expect when I walked in. But the ladies running the program were absolutely lovely and so kind and fun. We were happy to have booked a private group, instead of joining one of the much larger groups that came later.
We learned all about what it takes to make good sushi (basically good rice, fresh ingredients, and the correct process), from the right way to stir the sushi rice to the six-step process of forming a piece of nigiri sushi. In the end, we each produced five pieces of sushi and two rolls. Then it was time to decorate our plates and eat!
With the sushi making, we also added on a tea and sake pairing experience, allowing us to try various teas and types of sake with our meal. Sushi is the most integral to Japanese cuisine and it was great to get insight into how to produce this quintessential food.
Tokyo Tower
There are many observation decks to get great views of Tokyo including the Tokyo Skytree, Shibuya Sky, and the Tokyo Tower. My husband Glenn is not a huge fan of heights, so we didn’t want to go out of our way to visit an observation deck, but since our sushi-making experience was right across the street from the Tokyo Tower, we decided to give it a try.
The Tokyo Tower was built in 1958 and reaches a height of 333 meters (1,093 feet). Smaller than the more modern Skytree, the Tower was designed by architect Tachū Naitō and constructed by the Nippon Television City Corporation to serve as a broadcasting tower for television and radio transmissions.
Inspired by the Eiffel Tower in Paris, the Tokyo Tower offers two main observation decks for visitors to enjoy panoramic views of the city. The main deck, located at 150 meters (492 feet), provides a lovely vantage point to see the sprawling metropolis with its skyscrapers, historical landmarks, and surrounding landscapes. The top deck, which requires its own ticket, is located at 250 meters (820 feet) and offers an even broader perspective, allowing visitors to see Tokyo’s urban expanse from a higher elevation.
Both decks are enclosed and the main deck only offers a small patch of glass floor, so except for the glass-enclosed elevator ride up, it is really quite tame even for those afraid of heights. You can either pre-purchase timed entry tickets or take your chances on waiting in line when you arrive. A visit to both decks shouldn’t take more than 45 minutes unless you want to spend time at the cafe or at the shops and restaurants below.
TeamLab Planets
TeamLab Planets was another highlight and much-anticipated attraction for our Japan trip. This immersive digital art museum takes you on a journey through a series of interactive and sensorial installations that is unlike anything I’ve ever experienced. It tops those interactive Van Gogh and other exhibits by a lot!
Created by the interdisciplinary art collective, TeamLab, this museum transcends traditional boundaries by merging technology, art, and nature to create a mesmerizing experience. Timed-entry tickets are required and you should look to purchase them at least a couple of months in advance of your trip. Just keep in mind that this is a multi-sensory experience involving water (you will need to remove your shoes for the duration and walk through water up to your knees at points), darkness, and flashing lights, so it may not be appropriate for some with mobility or sensory issues.
The experience takes about 60-90 minutes to complete and wraps you through the water and garden sections with rooms featuring hanging crystals that reflect off mirrored surfaces, water with projections of swimming koi fish, digital flower projections, and dangling displays of real orchids. The museum’s exhibits allow visitors to become active participants in the artwork. I don’t want to give too much away, but I haven’t met anyone that went and didn’t love it.
Ginza
When you finish with TeamLab Planets, you may want to head over to nearby Ginza for dinner (and shopping if your budget allows.) We had dinner at Bird Land, which is a Michelin-star yakitori restaurant specializing in chicken and all its parts. The restaurant was quite pretty and I appreciated being able to make a reservation and sit down after a long day. But to be honest, I had trouble with some of those chicken parts. It is probably better to not ask what you are eating, but sometimes the chewiness gave it away.
A couple of other places we considered were Ginza Sushi Fukuju, which is another Michelin-star restaurant, and Re:Dine Ginza, which is a unique concept where top chefs compete and customers enjoy the results.
Tokyo Itinerary Day 4
Day four brings us to another of Tokyo’s most popular tourist areas and most famous sporting events.
Asakusa
Asakusa is a historic neighborhood nestled in the heart of Tokyo. With a rich cultural heritage, this area attracts both locals and tourists seeking to immerse themselves in the traditional side of Tokyo. Asakusa’s history dates back centuries, and it was once a bustling entertainment district during the Edo period. Today, it retains its nostalgic charm, with preserved old buildings, narrow streets, and a vibrant atmosphere, as well as theaters and entertainment centers.
One of the most famous landmarks in Asakusa is the Senso-ji Temple. This ancient Buddhist temple, believed to have been founded in the 7th century, is Tokyo’s oldest and most revered temple. Visitors enter through the iconic Kaminarimon Gate, adorned with a massive lantern and guarded by two fierce statues. The approach to the main hall, Nakamise Street, is lined with shops and stalls selling traditional souvenirs, snacks, and local street food.
Another notable attraction in Asakusa is the famous “Kappabashi Street,” also known as “Kitchen Town.” Here, visitors can witness rows of shops selling a wide variety of kitchenware, including the iconic plastic food replicas that adorn the storefronts of many Japanese restaurants.
For those with a sweet tooth, Asakusa is also home to numerous local delicacies. One must-try treat is the melon pan, a sweet bread roll with a crunchy exterior that resembles a melon. Several bakeries and street vendors in Asakusa offer freshly baked melon pan, providing a delightful snack as you explore the neighborhood’s charming streets. There are many shops along the covered arcades that also offer sweets such as taiyaki with custard or red bean paste.
Since this is such a historic area, we decided to take a tour with Context Travel, as we have always had good luck with them in cities like Vienna and Budapest. We did learn a fair amount from our guide Patricia, but not as much about the history as I expected. If I was to do it again, I’d consider doing the Cultural and Street Food Walking Tour with Magical Trip.
Before you leave Asakusa, be sure to head to the 8th floor of the Asakusa Culture Tourist Information Centre opposite Asakusa Station for free views of the Tokyo Skytree.
There are plenty of options for lunch in this area, but we loved our tempura donburi at Tempura Akimitsu, just a 10-minute walk from the Senso-Ji Temple. It is a small place so I’d recommend making a reservation. There is an English menu that you can order using a tablet at the table. I’d highly suggest getting the red ginger tempura. This was a new discovery for me on this trip and I loved it!
Sumo Wrestling
If you are fortunate enough to visit during the Sumo Wrestling Tournaments in January, May, or September, it is an event worth seeing for its dramatic theater and sport. Each tournament lasts around 15 days and the best matches take place later in the day.
You need to book tickets as soon as they open up for sale and each ticket is good for the whole day, but unless you are a diehard fan, I’d suggest arriving around 2:00 – 3:00 pm and staying until the matches finish at 6:00 pm. When you order tickets online, you will need to stop by any 7-11 store to pick up hard copies of the tickets.
You can purchase tickets for box seats on the floor, which is truly a small boxed area on the floor with four cushions, intended to fit four small people sitting cross-legged. However, they more comfortably fit two people with legs extended. You can also purchase regular stadium chair seats in the upper tiers of the stadium.
Each match begins with the ring entering ceremony, where the wrestlers, dressed in their traditional mawashi loincloths, make their way into the dohyo (sumo ring) accompanied by rhythmic drumming and chanting. The matches are conducted under the strict supervision of a referee, clad in a striking kimono. Before the bout commences, the wrestlers engage in a series of ritualistic gestures, such as stomping their feet and performing salt-throwing, which symbolizes the purification of the ring and the summoning of the spirits.
Once the match begins, the wrestlers demonstrate their strength, technique, and agility as they engage in intense confrontations. The objective is to force their opponent out of the ring or make any part of their opponent’s body other than the soles of their feet touch the ground. The bouts are fast-paced and can be over in a matter of seconds or extend to a grueling showdown between two formidable opponents.
In between matches, there are banner holders that walk around the ring carrying the flags of the match sponsors. Fans cheer wildly for their local favorites and the whole match is quite a spectacle and it is easy to get caught up in the excitement.
After Sumo, you can have a soba dinner near the Tournament arena at Tokyo Ryogoku Edo Soba Hosogawa or head back to Shinjuku for dinner at somewhere like Shinjuku Kappo NAKAJIMA.
Tokyo Itinerary Day 5
On your last day in Tokyo, it is best to pursue the attractions that most interest you and your travel companions — and there is so much to choose from!
Museums
I’m a fan of the polka dot artwork of legendary artist Yayoi Kusama, so we visited the Yayoi Kusama Museum. (Tickets need to be purchased online about a month in advance.) The museum is fairly small and takes no more than 45 minutes to visit.
If this isn’t your cup of tea, there are so many other great museums and attractions to visit in Tokyo including:
Tokyo National Museum: The largest and oldest museum in Japan, housing an extensive collection of Japanese art and artifacts.
Mori Art Museum: Located in the Roppongi Hills complex, this contemporary art museum offers stunning views of Tokyo and showcases innovative and thought-provoking exhibitions.
Edo-Tokyo Museum: Dedicated to the history and culture of Tokyo, this museum provides a comprehensive look into the city’s past, from the Edo period to modern times.
Ghibli Museum: A must-visit for fans of Studio Ghibli films, this enchanting museum in Mitaka showcases the work of legendary animator Hayao Miyazaki and offers a glimpse into the magical world of Ghibli animations.
National Museum of Emerging Science and Innovation (Miraikan): A science museum that explores cutting-edge technologies, robotics, space exploration, and the future of science.
Odaiba Gundam Base: An interactive museum dedicated to the popular Gundam franchise, featuring life-size models, exhibits, and a shop filled with merchandise.
Pokemon Center Mega Tokyo: A haven for Pokémon fans, this store in Ikebukuro offers a wide range of merchandise, interactive experiences, and limited-edition items.
One Piece Tower: A theme park and museum based on the popular manga and anime series One Piece, featuring attractions, shows, and character-themed areas.
Tokyo Anime Center: Located in Akihabara, this center hosts exhibitions and events dedicated to anime and manga, showcasing the vibrant anime culture of Japan.
Imperial Palace East Gardens
After visiting a museum, it is nice to get some fresh air and enjoy a traditional Japanese Garden with a Walk through Imperial Palace East Gardens. These gardens surround the Imperial Palace and are free and open to the public. It is a relaxing oasis from the bustle of such a large metropolis.
Tokyo Character Street
From the Gardens, it is a short walk over to Tokyo Station, which, in addition to being a major transportation hub, is also home to many restaurants and the main reason we visited — the Tokyo Character Street. This area of the train station is filled with individual shops featuring Japan’s cutest characters and international favorites like Pokemon, Dragonballz, and other anime figures. Families will love doing some souvenir shopping here!
Godzilla fans might also want to walk past the Godzilla statue (1 Chome-2-2 Yurakucho, Chiyoda City) for a fun photo opp.
Flytographer Photo Shoot
Photo by Cho for Flytographer
I think vacations are a great time to have family or couple photos taken (or even solo photos since it is so hard to get pictures of yourself when traveling alone!) and we love to use Flytographer. If you are interested in setting up a Flytographer photo shoot, use my referral link to get $25 off your first photo shoot.
With Flytographer, you can choose your favorite photographer, how long of a shoot you want, and your preferred location. You typically get your final photos within about five days of your photo shoot and they make terrific vacation memories that can easily be turned into prints, photo books, canvases, or other products.
Shibuya
You can’t leave Tokyo without exploring the bustling neighborhood of Shibuya, including the famous Shibuya Crossing, known for being the busiest intersection in the world. In addition to making the crossing, you can also get a good view from above from the second level of the Tokyo Department Store at the west exit of the railway station. Also, get a view of Shibuya Crossing from above at the busy Starbucks or the quieter (but more distant) 11th floor of the Hikari Building. Mag’s Park and the rooftop terrace also offer good views.
If you want to brave the outdoor escalators of the Shibuya Sky Building and then the glass stairs to the 46th floor, you can reach the 360-degree observatory over Tokyo and even the “Sky Edge” glass balcony that extends beyond the building over the city.
I wish we had more time to explore Shibuya because I would have liked to take the Best of Shibuya Food Tour with Arigato Travel. Alas, it overlapped with the time of our photoshoot, but we did enjoy a delicious dinner at Han no Daidokoro Kadochika, even if it was a Korean BBQ restaurant, they still served up Japanese beef.
A few other restaurants we considered in this area are Hakushu (Kobe/Waygu beef teppanyaki), Sushi Uobe (high-tech sushi with one of Asia’s top female chefs), Shibuya Nonbei Yokocho, and Tempura Motoyoshi.
There is so much to do in Tokyo that you will end up wishing for more time. A few other activities we considered are:
Go-karting through the streets in character costumes
The best time to visit Tokyo is during spring (March to May) and autumn (September to November). Spring brings mild temperatures, cherry blossoms in full bloom, and lively festivals. Autumn offers pleasant weather, vibrant fall foliage, and fewer crowds. Summers can be hot and humid, while winters are generally mild but chilly. Just keep in mind that it will be very crowded and more expensive during Cherry Blossom season and Golden Week, which happens at the very end of April into early May.
Is Tokyo safe?
Tokyo is considered a safe city for tourists. The crime rate is relatively low, and locals are known for their honesty and helpfulness. We felt extremely safe while we were there, even on crowded subways. It felt safe enough to allow our teenage daughter to explore a bit on her own. However, it is always advisable to take standard precautions, such as keeping an eye on your belongings, especially in crowded areas. In case of emergencies or if you need assistance, look for police boxes (koban) or ask for help from station staff or hotel personnel. Additionally, it is required to carry your Passport with you when traveling in Japan.
Is it necessary to learn Japanese before visiting Tokyo?
While knowing some basic Japanese phrases can be helpful, it is not necessary to learn the language before visiting Tokyo. English signage, especially in tourist areas and major transportation hubs, is quite common. Many Japanese people, particularly those in the tourism industry, have a basic understanding of English and will try to assist you. However, having a few key phrases, such as greetings and “thank you,” can go a long way in showing respect and making interactions more enjoyable.
Are there any etiquette or cultural norms to be aware of in Tokyo?
Tokyo has its own set of etiquette and cultural norms. When visiting temples and shrines, it is customary to bow slightly and refrain from taking photographs in certain areas. It’s also important to remove your shoes when entering traditional establishments, such as ryokans, temples, or some restaurants. Politeness is highly valued, so be sure to use basic Japanese greetings like “Konnichiwa” (hello) and “Arigatou gozaimasu” (thank you). When using public transportation, avoid speaking loudly or engaging in loud phone conversations. Line up for trains, restaurants, and restrooms. Finally, remember to sort and dispose of trash properly, as Japan has strict recycling and waste disposal systems and there are very few trash cans around.
Are there any specific customs to follow when dining in Tokyo?
When dining in Tokyo, it’s customary to say “Itadakimasu” before starting a meal, which expresses gratitude for the food. It is also polite to wait for everyone to receive their food before beginning to eat. Slurping noodles, particularly ramen, is acceptable and even considered a sign of enjoyment. When using chopsticks, avoid sticking them upright in your food, as this resembles a funeral ritual. Also, don’t rub your chopsticks together. Finally, it is customary to leave a small amount of food on your plate at the end of the meal to show that you have had enough.
Should you tip in Japan?
No, tipping is not a common practice in Japan. In fact, leaving a tip can sometimes be seen as confusing or even rude. In Japan, service is generally included in the price, and people take pride in providing excellent service as part of their job. Instead of tipping, expressing gratitude or saying “arigatou gozaimasu” (thank you very much) is the appropriate way to show appreciation for good service. If you try to tip, it’s not uncommon for the staff to politely decline the offer.
Visiting Japan? Read more…
If you are planning a visit to Japan, be sure to also check out the following articles: